
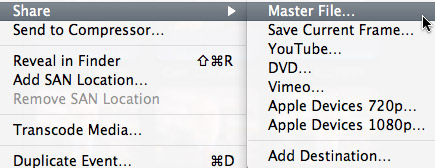
![]() I always want to export my projects before compressing or transferring them, because I want to be sure there are no problems with the export. So, I always use Share > Master File. However, because I do this so much, I also don’t want to waste any time, so I tend to use the keyboard shortcut for this process: Command+E.
I always want to export my projects before compressing or transferring them, because I want to be sure there are no problems with the export. So, I always use Share > Master File. However, because I do this so much, I also don’t want to waste any time, so I tend to use the keyboard shortcut for this process: Command+E.
However, last week, in my newsletter, I wrote that the Command+E export shortcut had disappeared! Gasp!
As you can see, here in this screen shot, there is no shortcut for Share > Master File. So, I went to create one using the Commands menu. Except….
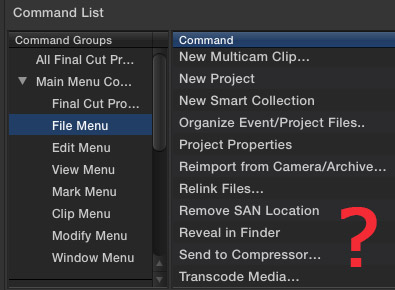
There is no way to create export keyboard shortcuts in the Command menu, because none of the Share menus are available.
This was a scandal!! No sooner had I published this astonishing fact, when several (OK, dozens) of readers wrote in to say that Apple moved this shortcut out of the Command menu and into Preferences. There was no scandal, just a new location.
In other words, I was not paying proper attention.
CREATING DESTINATIONS
The Final Cut Pro > Preferences > Destinations pane now allows you to determine which export options appear in the Share menu, and to easily assign a keyboard shortcut to the default output option.
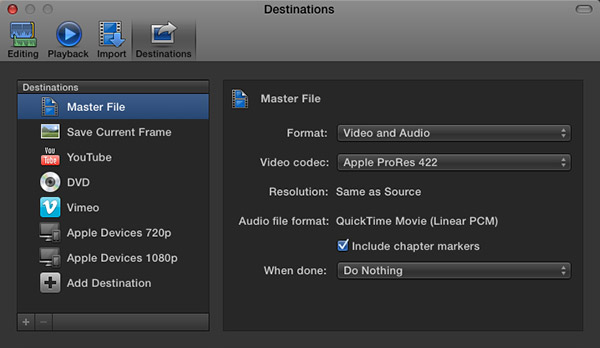
My recommendation, when exporting projects from Final Cut Pro X, is to always export a Master File. This is the highest quality and fastest export from FCP.
When you select Master File (or any other option from the list on the left), you are able to configure your default export settings on the right. My recommendation is to export using ProRes 422 (a good balance between high quality and smaller file size).
This screen shot above shows my default export settings.
NOTE: I am getting a LOT of reports of “bad frame” errors preventing exports when trying to burn DVDs or export to Vimeo. My recommendation is to export a Master File first, then compress/process/burn the file as a separate step, using different software.
SET THE DEFAULT KEYBOARD SHORTCUT
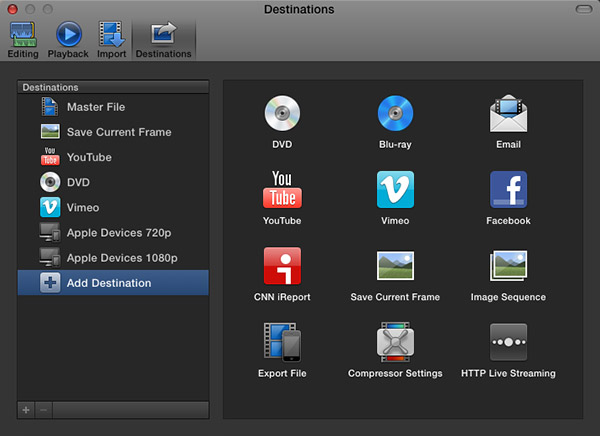
It is in this Preferences pane that you set the export keyboard shortcut. It can be to any of the options listed on the left, as these are the destinations that appear in the File > Share menu.
NOTE: The list on the right are potential destinations. To add a destination to the list on the left, simply drag the icon from the right to the left. You can change the stacking order by dragging up or down. You can configure the default export settings for any destination by selecting it on the left, and adjusting the settings on the right.
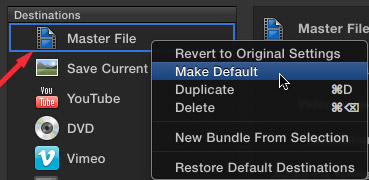
To create the Command+E keyboard shortcut, simply right-click the destination you want to use for the shortcut – in my case, that would be Master File – and select “Make Default.”
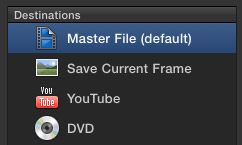
When the shortcut has been applied to a destination, Final Cut displays the words “(default)” after the destination.

To prove this for yourself, select File > Share > Master File and notice that the Command+E shortcut now appears where it belongs.
Thanks to everyone that wrote in pointing out this change. The next time my Command+E goes missing, I will know where to look!
141 Responses to FCP X: Export Master File
← Older Comments Newer Comments →-
 GRAHAM says:
May 8, 2014 at 5:41 am
-
 Larry Jordan says:
May 8, 2014 at 10:16 am
-
 GRAHAM says:
May 8, 2014 at 9:14 pm
-
 Larry Jordan says:
May 8, 2014 at 9:28 pm
-
 GRAHAM says:
May 9, 2014 at 1:48 am
-
 GRAHAM says:
May 11, 2014 at 9:19 pm
-
 Zhantu says:
May 11, 2014 at 5:53 am
-
 Larry Jordan says:
May 11, 2014 at 8:55 am
-
 Stefan says:
May 19, 2014 at 12:41 am
-
 Larry Jordan says:
May 19, 2014 at 10:10 am
-
 Ian Shifrin says:
June 4, 2014 at 10:01 am
-
 Larry Jordan says:
June 4, 2014 at 11:01 am
-
 Danny says:
July 27, 2014 at 1:09 pm
-
 Larry Jordan says:
July 27, 2014 at 1:29 pm
-
 Lutz says:
September 29, 2014 at 9:54 am
-
 LarryJ says:
September 29, 2014 at 8:27 pm
-
 Grant says:
October 6, 2014 at 1:13 pm
-
 LarryJ says:
October 6, 2014 at 9:05 pm
-
 jennifer says:
October 13, 2014 at 2:28 pm
-
 LarryJ says:
October 13, 2014 at 3:29 pm
-
 Hector Morales says:
May 7, 2015 at 4:27 pm
-
 Larry says:
May 7, 2015 at 4:57 pm
-
 SImon Owen says:
May 8, 2015 at 5:48 am
-
 Larry says:
May 8, 2015 at 12:56 pm
-
 SImon Owen says:
May 9, 2015 at 12:43 am
← Older Comments Newer Comments →hi larry,
i recored the party on my cannon camera which is .mts format and i imported it into FCP and changed the settings to 1080p. I am also a new user to FCP X as well, so i am still getting the hangs of things. I am done creating the movie and now i want to burn it into a dvd but using toast coz i to put in a menu ect.. i want the quality to still be same when played on the tv. how do i go abt doing this? wat should export it as? coz under the share menu there are a lot of options and i don’t know which one to use.
thank you
Graham:
Remember that ALL DVDs are standard-def. This means that you will lower your image resolution from 1920 x 1080 to 640 x 480, a 7x reduction. So the images on the DVD will not look the same as the HD images you are seeing on your TV.
The process, though, is simple:
* Export a master file, as this article describes.
* Import the file, or files, into Toast and create your menus
* Use Toast to burn the DVD.
Larry
hi larry,
thank you for the quick reply. K so i do change the settings when i import the files into FCP? i just leave the settings as it is and export it as master file. i hope i was able to understand wat you said. so i don’t need to take the files to compressor before importing them to FCP then? once i do the master file export, the file extension is mv4, so will that play on the dvd player once i burn it on toast?
thank you
Graham:
You don’t need to change how you import or edit.
You export your finished project using File > Share > Master file.
Then, compress them using Compressor and the default DVD settings. This creates two files: one for video and one for audio.
And NO!!! you can’t use MP4. DVDs are only MPEG-2 – that’s why you need to use the default DVD settings in Compressor, so that you create a file format that DVDs can read. Remember, DVDs are always standard-definition video, so you need to create format that converts your HD project into SD for the DVD.
Larry
hi larry,
so i am done wit the default master file and now i did wat u told me to do. i opened compressor and gave me options as to which setting i wanted and i selected dvd. there were 2 source files, 1. dolby digital professional 2. mpeg 2 for dvd. both of these said source on them. after this do i just hit the submit button or is there something else i need to do?
thank you
larry wat type of software should i use to convert my hd to sd?
Dear Larry
I am new user of FCP X, I want to export file from my time line but all my share option is inactive or disable .
So what should I do please let me know.
Regards
Zhantu
Zhantu:
FIRST, select the project in the Browser, then choose File > Share > Export Master File.
Larry
I can’t seem to export as Linear PCM, H.264.
It’s either MPEG-2, Linear PCM, timecode
or H.264, AAC, Timecode
Stefan:
Exporting a Master File should be using ProRes 422 or 422 HQ. You don’t export a compressed master file, that kinda defeats the purpose.
Larry
Larry,
I think you may have answered this, but as I can’t find a definitive answer anywhere, I’m hoping you can give me one.
We work in a shared environment where all the video is ingested is in XDCam HD (35mbs) and needs to be exported back to the video file server in the same CODEC. I’ve noticed since switching to Final Cut X from 7 exports (shares) now take significantly longer. When I look at the background task I see it is transcoding the video as it exports.
Is there a way around that? All the footage is in XDCam movs and I never transcode or optimize the footage, so I would think it wouldn’t need to transcode. Any advice would be greatly appreciated. Sadly as ingest and broadcast is handled by the video file server I need to use XDCam.
Thanks for your advice which has been so helpful.
Ian:
The problem is that render files are ProRes, which can’t be switched to XDCAM. At the moment, you can’t edit XDCAM natively, including render files.
You MIGHT be better off optimizing all media, which will make exports MUCH faster, then convert to XDCAM using Compressor. You will probably end up saving more time with that workflow.
Larry
Hi there Larry.
Great work and much respect !
When i share and export as a master file i can’t find the file on my itunes playlist where i assign the file to be saved at.
How can i find my final file?
Thanks
Danny:
The easiest is to do a search in the Finder for the file name of your master file.
However, I would generally not store a master file in iTunes – it is WAY too big to be easily managed that way. Just store compressed files that you create from the master file in iTunes.
Larry
Hey larry, thank so much for all your Great work!!!
I’m trying to export all my Clips of a 2 Min Movie from fcp x to colour-correct it in Premiere. Well as i Figured out there is no easy way to Export and then Import them(for example via xml, Couse it creates final-Cut-specific XML files that cant be read by Premiere.) OR IS THERE?…
Because i got. the Original Data on an external harddrive i thought i Could just Look up the in and out points or the timecode and ajust them in Premiere. But i Canon find any in or out points of the Clips and the timecode it is giving me is complete nonsense.
So now i will just go on and Export Every Single Clip by it Self and Wonder how i can get the best qualitty(file size doesnt matter)
Is there a way to Export without any Loss of Image-qualitty????
Or do you have any other ideal how i can reach my goal???
I Would be very very happy if you Could help me as soon as posibility Couse my deadline is tomorrow:(((
Thank You so much from Germany
Lutz:
Read this article – it will tell you what you need to do:
http://www.larryjordan.biz/fcp-x-transfer-projects-to-premiere-pro-cc/
Larry
Larry, I have exported a master file to my desktop. Now I need to be able to create a file I can send to a client via a large file transfer site that they can open on any computer and view the video. How do I do this? I have sent the actual master file to my wife’s Mac computer to see if she could open it. It could not. What do I do? thank you!
Grant:
The phrase “that they can open on any computer,” makes this an impossible request. MPEG-4 using the H.264 codec is generally a good choice.
But it won’t open on most systems more than four years old. It won’t play in some Browsers, but plays happily in others. It is not the best choice for streaming, especially for mobile devices. If you need to guarantee this will play on all systems, both desktop and mobile, plan on creating about 20 different versions.
Larry
Hello Larry
I’m an artist not a techie, and I use FCP well but know nothing about export. I know exactly what I want – the highest-quality footage for screening – but the various codecs leave me bamboozled. I am in UK so using PAL, and need 16:9. I am using FC Studio and can’t find the master file option at all. When I use export and look for the codec you recommend, it gives hundreds of ProRes 422 options. I have chosen ProRes 422 (HQ) PAL 48khz anamorphic. Is this right?
All advice gratefully received!
Jennifer:
ProRes 422 HQ is an EXCELLENT choice.
Please continue using it.
Larry
Hi , Larry …. Editing in Final Cut Pro X with two different video compressions which have different audio compression .. , Linear PCM and ACC …., when I give a run in the event it tends to slow when it passes from one format to another , which makes me hard edit quickly … only happens when I combine the material recorded from cameras diferntes .. (canon and gopro ) .. , which are those that I have to work , which recorded audio in different formats but the same h.264 …… As I get not halt from one clip to another in the event Mr. Jordan …… …… Thanks Hector.
Hector:
When you are working with different media from different cameras, it is really important to optimize your media. This will convert both audio and video into the same media format. What I suggest now is that you select all the clips in your Browser – or just those clips you are editing – and choose File > Transcode Media and optimize them.
That should make this problem go away.
Larry
Hi Larry,
I’m getting my head round FCPX having used Vegas. I was hoping to have some quality time getting to grips with it, what a foolish thought. A job has come in, they want it yesterday and I’m going to give it a go but its going to be shown on the big screen (800 delegates conference) and I don’t want to lose quality as it ‘bigs’ up. What’s my best preference/ render /master solution? I have to upload it via the net (I might have access to super fast fibre optic if my broadband is slow) but obviously there’s going to be a limit on size. It’s only going to be about 7 mins long though.
Any advice would be great. Thanks Simon.
Simon:
“Best” is a very slippery word. If the material was shot by a camera, use ProRes 422 HQ. If the material was created on a computer, use ProRes 4444. Either way, plan on about 1 GB per minute for file size.
If a 7 GB file is too big, then use ProRes 422.
Larry
Yes I understand the danger of “best’, a bit of a vague term.
Thanks very much that’s really helpful. My worry was that when it goes out on the bigger screen the increased size distorts the image but my thinking is the projector unit (or whatever it is) handles that side of things as long as your have done the right thing at the shared/render stage.
Thank you. Simon