
![]() Last night, I upgraded to macOS Ventura 13.1. It took four hours, plus another hour this morning.
Last night, I upgraded to macOS Ventura 13.1. It took four hours, plus another hour this morning.
The update went fine. My personal data all seems to have safely survived the transition. The challenge is that Apple keeps locking down the operating system to reduce our exposure to malware and hackers. Because of this, you’ll need to allow about two hours to set security parameters for the software you use.
I’m not running into any major bugs – with the exception of ExFAT and Sentinel One. But I am constantly tripping over security settings that need to be changed. This is taking a lot of time to get all my software – and hardware – reconfigured.
BIG, BIG, BIG NOTE
Upgrades take time. Much more time than you expect. Never upgrade when you are facing a deadline. Ideally, upgrade between projects. Assume you’ll need to spend four hours getting everything reset.
BEFORE YOU START
Update all software – except the macOS – using the Mac App Store before doing the update.
Make a complete Time Machine backup of your system. You really don’t want to lose your data. You probably won’t need this backup, but you’ll be really glad if you do.
Write down your Apple ID password on a piece of paper before upgrading. You’ll need to enter this before you can access your computer after the update is complete.
CURRENT PROBLEMS
The first time you launch Ventura you’ll get deluged with security setting alerts. Don’t panic. Take these one app at a time and set permissions the way they require.
I discovered that Ventura reads and writes SSDS – whether formatted using APFS or ExFAT – up to 35% more slowly. (Here’s my warning.) This has a major impact on multicam editing, DIT work and editing large frame size video.
Sentinel One security software keeps demanding full disk access even after it is granted. I haven’t solved this. Their tech support pages aren’t any help, there’s nothing on configuring it for Ventura.
I had a lot of problems getting SoftRAID RAID volumes to mount. If you use SoftRAID, be sure to upgrade to version 7.0.1, pay CLOSE attention to their help document on getting all the security settings correct. It took me 30 minutes to get these set correctly. But, now, SoftRAID is working fine and all volumes mount. This is the result of Apple’s new security settings.
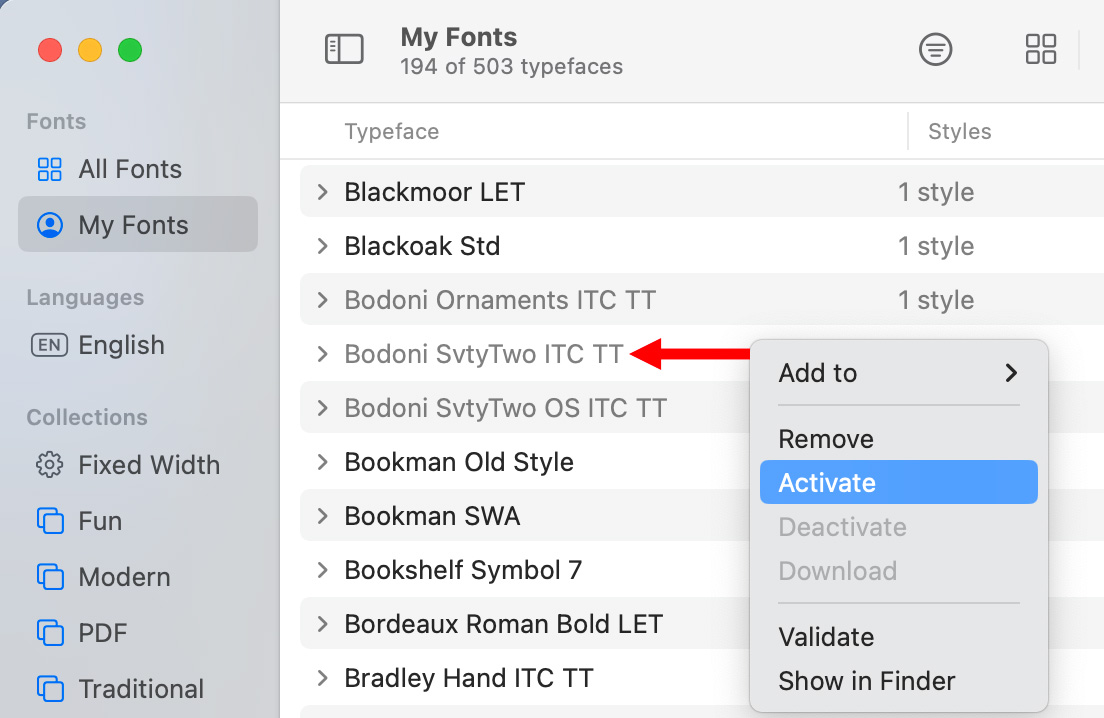
Not all my fonts made the transition. Open Applications > Font Book. Fonts that have a downward-pointing arrow need to be downloaded. Gray-named fonts need to be activated. Right-click the font name and select Activate.
MORE DETAILS
Downloading and installing the update took about an hour and a half. Configuring all the security settings and getting software working again took another 2-3 hours.
Given the new security settings in Ventura, every external device – especially drives – that connects directly to your Mac needs to be approved before you can access it. The best way to do this is to connect each drive directly into your computer – don’t go through a dock – approve it, then, reconnect it the way you had it before. This process is quick, but we haven’t had to do it before.
Most editing applications will need security setting adjustments to allow access to files. This can’t be done as a group. Making this more challenging is the complete redesign of System Preferences into System Settings. The task isn’t difficult, just time consuming, especially as you struggle to find your way around the new layout.
Make a point, after the upgrade is complete, to open all the software you use regularly and make sure it opens. Many will require security setting changes, especially utilities. This is especially true for CommandPost, ScreenFlow and DropBox. Audio interfaces, like FocusRite, upgraded with no problem.
For the first time we have easy access to controlling which software opens at log-in, as well as background activities (Launch daemons). The problem is that these are listed by the name of the developer, not the software that uses them. Turning stuff off is generally a good idea, but make sure you know WHAT you are turning off before you do.
NOTE: You should be getting the idea that upgrading will require more time than you expect. It will. Be patient. The security of your system and projects you create will benefit from the time you spend.
WHAT I DID
I was having technical problems with my internal drive which made me realize that I should probably erase and reformat it before I install the new operating system. This is an optional step, but it helped me.
Rather than directly upgrade my system, I created a bootable external drive (which was a single SSD, not a RAID) and installed macOS Ventura on it. I then used Utilities > Migration Assistant to transfer all my files from the Mac to the external drive.
At this point, my computer was running Monterey and the external drive was running Ventura. All my data was duplicated – plus I had a full Time Machine backup. I booted off the external drive and started testing my applications before I made the upgrade permanent. Running Ventura off the external drive also reassured me that key software was working properly.
I deleted several apps that were causing problems, tweaked settings, explored the new OS and generally reassured myself that the upgrade wouldn’t cause problems. It didn’t.
Then, I erased the Macintosh HD on my main laptop, installed Ventura and migrated all my files back from the external drive. With the exceptions noted above, that seemed to work fine. The whole process took a couple of hours.
NOTE: There is something somewhat terrifying about clicking “Erase” for the computer hard drive that holds your entire digital life. I will confess I thought about that for a couple of minutes before plunging ahead. Fortunately, it all worked fine.
RECOMMENDATION
Upgrading to the next major OS version is never trivial. However, the problems I’m running into seem to be operational, not bugs.
If you are wondering whether it is time to upgrade, 13.1 seems to be safe. Just give yourself time to get everything sorted once the upgrade is complete.
The good news is that all my personal data made the transition safely. Whew.
EXTRA CREDIT
38 Responses to The Upgrade to macOS Ventura Went Fine – Mostly
Newer Comments →-
 Philip Snyder says:
December 18, 2022 at 4:15 pm
-
 Larry says:
December 18, 2022 at 4:23 pm
-
 Philip Snyder says:
December 19, 2022 at 5:52 am
-
 Larry says:
December 19, 2022 at 6:47 am
-
 Philip Snyder says:
December 19, 2022 at 6:51 am
-
 Larry says:
December 19, 2022 at 7:08 am
-
 Philip Snyder says:
December 21, 2022 at 7:11 am
-
 Larry says:
December 21, 2022 at 8:18 am
-
 Philip Snyder says:
December 21, 2022 at 8:22 am
-
 Larry says:
December 21, 2022 at 8:30 am
-
 Ray says:
December 19, 2022 at 4:35 am
-
 Thomas Chartrand says:
December 19, 2022 at 6:36 am
-
 Larry says:
December 19, 2022 at 6:48 am
-
 Curtis Craven says:
December 19, 2022 at 7:48 am
-
 Larry says:
December 19, 2022 at 7:55 am
-
 David Gaudio says:
December 19, 2022 at 8:16 am
-
 Larry says:
December 19, 2022 at 8:36 am
-
 Tod Hopkins says:
December 19, 2022 at 2:08 pm
-
 Larry says:
December 19, 2022 at 2:24 pm
-
 Tod Hopkins says:
December 19, 2022 at 2:03 pm
-
 Warren Nelson says:
December 19, 2022 at 8:20 am
-
 Larry says:
December 19, 2022 at 8:37 am
-
 Philip Snyder says:
December 19, 2022 at 9:54 am
-
 Kit Laughlin says:
December 19, 2022 at 12:02 pm
-
 Larry says:
December 19, 2022 at 1:58 pm
-
 Dan Preston says:
March 30, 2023 at 9:53 am
-
 Larry Jordan says:
March 30, 2023 at 11:27 am
-
 Duane Abler says:
June 7, 2023 at 5:42 am
-
 Larry Jordan says:
June 7, 2023 at 6:18 am
-
 Duane Abler says:
June 7, 2023 at 6:58 am
-
 Duane Abler says:
June 7, 2023 at 7:21 am
-
 Duane Abler says:
June 7, 2023 at 7:30 am
-
 Duane Abler says:
June 7, 2023 at 7:29 am
-
 Larry Jordan says:
June 7, 2023 at 9:28 am
Newer Comments →Larry,
What concerns me right off the bat is this paragraph:
“Given the new security settings in Ventura, every external device – especially drives – that connects directly to your Mac needs to be approved before you can access it. The best way to do this is to connect each drive directly into your computer – don’t go through a dock – approve it, then, reconnect it the way you had it before.”
I have three WD external drives (not RAIDs) for my video media plus 3 My Passport drives for assorted media. I use Carbon Copy Cloner (not Time Machine) to backup all my files from my main HD and my three external media drives mentioned above (all formatted Mac OS Extended). CCC does the backup onto a G drive with partitions that correspond to each of my external media drives.
Would you suggest disconnecting each of these external drives BEFORE upgrading to Ventura? They drives are currently daisy-chained together and then connected to the iMac via a single Firewire-to-Thunderbolt adapter. The CCC backups are connected by a multi-port dock.
According to your article, after upgrading, I should connect each drive individually through the adapter to get it “approved”.
I’m not having any problems with my iMac HD, so hopefully it won’t be necessary to erase it before upgrading to Ventura as you did.
Finally, I format flash drives as ExFAT. I use these to copy digital files of my films onto that I send to film festivals. Will I still be able to format them this way? Will Ventura have a problem with them?
Once again, thanks for the article and any additional info.
Philip:
These are all great questions. To prevent unauthorized users from connecting a drive without your knowledge, you now need to approve any external drives. To do this, simply connect each one, one at a time, to your computer and answer the pop-up dialog that appears. You only need to do this once per drive. After that, they behave as normal and you can connect them as you see fit.
You don’t need to disconnect any drives before upgrading. However, I generally do because I’m nervous.
If you aren’t having any problems with your internal hard drive, you don’t need to erase it.
Finally, Ventura can read and write ExFAT (and FAT32) drives. However, it is significantly slower doing so than Monterey. Here’s an article that explains this:
https://larryjordan.com/articles/warning-exfat-does-not-exist-in-macos-ventura-and-ssd-speeds-are-much-slower/
Thanks for asking.
Larry
Larry,
Two ancillary questions:
1) How does the Ventura approval process apply to additional partitions on the main hard dive? For example, on my main hard drive running Monterey, I’ve installed a separate partition running Catalina. I use it make Blu-ray disks in Compressor. Will I be able to open it? Does it have to be approved?
2) On my G drive on which I have three separate partitions with the Carbon Copy Cloner backup of each of my external media drives. Does each partition have to be approved and how would that work?
Thanks.
Philip:
My understanding is that you are approving the physical device, not individual partitions.
Larry
I guess I just have to “jump in” and see what happens.
Philip:
Even if each volume needs to be approved, the process only takes seconds. It isn’t a big deal – it’s just that approvals are new.
Larry
Larry,
Does the computer that you upgraded to Ventura have an M1 Silicon chip? Mine does not.
Thanks,
Philip
Philip:
Yes, my MacBook Pro has a M1 Pro chip.
I can’t speak to Intel systems as I no longer have one.
Larry
Larry,
I got this info from Apple tech support:
https://support.apple.com/en-bw/guide/mac-help/mchlf779ae93/mac
Philip
Philip:
Thanks for sharing this link. I think this will also apply to any Intel system that has a T-2 chip.
Larry
For those Promise Pegasus HD (non SSD) users, I have a Pegasus R6 24TB drive in RAID 5 which mounted and as usual. No problems once so ever….. Not even a pop up. Knock on wood……..LOL.
Can anyone verify Panasonic P2 Drivers work with Ventura?
Thomas:
I suspect they do. Does Panasonic have any warning s out?
Larry
Larry:
I thought you were not going to update until the arrival of macOS Ventura 13.2?
Curtis:
Nope. I always said I’d update when the .1 version was released. There are a number of security enhancements in Ventura that I think are important. So I didn’t want to wait too long.
However, one of the key pieces of software that I use didn’t get updated until two days before 13.1 was released. So it always makes sense to wait for developers to catch up to Apple.
Larry
Hi Larry – great seeing you at the last LACPUG meeting! I just purchased a Mac Studio M1 Ultra, with the latest Ventura OS installed (13.0.1). Just wanted to let you know that I was having a terrible experience in Premiere, with a horrific lag time (several seconds before anything actually moved). I was ready to return it and go back to my 2017 iMac. Then, I remembered that I had installed Rosetta and checked its box so I could load the NewBlueFX I had just bought (the techs there told me that Rosetta was the only way to recognize the plugins). I unchecked the Rosetta box, opened Premiere, and saw very quickly that that was the culprit. Suddenly, everything was springy and incredibly fast. So, unfortunately for now, I can’t use my NewBlueFX (unless I open in Rosetta, render them, and then reopen without Rosetta), but my Mac Studio works very well indeed. Just a heads-up about that – have you heard anything about it? Btw, the NewBlueFX folks tell me they’re working on a non-Rosetta fix…
David:
This is a GREAT comment – thanks for sharing!
For those that don’t know, how did you disable Rosetta?
Larry
Open “Get Info” for the application and there’s a checkbox at the bottom of the General section. It appears you can only do this from the original application icon so there’s no way to create different alias’s to mode switch.
I’m running Premiere native with no issues, except for NewBlueFX, but After Effects has a long list of built-in effects that require Rosetta.
Tod:
Thanks for this description. Rosetta is not a button I’ve needed to click yet.
Larry
I also ditched NewBlueFX over the Rosetta issue. Mac Studio and Monterey, not Ventura, and I’ll stay there until I have a compelling reason to change.
Morning,
One workflow app for me is “Android File Transfer.”
It broke. 🙂 However, there are several work arounds that let me get my transfers done. They just take an extra step or two.
Warren:
Thanks for letting us know.
Larry
Warren,
I would be interested in knowing these workarounds for Android File Transfer.
I use it to pull photos and video files from my Samsung phone.
Thanks
Larry,
We operate a standalone multicam studio (4 cameras, second system sound) and this all works fine on our equipment at present. Given your noted SSD speed decreases of up to 35% (we use SSDs as external drives often), and the four-hour upgrade process, what are the advantages of Ventura over Monterey for a video and sound editor?
Kit:
I don’t know all the features of Ventura, but three stand out:
1. Greater stability
2. Greater security
3. Works better with docks
Others are welcome to share their opinions.
Larry
Hi Larry – It’s 3/30/23 and I’m still on Monterey. Ventura 13.3 is now out. Should I expect the same issues you had installing and setting up 13.1, or have some of the wrinkles been smoothed out by now?
Running mainly Adobe CC. Maybe better to stick with Monterey (updated to 12.6.4) since it ain’t broke and why fix it? Or will I be missing out on something?
Thanks!
Dan:
Well, there are two sides to this.
1. If your system is working fine, there’s no rush to upgrade.
2. However, at some point you will need to upgrade unless you plan to run this system on older software forever. It is easier to upgrade incrementally, than make a giant multigenerational leap all at once.
Personally, I think 13.3 is fine. I’d recommend upgrading, unless – as I did with two older computers – you make the conscious decision to keep these as legacy systems.
Larry
HELP!! I’m in the UK for a shoot on Monday and using my old Panasonic P2 HD camera for a lockdown shot. But I just discovered my MacBook Pro running OS 13.4 won’t mount the P2 cards for media transfer and backup… Any thoughts would be greatly appreciated. dabler@vision.org P.S. I’ve tried several times installing the Panasonic drivers for Big Sir (latest I could find) to no avail.
Duane:
My best advice is to contact Panasonic directly. I don’t have any specific suggestions that would help.
Sorry,
Larry
Thanks Larry.
You would not believe how incredibly unhelpful Panasonic’s Chat Support line was just now. Oh well.
When connecting the P2 card, I get this message: The disk you attached was not readable by this computer. “Eject, Ignore or Initialize” UGH.
When connecting the P2 card, I get this message: The disk you attached was not readable by this computer. “Eject, Ignore or Initialize” UGH.
Duane:
Go to Apple logo > Settings > Privacy and make sure you grant access to the P2 card.
That is generally what prevents it from connecting. Also give Apple Support a call. They can walk you through other connectivity steps.
This may be easy to solve, without involving Panasonic.
Larry