
![]() [ Disclaimer: I purchased this product for my own use. ]
[ Disclaimer: I purchased this product for my own use. ]
As filmmakers and media creators we continually need to convert still images, documents, slides and photographs into digital format. We scan at a wide range of resolutions so we can create animated moves. And we need these images to be the highest quality possible, with the least amount of dust, dirt or scratches, even when the originals are not in very good shape.
Oh, and we need them yesterday.
The purpose of scanning software is to digitize paper documents, photographs and transparencies into high-quality image files. This requires two principal components: hardware (the scanner) and software (the instructions on how to make it work).
Last week, I reviewed the Epson Perfection V600 Photo and Perfection V850 Pro scanners. (Read it here.) This week, I want to look at the software side of the process.
Recently, I inherited packing boxes filled with old photographs and, literally, thousands of slides. My trusty Epson V600 scanner needed help and I ultimately purchased the V850 because it can scan up to 12 slides in a batch.
But, with the new hardware came the opportunity to select new software. I’ve used Epson Scan 2 software for years, but wondered if there was something better. That question became the foundation of this review.
NOTE: For the purpose of this review, I will work exclusively with the Epson V850. However, from the perspective of documents and prints, the results will be similar to the V600 or V750. The big benefit to using the V850 is transparencies and slides.
OVERVIEW
There are two ways a scanning system can prioritize digitizing images:
Obviously, every scanner wants to create good-looking images, quickly and easily, all for a low cost. But, while that’s an ideal goal, different tasks require different priorities.
NOTE: There are extremely high-end scanners that cost into the tens of thousands of dollars for tasks like scanning books at high-speed, maps and architectural documents, and large transparencies. I’m not considering that part of the market for this review.
SOFTWARE OPTIONS

For simple, easy and accessible software, you can scan directly from Preview. This is a fast way to digitize a document into a variety of formats, include PDF, JPEG, PNG and TIFF. But, it provides a minimum of control.
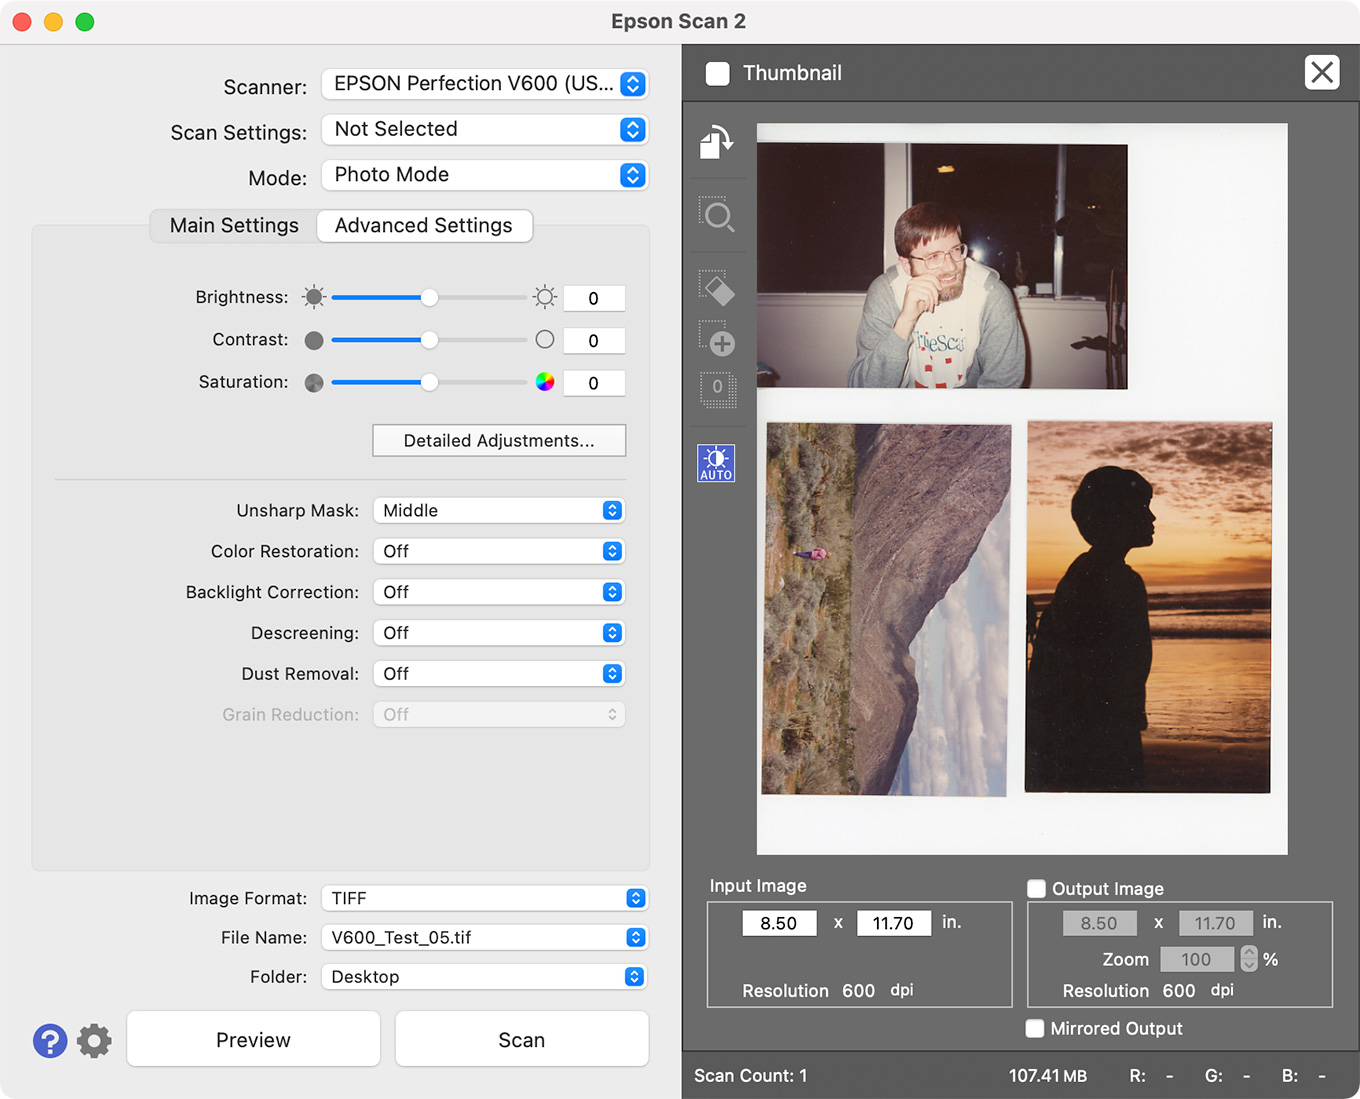
The next level up is Epson Scan 2. This software is bundled with all Epson scanners. It is flexible with a variety of features, but recent versions have emphasized ease of use, making advanced features harder to access or unavailable.
I used to use this all the time. But, not any more.
At what I consider the professional end of image scanning are two pieces of software: VueScan and SilverFast. Both have devoted audiences and have been around for a long time. Both do excellent work. VueScan’s biggest claim to fame is its support for more than 6,000 scanners. However, I find the image adjustment controls in VueScan lacking.
My preference, after using both for a while, is SilverFast. While it still clearly shows its roots in scanning images for print, the quality of its scans can be outstanding. However, its interface, automatic settings and help files need more work.
EXECUTIVE SUMMARY
LaserSoft Imaging began development of SilverFast more than 30 years ago. The current version is 9.2.1 which runs on M1 Macs and Monterey as well as older devices. SilverFast SE 9 supports more than 340 scanners, Mac and Windows, and comes in three versions:
NOTE: LaserSoft also offers SilverFast Archiving software, which is a comprehensive archiving tool for scanning photos in a lossless RAW format, which can then be accessed later for processing and image clean-up.
The strength of SilverFast is the quality of the images it creates. However, the software itself assumes that scans are principally used for print, rather than the web. The interface is hard to learn, with out-of-date user manuals and automatic settings that yield sub-optimal results. Using its Workflow Pilot for high-quality scans for video is an exercise in futility.
If you take the time to learn the interface, you will create images that are superior to anything else I’ve seen. However, this is software the succeeds in spite of its interface, not because of it.
Developer: LaserSoft Imaging
Product: SilverFast SE Plus 9
Website: https://www.silverfast.com/scanner-software/
Price: $99 (US)
A free trial is available for all versions.
LICENSES
LaserSoft licenses its software by scanner. So, you need one SilverFast license for each scanner attached to your computer. I have two scanners, so I need two licenses. Once licensed, SilverFast can switch between multiple scanners attached to the same computer.
SilverFast can be installed on up to three computers at the same time; licenses are managed from the MySilverFast.com website. SilverFast requires access to the web for license activation; as well, it needs to log onto the web every 90 days or so to renew the license.
Installing the software isn’t hard, but it requires creating an account on MySilverFast.com, downloading the software, purchasing a license and getting everything installed. The process took about an hour and LaserSoft provides a web-based tutorial on what you need to do to complete the installation.
NOTE: LaserSoft also provides a “First Steps” Guide to installing and running SilverFast. This free guide is what I used to get up and running.
THE INTERFACE

(Click to see larger image.)
This is the SilverFast interface. Yeah, it’s a bit overwhelming.
Up at the top left is a red icon. This is the Workflow Pilot – a streamlined interface designed to help you create high-quality scans quickly, without getting lost in the tools. Click the red icon to enable this or, when it turns blue, click it again to turn it off.
NOTE: Although this review is for SilverFast SE Plus 9, you may see that I have the AI Studio version. I upgraded in the middle of this review, but I am not using any of the higher-end features in this review. Nor, for that matter, would I necessarily recommend the AI version over SE Plus 9.
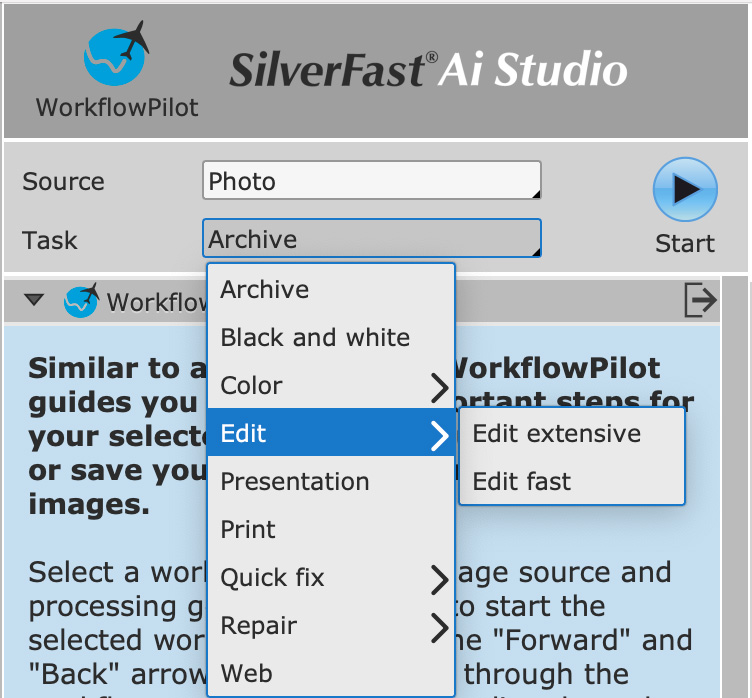
When active, Workflow Pilot provides a number of presets, along with on-screen instructions on each option.
The underlying assumption of the Workflow Pilot is that you are scanning for a specific task – print, web, video and so on. The problem this creates is that I often want to create a high-resolution master scan of my image, say for doing pan-and-scan work within a documentary video. The Workflow Pilot does not know how to deal with an image where the ultimate size of the finished scan is unknown. (Archive is an exception, but this has a significant limitation, which I’ll explain shortly.)
I find that I’m working against the Workflow Pilot more than it is enabling me to get my work done quicker. It may make scanning easier for newbies who are scanning images for fixed sizes for clearly defined purposes, but I find the Pilot too limiting.
SCANNING A PHOTO AS AN ARCHIVE
I mentioned that SilverFast scans images for archiving. However, to take full advantage of the recovery and repair features built into an archive scan, you also need to purchase SilverFast HDR.
If you don’t need image repair settings saved with the file, you can create a RAW file of the scan which can then be opened in Photoshop. The problem is that an archive looks terrible when you open it in Photoshop. The image above is what the image looks like in SilverFast preview (and, for that matter, in real life).

(Click to see larger image.)
Here’s what the archive looks like in Photoshop. Shadows are crushed, highlights are way over-extended. Yes, I understand RAW images need adjustment, but look at the shadows – there’s no easy way to recover that data.
Worse, when scanning as an archive, SilverFast does not allow any image adjustments or dust removal settings prior to the scan. It assumes those will be made later using the SilverFast HDR software. However, those options are lost when the file is opened in Photoshop.
Creating archives is fast, but you’ll spend far more time trying to fix them later than you save in the original scan. Time to look at a different option.
SCAN A PHOTO MANUALLY
Instead, let’s get into the real reason for using SilverFast, creating high-quality image scans using the manual settings.
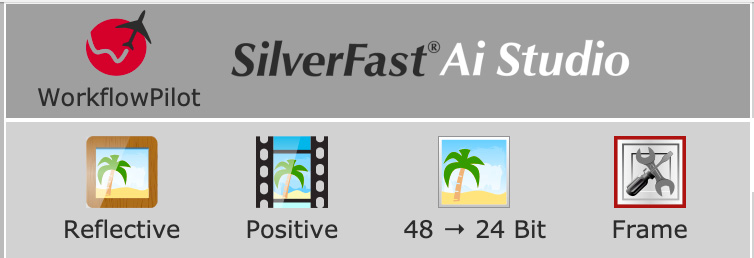
Across the top left are four buttons that determine the type of scan: Reflective vs. Transparency, Positive vs. Negative film, Color bit depth and Frames, which defines the area of the image to be scanned.
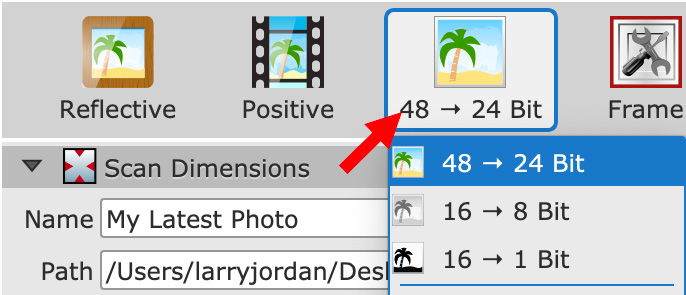
The first two choices are obvious, and the default setting of 48 > 24 Bit is a good one for most scans. Color prints have a very limited color range, so this setting is fine. Well-exposed, color saturated slides – especially large format negatives or prints – may benefit from a full 48-bit color bit depth which requires the AI Studio version.
For my slides, I find the 48 > 24 Bit setting perfectly acceptable.
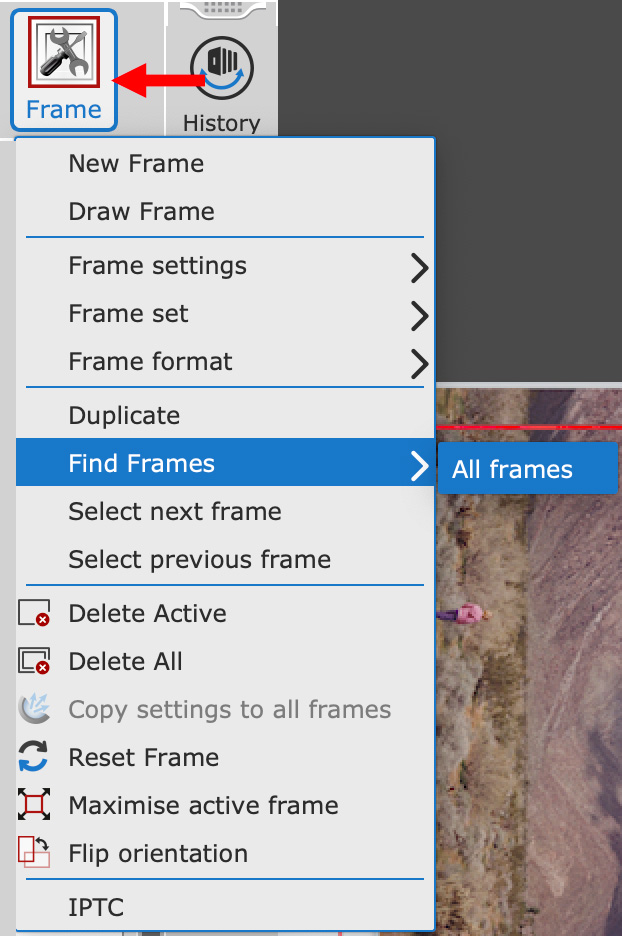
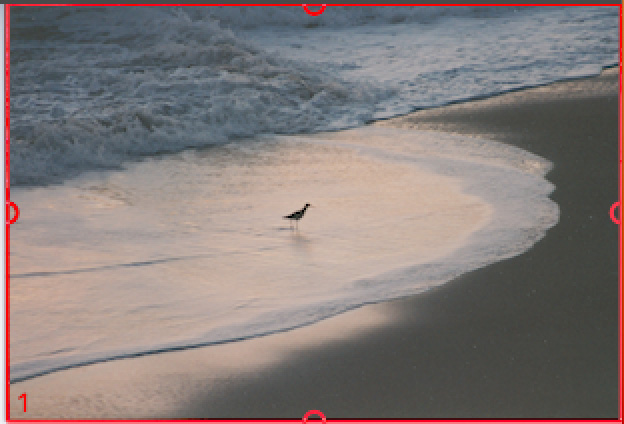
After completing a pre-scan (described below) click the Frame button and choose Find Frames > All Frames. This sets scanning boundaries (frames) around each image automatically. Just like cropping rectangles in Photoshop, these boundaries determine what part of each image will be scanned and can be resized, repositioned and rotated.
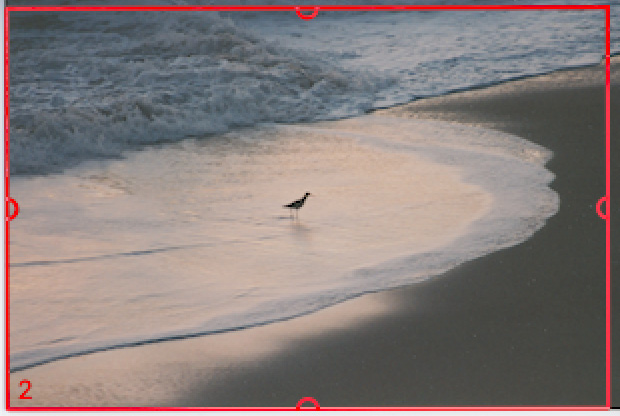
Frames are indicated by red rectangles. I found this feature works perfectly with slides, but it is less accurate defining the boundaries of prints. However, adjusting these manually is easy.
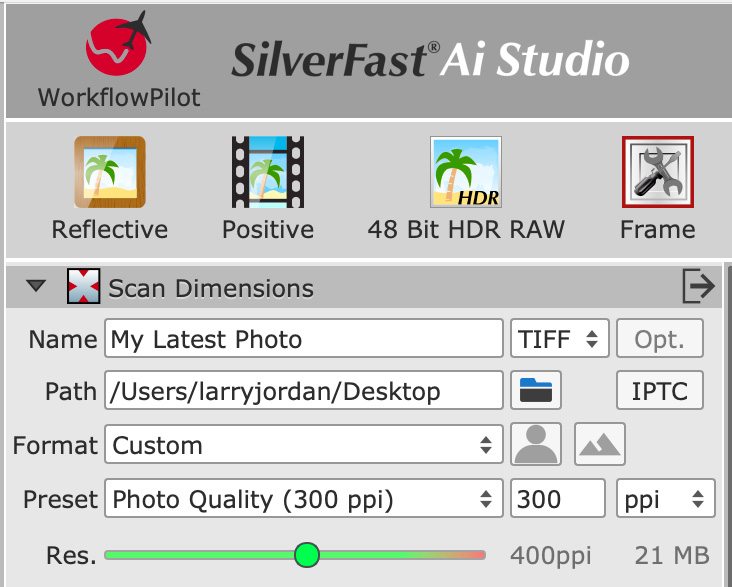
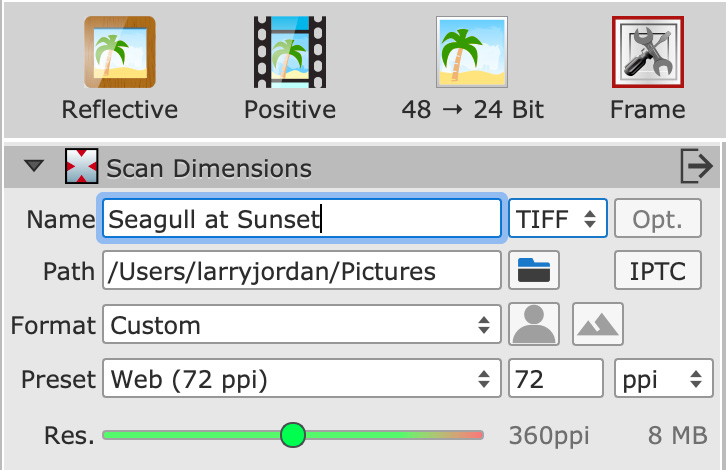
Below these four buttons is Scan Dimensions where we add:
NOTE: Changing the Preset also resets the Res (scanning resolution). This can cause unpleasant surprises, be sure to set Preset first!
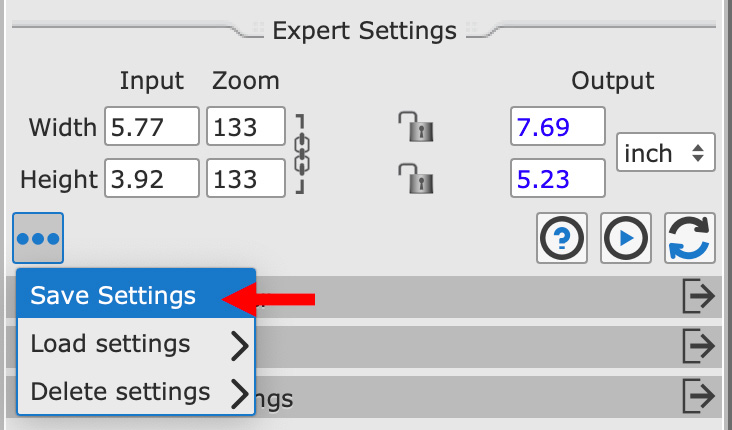
We can save, load and delete these custom dimension settings, as illustrated by the red arrow in the screen shot above.
![]()
These three buttons appear in many areas throughout the program:
The only problem is that the User Manual links to version 8, not version 9. I have not found any accurate online reference guide to using the features in SilverFast SE version 9; aside, perhaps, from an eBook the company is selling on its website.
PREVIEW THE SCAN

The buttons across the top display commonly used settings:
Other settings in this top menu bar include:
It’s nice that their is this level of color correction. But, to me, the purpose of any scanning software is to capture the image as accurately as possible, without losing any detail in the shadows, highlights or colors and without creating a color cast of its own.
While we can save custom scanning dimensions as presets, we can’t save adjustment panels or presets to apply to an image. This is a big limitation – but there’s a work-around:
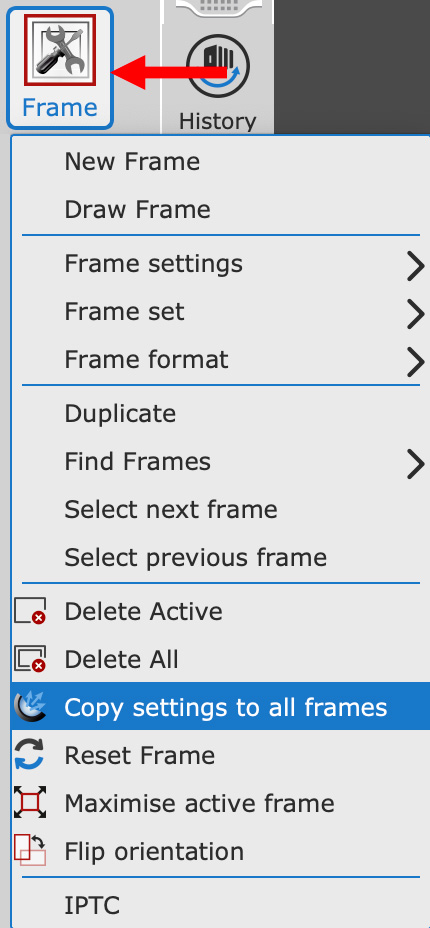
Select the first image and apply whatever panels and settings that you want, then, choose Frames > Copy Settings to All Frames. This applies those settings to all the other frames. I’ve found this step saves me a lot of time when scanning similar images or, especially, slides.

But, there are issues when using these automatic settings. Here are two examples of the Auto setting applied to two different photos. Notice how in both cases, the Histogram shows the highlights or shadows getting crushed. This is not why we buy a high-end scanner.
NOTE: These are caused by using the automatic settings. Adjusting these settings manually is not a problem.
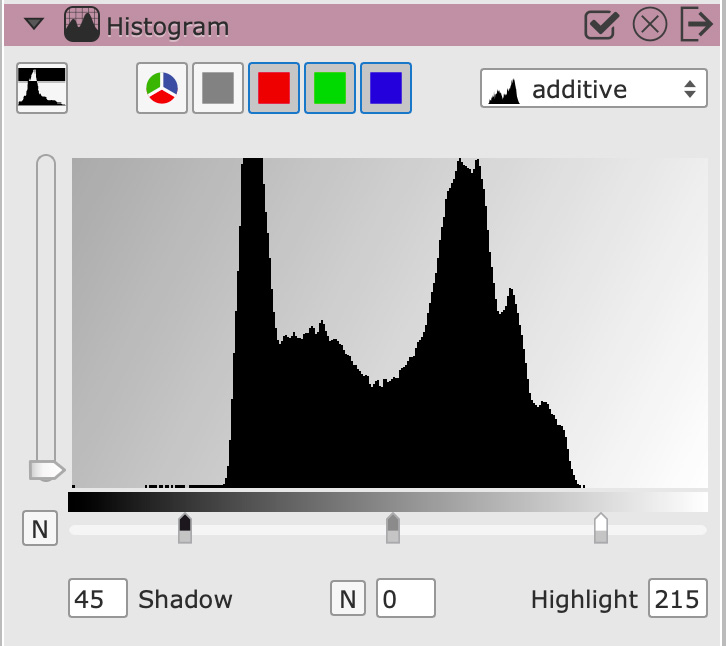
Compare the crushed setting in the Histogram with a manual setting where all detail is preserved. Yes, this means that we would still need to tweak this image in Photoshop – but, the KEY is that all grayscale detail is preserved in the scan. I would never expect the scan to be my finished image.
NOTE: When using the Histogram for scanning, adjust the shadow and highlight levels so that they are close to, but don’t cut into, the pixel range displayed for the image. You want to get the maximum value from your image, without losing detail. Mid-tones can be set to whatever looks good to you.
For this reason, while I would like to use Auto just to save time, it is critical that you check the histogram settings after applying this toolbar option to make sure you aren’t losing detail in the image.
The good news about using the Auto setting is that you can see the changes SilverFast made to the Histogram. However, this is not true for the Global CC color correction setting. The program tweaks colors, but doesn’t indicate what changes it made. I would be much happier with this feature if I could see what it did and then adjust it as necessary. Because these color changes are made blind, I don’t use it.
THE MIDDLE TOOLBAR SETTINGS

The middle toolbar contains the tools that are the reason I use SilverFast:
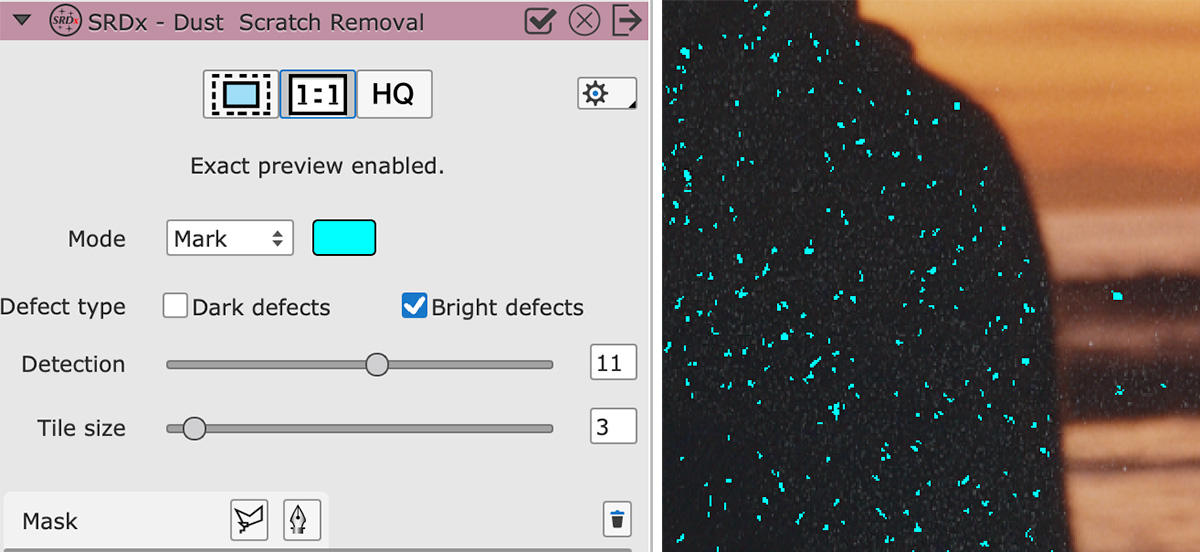
NOTE: Use SRDx for prints and iSRD for slides. You’ll see examples shortly.
In my scans, I regularly use:
However, as mentioned earlier, it is not possible to set these as a default or preset.
SCANNING
When it is time to scan, clid the Scan button to scan whichever individual image is active; that is, highlighted with a red rectangle.
Or, click Batch to scan all the slides to display the Batch Scanning window (above).
NOTE: The Batch window ignores any file names or path names in the Scan settings. This, too, is a trap because you think you already set it, but the existing Path name in Scan Dimensions is not shared with the Batch window.
COMPARING RESULTS
Here are four examples comparing the scanning features of SilverFast. NO adjustments or corrections were made to the image after scanning.
NOTE: Because the largest image WordPress allows me to post is 2560 pixels on a side, I combined and scaled these images in Photoshop. No other adjustments or retouching were made to any image in Photoshop.

(Click to see larger image.)
In this first example, we see the difference when SRDx dust removal is enabled and adjusted. Top right is the scan without enabling dust removal. In the left image, the blue dots indicate white dust that will be removed by this feature. (This setting needs to be adjusted manually to determine what’s dust and what’s essential image information.) The lower right image shows the results after dust removal. (This will be easier to see on the larger image.)

(Click to see larger image.)
This image compares the source image (top) with an automatic exposure adjustment (middle) or manual adjustments (bottom). Both the automatic and manual settings use the histogram to alter grayscale settings and you can alter the automatic settings manually after they are applied.
The safest approach to scanning an image is to make grayscale changes that provide the widest latitude later when you are processing the final image in Photoshop. My general practice is to make the image look as good as possible without losing image detail. The bottom scan looks lovely, but that level of adjustment might better be made in Photoshop.

(Click to see larger image.)
This image compares an automatic and manual color correction to a source image. I generally tend to adjust color later in Photoshop, but SilverFast provides tools to make color adjustments to the image before the scan.

(Click to see larger image.)
When you take the time, though, you can get some great looking images. This image compares both automatic exposure and color correction to using the tools manually. Specially, the image on the right includes adjustments for:


(Click to see larger images.)
When you pay attention to the settings, you can get amazing scans, even when the original prints are not that good. This level of control is why I use the software.
SCANNING SLIDES
When scanning slides, set:
Then copy those settings to all other frames.
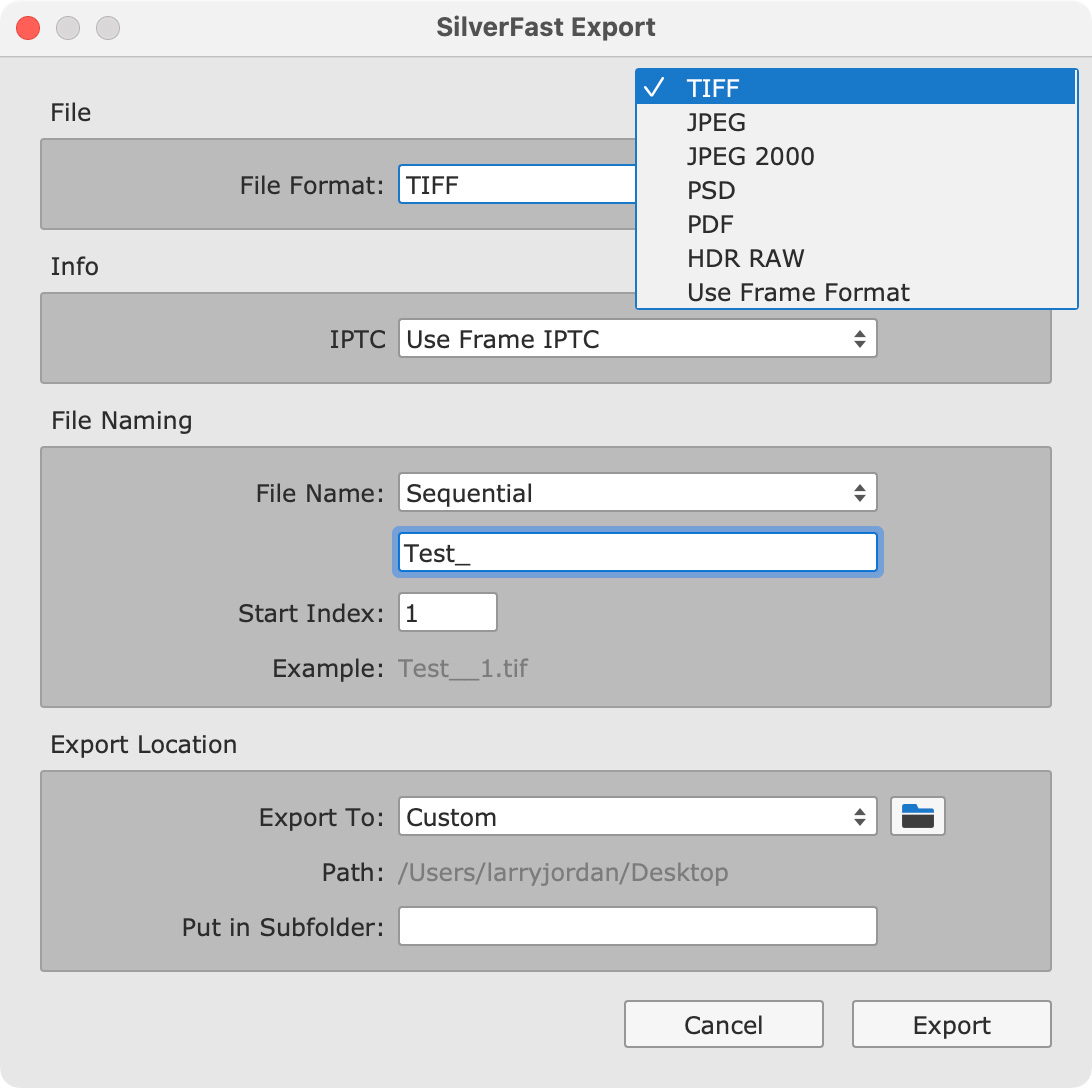
Slides, like prints, can be scanned to TIFF, PSD, PDF and JPEG formats. However, SilverFast does not support PNG.

(Click to see larger image.)
This showcases the benefit of using iSRD for removing dust. Notice how much dirt was removed from what appeared to be a “clean” slide during the scan.
NOTE: iSRD can only be used with slides or other transparencies. Not all scanners support this function, which requires scanning the slide using infrared light. SRDx should be used to remove dust from prints.

(Click to see larger image.)
With these settings, it takes a few minutes to scan a slide, but, again, the results are worth it. The good news is that SilverFast can run in the background, so you can do other work while the software is busy scanning slides.
THINGS I’D LIKE TO SEE
SilverFast lives up to its reputation for creating high-quality scans. But its interface is far too print-centric. I live in the world of video and web and the interface keeps getting in my way. Here’s what I would like to see in the next version:
SUMMARY
SilverFast SE Plus 9, by LaserSoft Imaging, provides high-quality image scans for professional use. However, it has an interface that takes time to learn. Sadly, many of the automatic settings yield poor results.
Just like learning how to color grade in an NLE takes time, the time you spend learning the SilverFast interface returns value multiple times over with the ability to improve the look of your images.
SilverFast is far superior in terms of control and image quality to Epson Scan 2, especially in noise and dust removal. It takes time to learn and there’s a lot about the interface that needs improvement, but the results are what matter. And the results can be excellent.
28 Responses to Product Review: LaserSoft SilverFast 9 SE Plus Scanning Software
Newer Comments →-
 Bryce Bennett says:
January 24, 2022 at 3:44 am
-
 Larry says:
January 24, 2022 at 6:17 am
-
 Janvier Smith says:
January 24, 2022 at 5:05 am
-
 Larry says:
January 24, 2022 at 6:15 am
-
 Allynn says:
January 24, 2022 at 7:05 am
-
 Larry says:
January 24, 2022 at 7:33 am
-
 stu says:
January 24, 2022 at 8:12 am
-
 Larry says:
January 24, 2022 at 8:54 am
-
 mario flandoli says:
January 24, 2022 at 8:34 am
-
 Larry says:
January 24, 2022 at 8:56 am
-
 Bryce Bennett says:
January 24, 2022 at 10:50 am
-
 Larry says:
January 24, 2022 at 11:01 am
-
 Bryce Bennett says:
January 24, 2022 at 10:53 am
-
 Larry says:
January 24, 2022 at 11:00 am
-
 Allynn says:
January 24, 2022 at 1:55 pm
-
 Bryce Bennett says:
January 24, 2022 at 4:22 pm
-
 Donald Davis says:
January 28, 2022 at 4:09 pm
-
 Larry says:
January 28, 2022 at 4:32 pm
-
 Donald Davis says:
January 28, 2022 at 6:09 pm
-
 Larry says:
January 28, 2022 at 7:59 pm
-
 Raul says:
August 7, 2023 at 6:40 pm
-
 Larry says:
August 8, 2023 at 4:25 am
-
 Andrew Bealing says:
November 9, 2023 at 7:13 am
-
 Larry says:
November 9, 2023 at 7:20 am
-
 Peter says:
November 20, 2023 at 4:37 am
-
 Larry Jordan says:
November 20, 2023 at 5:03 am
Newer Comments →Thanks, Larry. Very interesting.
I’ve been monitoring SilverFast and its features list since 2005.
Since 2005 I’ve been using a competitor called VueScan. It will run on over 6,500 scanners (yes, six thousand, five hundred), costs just $89.95 for the “pro” license and is updated about once a month. And it’s a forever license – free updates and upgrades forever. And you can run it on four computers (with the same owner). The interface is can be costomized in all sorts of ways.
I have four (4) scanners connected to my Mac, and they all run without a hitch, and with just the one licence:
– Nikon CoolScan 5000, with slide feeder SF-210 (dedicated 35mm film scanner) – 2 units
– Minolta Scan Multi-Pro (dedicated medium format film scanner)
– Epson Perfection 4990 Photo
Improvements and new features are added to scanners that never had such, so my Nikon scanners are creating much better scans for me now than 10-15 years ago.
And the scan results look great.
Bryce:
Thanks for your detailed comments. And I’m very glad you like VueScan – you are not alone, I’ve received many similar comments. I will re-look at VueScan in the future. It has become clear to me, in reading these comments, that no scanning software is perfect. It is also good to know that we have options in picking the scanning software that works best for us.
Larry
Larry, thanks for this excellent and thorough review. I have been using VueScan for many years, and hope they will add some image adjustment features to compete with SilverFast. I also have a large library of color slides handed down from my father and uncle, in addition to over 50 years of my own slides. I really need to scan in batches larger than 12, and my Nikon Super CoolScan 4000 handles that well, but the feeder jams occasionally, just a minor inconvenience. I wish SilverFast were not so eager to grab more money for multiple scanners and other add-ons — that is a real turn off. Again, thanks for another great review, and we hope it will help make future scanning products better!
Janvier:
Thanks for your comments. Since the Nikon Cool Scan does not seem to be made anymore, I was reluctant to buy a used one without any experience with it. Your comments are reassuring.
I agree, SilverFast tends to price itself at the high end of the market, which is why I don’t recommend spending the money for the AI Studio – it costs too much and the Plus version does what needs to be done.
Larry
Buy one, Larry. They are the BEST. I’ve even seen new, never opened ones on eBay.
Allynn:
You are talking me into it. Do you recommend the 4000 or 5000?
Thanks,
Larry
OK – let me be Number 7 here to THANK YOU for this incredible, detailed TIME-CONSUMING dive into this scanner and software!!!!
What a perfectly timed Gawd-Send!
Rescued – again – by Larry Jordan.
Many thanks, sir!
Stu
Stu:
Blush…
Larry
calibration ! you need to buy extra from laser soft, the calibration targets specific for slides or prints. the calibration process in the AI version is automatic, and suddenly, everything goes into place and colours and exposition get perfect….
Mario:
Good to know – however, this information is buried in the LaserSoft website. In fact, their Help files are woefully inadequate, as is a more detailed description of the differences between the programs, aside from the name of the feature.
Larry
Mario brings up an important point, that if one wants to produce color and exposure-accurate scans, then one must “calibrate” the scanner. That is to say, if one wants to create scans that MATCH the original. And this is the case if one wants to digitize a collection of images.
This is more accurately called “profiling” the scanner, which forms the basis for ICC color management. If one employs this methodology, the scanner software should be set to the optimal manual setting that ensures the widest tonal range, without clipping on either end, and all automatic tonal or color corrections turned off.
As Mario points out, a “target” image is used which contains a collection of standarized color patches that profiling software uses to compare the scanner’s rendition of these patches up against their true values. The differences are recorded in a simple text document called an “scanner profile”, which is a type of input profile in an ICC color managed workflow.
I’m happy to share more details about how this is done, but this probably isn’t the place. Perhaps the subject of another newsletter article? It’s your call, Larry.
– From someone who’s scanned 35,000 slides so far, and supervised a team who has done this for a couple of institutions (and now I’m working on my own archives of 90,000 slides)
Bryce:
Excellent points.
If you want to write up an article / tutorial on calibration, I’m happy to publish it. It would work best as a separate article, I think.
Larry
Larry, you asked about the differences between the Nikon Super Coolscan 4000 and 5000 models.
• Bit depth per color: 4000: 14 5000: 16
• Multi-exposure (separate scans to optimally expose shadows and highlights, to increase dynamic range): 4000: N 5000: Y
• Multi-scan 2, 4, 8, 16-fold to reduce noise: 4000: N 5000: Y
• Interface: 4000: FW400 5000: USB 2.0
• 35mm roll film adapter slot: 4000: N 5000: Y
• 5000 has much faster, more accurate focusing
• 5000 has much faster scanning times
Bryce:
This is great information – especially about the interface. I’m off to find a 5000 and do some experiments.
Thanks!
Larry
you beat me to it, Bryce! I like your answer. Better organized than mine. I would just like to add that, if you are planning to scan a lot of slides you really need to spring for the SF-200S bulk slide feeder. You can load 50 slides up at a time and… well… watch them very carefully to be sure they don’t jam! Okay, it’s not *that* bad and it is faster than loading them in by hand. Cardboard mounts jam a lot more than plastic mounts and it helps to “fluff” them first (especially if they have been in a box for 40 years or so). In all my slide scanning (probably thousands over the years), I never had the Nikon “eat” a slide so a jam is just an annoyance, not a tragedy.
Also seems that the 5000 can do Digital ICE on Kodachrome but the 4000 can’t. The 4000 can certainly use Digital ICE but Kodachrome is different somehow so that version of it doesn’t work. I always knew that Digital ICE only worked on transparencies and “scanned dirt” to remove it but I didn’t realize it was a hardware process that actually used an infra red, second scan
Allynn, thanks for the confirmation and backing. It’s good to hear that others are using an ICC color workflow as well (most scan-ists don’t).
The newer and last model of the slide feeder is the SF-210. It has a variable feeder adjustment plate (i.e. slot) that can be adjusted with a thumb dial, to just slightly wider than the thickness of the slide mount. That way only one slide at a time can be fed/pushed into the scanner. Of course one should scan slides in bunches with the same mount thickness, or the adjustment plate’s purpose is defeated (one re-adjusts the plate for each new mount thickness).
I have a little hack that minimizes jams to less than 1 per 500 scans:
I use a dowel (actually the plastic body of a fine marker pen) – 10mm diameter and 45mm length. It’s placed vertically up against the left side of the last slide’s mount (in the feed magazine), and held in place by the push plate (which is spring-tensioned).
This exerts pressure on the left side of the mounts, in essence fanning and separating the right edges at the opening of the feeder adjustment plate. This separation decreases the chance of two mounts getting past the plate (which I set to approx. 170% the thickness of the mount).
Great review, Larry and thanks! As a long time Silverfast user, I discovered a long time ago that saving scans then means having to import them into Lightroom/Photoshop. So, I now use this workflow to automate that process: 1. Create a “watched” folder in Lightroom with “Save” instructions through the setup panel to save to the final destination folder and I also check the box that creates a “Shared Folder” in case I want to work on the scans on my iPad Pro. 2. In Silverfast, I start the scan or batch scan and direct it to save to the “Watched” folder. When the scans are complete, nothing is in the “Watched” folder, but all are in the final destination folder and also referenced in the “Shared Folder” in Lightroom. No need to import, it’s all done. Now edit to taste. Hope this helps as it saves me lots of time.
Don:
I appreciate your comments. Are you simply saving the scan, or are you creating an archive? Because the archives don’t seem to look good in Photoshop.
Also, because I don’t know Lightroom, what’s the advantage to your system? In either case, don’t you still need to open the file from a folder in the Finder to process the slide? I’m unclear why you are using Lightroom. (NOT objecting, just confused.)
Larry
Lightroom saves the scans with the develop/archive settings you’ve outlined above in whatever raw format you’ve chosen. I use TIFF. I catalogue all of my photos in Lightroom for organizational purposes. I also begin editing in LR then from LR, I edit further in Photoshop, Topaz DeNoise, or any other photo editing program while retaining my Lightroom file structure and preserve the original scan/archive TIFF file. When you have thousands of photos possibly on multiple drives, LR makes it possible to search and find a particular photo, one of LR’s major strengths. Otherwise, you have to search through the drive and file structures the old fashioned way.
Donald:
Thanks. I appreciate these details.
Larry
I use Silverfast because I have to, but, man, is it poorly designed—almost comically so. I sometimes teach classes in UXUI and use the software as an example of what to avoid. I’ve been hoping for years that someone would come in and disrupt this space.
Raul:
Smile… Silverfast is powerful, flexible scanning software. But easy to use – or learn – it is not.
Larry
My copy of Silverfast came free with my Epson scanner, if I remember rightly, you just enter the serial number on the download site. Yes it’s clunky but gives great results. I like the colour film profiles for negatives (“Negafix”) Their instructional videos are quite good.
Andrew:
Thanks for your comment. I like Silverfast a great deal and use it every week.
Larry
Larry, thanks for the SilverFast 9 SE Plus review. Since you mentioned having just gotten the Ai version in the review, I was curious if you saw any benefit to that over the Plus version. I have the Plustek 8200i scanner – a singe image film scanner – that I’m just starting to use for scanning my slide collection and it looks like some of the features of the Ai version are for batch scanning, which I cannot do with the Plustek scanner. So, curious about some of the other features.
Thanks,
Peter
Peter:
In my current scanning of documents, prints and slides, I have not found myself using any of the AI features.
Larry