
![]() There are three different types of video media used by Final Cut Pro X:
There are three different types of video media used by Final Cut Pro X:
Camera native media can use a wide variety of codecs, though only one codec is allowed per media file. Codecs include:
And those are just some of the more popular varieties of the hundreds of codecs that are currently in the market. So, which media format should you use? And how can you tell which one FCP X is using? Answering that question is the purpose of this article.
SOME QUICK DEFINITIONS
Camera Native Files. The file format shot by your camera and captured to a card, hard disk or tape for editing. These files have four key parameters:
Of these four, the most important is the codec.
Codec. The mathematics used to convert light and sound into numbers the computer can store. Some codecs are optimized for small file sizes, others for image quality, still others for effects processing. Codecs are, generally, determined by the camera manufacturer and, essentially, determine file size, image quality, editing efficiency, color space and all the other elements that go into an image. It is impossible to overstate the importance of the video codec in video production and post.
NOTE: Codecs are also referred to as video formats, though that is a less precise term as “video formats” can also include elements outside the codec such as image size or frame rate.
Transcode. To convert media, either audio or video, from one format to another.
CHOOSE WHICH TO USE
While there are always exceptions to the rules, here’s what I’ve come up with:
While Final Cut does transcode all files in the background, which saves time, if all you are doing is cuts-only edits with a bit of B-roll, there’s no big advantage to optimizing, because FCP will render all camera native files as necessary during editing. While exports will take a bit longer than optimized media to allow time for rendering to occur for any files that need it, the time you lose in exporting will be saved in not waiting for optimizing to finish during importing. In other words, you only render the media you export, not all the media you import.
However, most camera native formats – specifically HDV, H.264, AVCHD, AVCCAM, and MPEG-4 – are very mathematically complex. As you start to add layers, effects, color adjustments, or fancy transitions, the amount of calculations your computer needs to process will slow things down. Optimizing converts your footage into something much easier to edit, with virtually no loss in visual quality.
Proxy files are extremely small and are a perfect fit for multicam editing, or working with large resolution files during the rough editing phase. Final Cut makes it easy to switch between proxy and camera source or optimized files for final polish and output. (As a sidelight, proxy files are 1/4 the resolution of the camera native file.)
NOTE: One other element to consider is your hardware. Proxy files will always be easier to edit than optimized files; this is especially true on older/slower systems. However, powerful machines like the new Mac Pro can handle multicam and high-res media without needing to create proxy files. Using a Mac Pro for these tasks can save both time and hard disk space.
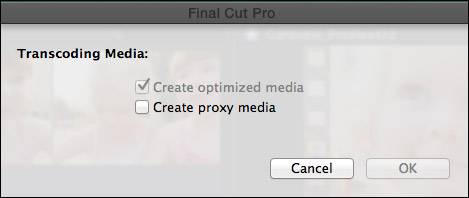
TRANSCODING MEDIA

There are two places where you can transcode media:
NOTE: All transcoding happens in the background. When transcoding each file is complete, Final Cut automatically switches from camera native to optimized files.
The screen shot above illustrates your choices during import:

If you choose to import camera native files then convert some or all of your files after import, choose File > Transcode Media. The screen shot above illustrates your choices.
NOTE: If both camera native and optimized files exist for the same media, FCP X always uses optimized files in the project. When optimized files don’t exist, FCP X uses camera native files. Final Cut never uses proxy files unless you explicitly tell it to.
HOW TO TELL WHAT YOU ARE USING

For this article, I’ve imported a variety of codecs into Final Cut Pro X (v.10.1):
For example, this shot of a Great Blue Heron is H.264. (Um, I know that because I put it into the file name.)
But… what if you don’t know what the codec is?

Right-click (or Control-click if you are using a trackpad) on a column header in the List View of the Browser, then check Codecs to display a new column showing the codec for each clip. (Remember each clip only uses one codec.)

As you can see here, the file names accurately match the codecs. (I dragged the Codecs column header from the far right of the display to place it next to file names.)
NOTE: AAC is MPEG-4 compressed audio. Linear PCM is uncompressed audio; which generally means WAV format. The ProRes and Photo-JPEG clips are silent, which is why no audio file is listed.
The Inspector also provides a way to monitor codecs. Select a clip in the Browser and open the Inspector (Cmd+4)

At the bottom of the Info tab are three icons that indicate whether camera native, optimized or proxy files are present for that clip. In this case, only the camera native files exist, indicated by the green light next to “Original.”

Click the Settings button below these icons and change the Info display to Basic.

Near the top of the Info screen is listed the codec of the camera native clip. Here, for instance, the video codec is Photo-JPEG.
TRANSCODING MEDIA
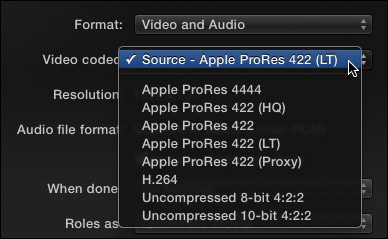
I generally transcode all media during import. It is fast, easy, and doesn’t get in the way of my editing. However, if you need to transcode files later, select the files you want to transcode in the Browser and choose File > Transcode Media. (Media can not be transcoded from the Timeline.)
In this screen shot, Optimized is grayed out because the clip I selected was already in ProRes format. Other formats that generally don’t need optimization include:
NOTE: Both AVCHD and H.264 can be played back in real-time, but on slower systems, or more complex edits, will benefit from being optimized.

If both options are dark, it means that you have imported media that will benefit from optimization. (In general, you only need to create proxy files for multicam editing or media with resolutions above 1080p.)
The time transcoding takes is based upon the duration of your media, the speed of your processor and whether you are editing while the transcoding is going on.
For this example, I created both optimized and proxy files for all these clips.

You can monitor the status of transcoding, and other background tasks, by clicking the clock icon to the left of the timecode display. This opens the Background Tasks window (or type Cmd+9). Here, the clock indicates that transcoding is 100% complete.

While this is what the Background Tasks window looks like when it is transcoding a media file.

Notice that in the Codecs column of the Browser, the actual codec of the camera native file is still indicated; even though transcoded files exist.
NOTE: Optimized files are always ProRes 422, regardless of what choices you make for project render files.

If we go to Inspector > Info > Basic settings, although the codec is listed as Photo-JPEG at the top, the green light icons at the bottom indicate that additional media files now exist.
HERE’S THE RULES
If Optimized files do not exist, FCP X uses camera native files in your project.
If Optimized files do exist, FCP X uses optimized files in your project and ignores the camera native source files.
Proxy files are always ignored, until you change a preference setting.
Apple is very clever in tracking media files. Replacing an old file with a new file of the same name in FCP 7, would cause FCP 7 to link to the new file as though it was the old file.
However, replacing an old file with a new file of the same name in FCP X, disconnects all transcoded media and FCP X treats the new file as a brand new file. This is because Apple tracks more than just the file name in its media management. (Apple calls this tracking the “metadata” of the media file.)
SWITCHING BETWEEN OPTIMIZED AND PROXY FILES

Switching between optimized and proxy files could not be easier. In FCP X (10.1) go to the switch in the upper right corner of the Viewer and choose between Optimized/Original or Proxy files.

In earlier versions of FCP X, go to Preferences > Playback and click the appropriate radio button. (Apple moved both these preference settings to the Viewer switch in the 10.1 release.)
If proxy files exist, the images will instantly switch to proxies.

If proxy files do not exist, you get the dreaded “Missing Proxy” red screen.

Missing proxies can easily be fixed by selecting the media file in the Browser, choosing File > Transcode Media and checking the Proxy checkbox.
EXPORTING
When we export a master file, which is my general recommendation for all exports, the Settings tab gives us a number of options. (Here’s an article that talks about this more: Export a Master File.)
In general, you should set the render codec to the same setting as you plan to export. Then FCP can use the render files and just copy them when exporting. Otherwise, it will regenerate the render files from the source material during the export process, which will take longer. (Though on the new Mac Pro, this time difference may not be significant.) But if you know what your deliverable will be and you will always be creating a ProRes master, then rendering and exporting using the same ProRes setting is a best practice.

Selecting Source for output exports either proxy files, if the project is set to proxy files (as illustrated in the screen shot above)…
Or, if Optimized/Original is checked, selecting Source matches the render file settings in Project Properties (Cmd+J). In the screen shot above, I set render format to ProRes 422 LT, which becomes the output format.
Or, if you want to export a format other than the one you picked for Project Properties, you can choose between one of the five ProRes formats, as well as H.264 and two uncompressed formats.
I generally recommend against compressing H.264 using Final Cut, not because of any bugs, but because I like to create a master file first for archiving, then create compressed files from that master file. In other words, I create all my H.264 versions after the export is complete.
In general, while uncompressed files yield the highest possible quality, they also create the largest file sizes. As an example, I exported a 28-second 1080p 25 fps file.
THAT is quite a range in file sizes!

(Click here for a larger PNG version of this image.)
Could I see a quality difference between Proxy files and everything else? Yes, absolutely. Look at the hair, the artifacts in her skin, and the blockiness around the edges of her mouth.
However, could I see a difference between ProRes 4444 and Uncompressed 10-bit? Not for this 1080p image scaled to 1280 x 720, which is what I would post to the web.
Whether you need, or can even see, the additional image quality provided by these high-end formats is entirely up to you. If you are compressing files for the web, I would suggest you are wasting disk space; stay with ProRes 422. If you are creating files for digital projection to large screens, using high-end formats like ProRes 4444 or Uncompressed is critical, even though the file sizes are enormous.
NOTE: Final Cut does not export camera native media files.
UPDATE – EXPORTING CAMERA NATIVE FILES
After further exploring the Apple website, I learned the following:
However, these camera native exports are “wrapped” in QuickTime, so they are not “camera native,” but they are the same quality as the camera native formats.
There are also two export tools worth mentioning:
When you export using settings different from your render settings, Final Cut calculates the new files using the source media, not the existing render files.
Also, I would also not recommend using “Send to Compressor” unless you need to use a Compressor plug-in and even then I would save your project as a Master file and check the “When done” menu in the Share settings window to “Open with Compressor.” This exports the master file as quickly as possible, then opens it in Compressor where you have all the Compressor settings at your finger tips. If you need specific settings that are only in Compressor, then I would save that as a custom Compressor setting so that it shows up in Final Cut’s Share menu as a Destination.
SUMMARY
My strong recommendation is to set project render file settings to match the format you want to export as your final master file.
Final Cut does a great job of managing media. For most editing tasks, optimizing media is the best and fastest option. But, there are always situations that demand different solutions. And, now, you have a better idea what your options are.

151 Responses to FCP X: When to Use Optimized, Proxy, or Native Media
← Older Comments Newer Comments →-
 Dan Durbin says:
June 17, 2018 at 11:00 am
-
 Rachel Brennecke says:
July 27, 2018 at 8:14 am
-
 Larry says:
July 27, 2018 at 8:34 am
-
 Slavik Boyechko says:
August 7, 2018 at 12:03 am
-
 Larry says:
August 7, 2018 at 8:46 am
-
 Jacob Javor says:
August 8, 2018 at 7:01 pm
-
 Massimo says:
November 18, 2018 at 7:25 am
-
 Larry says:
November 18, 2018 at 8:11 am
-
 Massimo says:
November 18, 2018 at 1:01 pm
-
 Larry says:
November 18, 2018 at 1:04 pm
-
 Shu says:
November 21, 2018 at 9:09 pm
-
 Larry says:
November 22, 2018 at 8:40 am
-
 Shu says:
November 26, 2018 at 11:37 am
-
 Dennis says:
January 27, 2019 at 4:16 am
-
 Larry says:
January 27, 2019 at 8:48 am
-
 David says:
May 14, 2019 at 11:22 pm
-
 Larry says:
May 15, 2019 at 5:51 am
-
 David says:
May 15, 2019 at 7:08 pm
-
 Oleksiy says:
August 26, 2019 at 11:00 am
-
 Larry says:
August 26, 2019 at 1:29 pm
← Older Comments Newer Comments →Thanks Larry.
This is so helpful! My question is where are the optimized 422 files stored? Just switched from 7 to X and was used to creating new folders for my 422 optimized media before starting my project. Letting FCP X do it generates (similar to iTunes) a closed icon called “Library”, only I can’t see the actual 422 files. I like knowing where all the hard files are, so not being able to see the 422 files generated from importing through FCP instead of first generating all my media into 422 through Compressor is unsettling. Any help on this most welcome. Thanks!
Rachel:
By default, all files generated by FCP X, including optimized files, are stored in the Library. However, you can change this by modifying Library Properties. Here’s a short video that explains how.
https://larryjordan.com/articles/fcp-x-library-properties-video/
Larry
Thanks Larry, I’ve come back to this post several times, while messing around with modifying Library Properties and trying to hack a Proxy workflow that uses camera-made proxies. Still working on it. But did figure out a temporary workaround in the meantime: http://www.geardads.com/fcpx-proxy-editing-relinking-external-proxies-and-temp-media/
Cheers,
Slavik
Slavic:
This is an EXCELLENT article and I encourage everyone working with proxies to read it. I also agree that, when working with stock media and other temp files, the current proxy system does not work well. Hopefully, this will be addressed in a future update.
Thanks for sharing.
Larry
Thanks Larry. Just learned something because of you.
Hi Larry
I am running into a dilemma for my Panasonic GH5 AVC Intra files, They have 400 Mbps bitrate so they are quite bit nearly as big as prores. I would prefer not to optimise them and as they are intra coded there should not be a reason to do so. However FCPX uses prores for rendering and I am under the impression that when it jumps from render files to original file there are problems as I get choppy playback
I believe Panasonic AVC Intra 400 are really solid files and I am not sure if I am loosing something converting to prores 422 so I would rather keep them where they are. Should I instead optimise in order to avoid other issues?
Massimo:
AVC-Intra, unlike AVCHD, is already optimized. So FCP X will not create optimized media when you use it. It is a good format.
Given the nature of AVC-Intro, you should not see any image difference when rendering using ProRes 422. If you do, change your render files to ProRes 4444.
Larry
Thank you for your reply. You are totally correct after the clip is analysed FCPX will not create an optimised file and just leave it as is.
The issue I have with the files is that they are 10 bit colour see mediainfo output here
Format :
AVC
Format/Info :
Advanced Video Codec
Format profile :
High 4:2:2 Intra@L5.1
Format settings, CABAC :
No
Format settings, GOP :
N=1
Codec ID :
avc1
Codec ID/Info :
Advanced Video Coding
Duration :
38 s 400 ms
Bit rate mode :
Variable
Bit rate :
399 Mb/s
Width :
3 840 pixels
Height :
2 160 pixels
Display aspect ratio :
16:9
Frame rate mode :
Constant
Frame rate :
25.000 FPS
Standard :
Component
Color space :
YUV
Chroma subsampling :
4:2:2
Bit depth :
10 bits
Scan type :
Progressive
Bits/(Pixel*Frame) :
1.926
Stream size :
1.79 GiB (99%)
Encoded date :
UTC 2018-09-17 06:35:13
Tagged date :
UTC 2018-09-17 06:35:13
Color range :
Full
Color primaries :
BT.709
Transfer characteristics :
BT.709
Matrix coefficients :
BT.709
What seems to happen is that in situation where there is a transition rendered in prores and original clip in AVC there are some hiccups.
Also it is very hard to playback the file even just the original from FCPX
So I have resorted to use proxies in order not to incur stutter, of course this is not the way forward for colour correction and other editing…
I am now thinking about a more serious eGPU I tried the blackmagic RX 580 but it would still stutter so I am now thinking about a Vega 64…
In essence it seems my Mac Mini 2018 6 core is not strong enough to play those files once the hardware acceleration goes away…
Massimo:
I’m not sure what’s going on here. Both AVC-Intra and ProRes 422 are:
* Rec. 709 color space
* 10-bit
* 422 color sampling
And, once the file is rendered, it is no bigger than an AVC-Intra file – well, pretty close at least.
There should not be a stutter. I recommend you contact Apple Support. Also, try rendering in ProRes 4444 to see if the problem goes away.
Larry
Hi Larry, I’m using FCP 10.4.4. I believe I have a good understanding of transcoding/optimizing media and its purpose, however, I need further clarification re: exporting/sharing the file.
Hypothetically speaking, let’s say I’ve imported media from my GH5 with a bit rate of ~2000Mbps/4:2:2 10bit and transcoded to ProRes422. I understand “ProRes” is a high-quality video compression format, and per Apple’s website, ProRes422 has a target data rate of “approximately 147 Mbps at 1920×1080 and 29.97 fps”.
On export, let’s say I chose the Master file option. Given the above scenario, if my main goal was to produce the highest possible quality file, wouldn’t it make sense for me to export using the video codec “ProRes422 HQ” or higher since they support higher bit rates? Or what would I need to choose in order to get the “best” quality – comparable to my original media? Would I need to choose the “Uncompressed” 8 or 10-bit option? I have “Optimized/Original” set for Media, but it seems that’s only part of the requirement since choosing the correct codec is also important. Am I looking at this correctly?
Lastly, if I chose ProRes422 (source), would that mean the output quality would be slightly lower than my original media?
P.S. I’m sure the ultimate decision of which codec to choose depends on the intended use of the Master file…but even if you are doing it for archival/future editing…wouldn’t you also want the highest possible quality?
Shu:
First, the GH5 doesn’t record at 2000 Mbps, it records at 100 – 150 Mbps, which is roughly the same range as ProRes 422.
Second, unless you are shooting a raw file exported out of the GH5 and captured on an external hard disk, the video the GH5 shoots is highly compressed – especially in 4K. This compression will do more to reduce your image quality than any transcoding will do.
So, would it make sense to export at ProRes 422 HQ? Maybe, but I doubt if you’d see a difference in image quality. The file sizes will be bigger, though. Try it. If you can see a difference, use it. If not, stay with ProRes 422.
Don’t use the Uncompressed codec. It is older and less flexible than ProRes.
Here’s a good analogy. Imagine you have a five gallon bucket filled with water. If you pour it into a bathtub, you don’t lose anything. If you pour it into a one-quart pitcher, you lose a lot. If you want the absolute highest quality for your media, use ProRes 4444. It’s a bathtub. All the image quality of your media – audio and video – will fully transfer and nothing will be lost. But your files will be REALLY big!
If you want reasonable sized files, with excellent quality, given that you are shooting a highly compressed format (H.264/MP4) in the GH5, ProRes 422 will be fine.
If you were shooting RAW images in the GH5 and recording them to a separate hard disk, I would transcode to ProRes 4444.
Larry
Larry,
Thanks for the quick reply and great analogy re: bucket/tub/pitcher – makes a lot of sense. Re: 2000 Mbps…that was actually a typo. I meant “200 Mbps” in Full HD. I’m also aware that the GH5 can record up to 400Mbps in 4K/C4K modes; however, since the file sizes are ridiculous at those settings, I hardly ever use them.
I’ll test a couple minutes of test footage exported in ProRes 422 HQ and ProsRes 4444 and compare the quality to that of ProRes 422. As you mentioned, the difference in quality (specifically, in 422 HQ), might be small – esp considering playback screen-size(s).
Hi Larry,
Currently I have an issue where FCPX 10.4.5 does not generate a proxy file. There are two original files that are shot with the same camera and have the same format. The only difference is the size. All originals are externally managed. The alias link files in the library are both pointing to the correct original files. But when generating the proxy files, only one is generated and the other not. Switching to proxy view show the Missing FIle error, which is correct, because the proxy file for one original is not generated. Removing all generated library files and relinking does not solve the solution. Removing the one file from the library removes the alias in the library. After importing that file again with the option “Leav in place” and “Generate Proxy” gives the same behaviour. No proxy is generated. Only the alias. At file level, the rights are the same. Both files play fine, via Quick Time and in FCPX.
Do you have any idea what is going on here and how to fix this (beside only to use Original view 😉 ?
Thanks in advance for your help.
Dennis
The Netherlands
Dennis:
Very strange. Three things to try:
1. Select the file in the Browser and choose File > Transcode Media and select Proxy. See if generating a proxy after the file has been imported works.
2. Trash FCP X preferences. Here’s how:
https://larryjordan.com/articles/trouble-shoot-your-apple-final-cut-pro-x-system/
3. Call Apple Support. This should not be happening.
Larry
Thank you for taking the time to write this. I find your articles are more helpful than the information that’s available through Apple!
I have three questions and I’m hoping you can help.
1) If I bring h.264 video from a library into a project and it hasn’t been transcoded, will FCPX render it in the background before applying effects such as sharpening or de-noising?
2) If the above is true, what happens if I set the rendering in a project to ProRes 422 LT? will it only create LT files in the background, or will it also create and save regular 422 files? I ask because I’m concerned with saving hard drive space.
3) When applying effects to media recorded in h264 from a consumer-grade camera like a smartphone, is there a quality advantage to using ProRes 422 over ProRes 422 LT?
4) When exporting media, would ProRes 422 have a speed advantage over ProRes 422 LT? (To clarify: When exporting media, would projects that have a RENDER setting of ProRes 422 have a speed advantage over projects with a render setting of ProRes 422 LT? (I would be keeping the export setting the same as whichever codec chosen for the project)
Thanks!
David:
Great questions!
1. You are confusing rendering with optimizing. When you import H.264 footage AND you optimize, your media is converted to ProRes 422 as part of the import process, before editing even starts. Rendering is done during editing as effects and transitions are applied to clips. So, the answer to your question is rendering is only done as effects are applied to existing media.
2. FCP X only creates render files that match your project settings. Optimizing, which is done during import, always create ProRes 422 files.
3. Theoretically, yes. ProRes 422 has a higher bandwidth, providing the potential for higher image quality in gradients and detail. However, you may not be able to see a difference.
4. This is a GREAT question which I’ve never tested. I’m planning to spend Friday running tests and will write about this in next week’s newsletter.
Larry
Yes, I was confused about rendering vs optimizing -but I’m happy to report that it makes sense to me now.
I’ll sign up for the newsletter and watch for your test. I’m intrigued!
Thank you for your reply 🙂
Hi, Larry,
I had read two your articles about proxy and optimized files in fcpx. I understand all, however, I couldn’t find information about native file in full hd versus proxy or optimized ProRes.
I have native files from camera 1920×1080 60p codec aac h.264. I didn’t transcode to proxy or optimized when I imported them. When I transcode later to proxy I get files with larger size than original. Is it all right? I work on MacBook and I want to get smaller file.
The second question. My project parameters are 1920×1080 50p for native files h.264 as I wrote earlier. Do you mean that I have to export them in ProRes 422 and after that transcode to h.264?
Thank you.
Oleksiy:
Thanks for writing.
H.264 is extremely compressed, which creates very small files. However, in so doing, it creates 8-bit files which slower system have a hard time editing; meaning that they create dropped frames on playback or effects take a long time to render.
ProRes Proxy creates files which are optimized for editing. This means they are 10-bit – which is better for color correction – and less compressed – which means they render faster when you are creating effects or exporting. However, because these files are 10-bit, they require more storage space (larger) than H.264. However, when compared to optimized files – ProRes 422 – ProRes Proxy is about 6X smaller.
While NOT required, if you are exporting a project with color correction or gradients or other image effects, it is often best to export using ProRes 422 to create a high-quality master file which you can use to create different deliverables or simply archive for the future.
If, on the other hand, you only need to create one copy of your project, it doesn’t have a lot of color grading or effects, you can easily export H.264. However, it is unwise to compress that H.264 file into different formats, because compressing an already compressed file does not do good things to image quality.
Larry