
![]() [ Read my product review disclosure statement here. ]
[ Read my product review disclosure statement here. ]
OWC is not the first name that pops to mind when someone says “servers.” Recently, OWC asked if I was interested in reviewing one of their Jupiter servers. I am very familiar with OWC’s RAIDs and other locally-connected storage. I also knew they recently acquired the Jellyfish line of video-optimized servers. But “Jupiter” I had not heard of before.
I told them I was interested and a few days later a unit showed up on a two-week loan. Here’s what I learned.
EXECUTIVE SUMMARY
The OWC Jupiter Mini server is a capable, general-purpose desktop server that, once you get it connected, provides high-speed performance with the ease-of-use that you expect from a server.
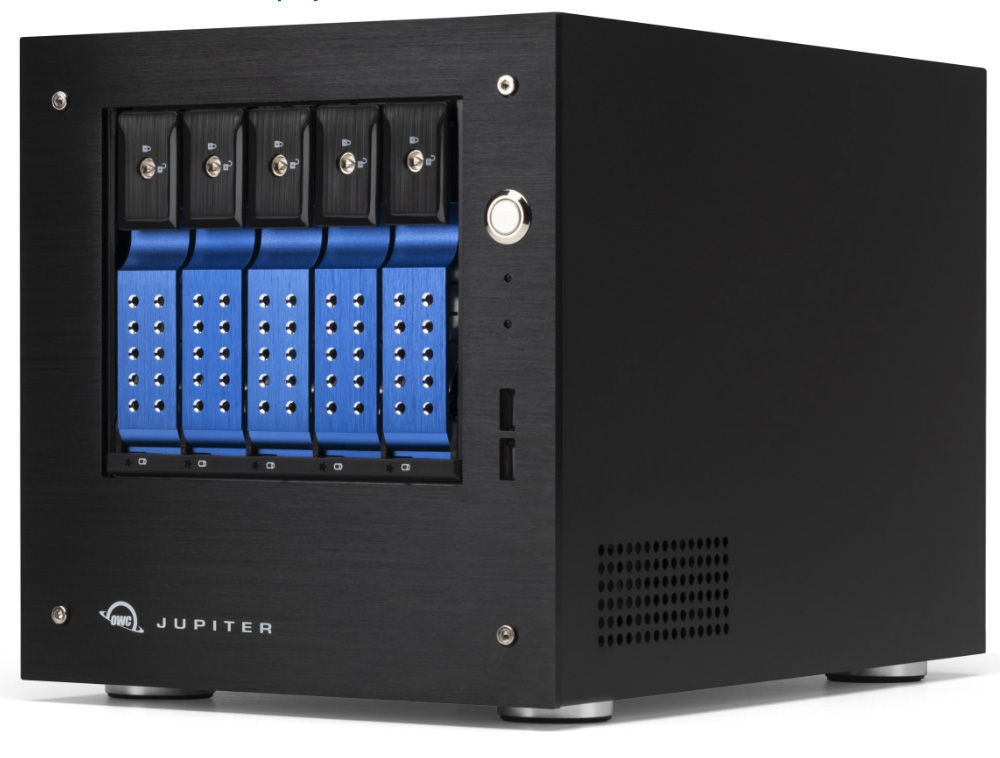
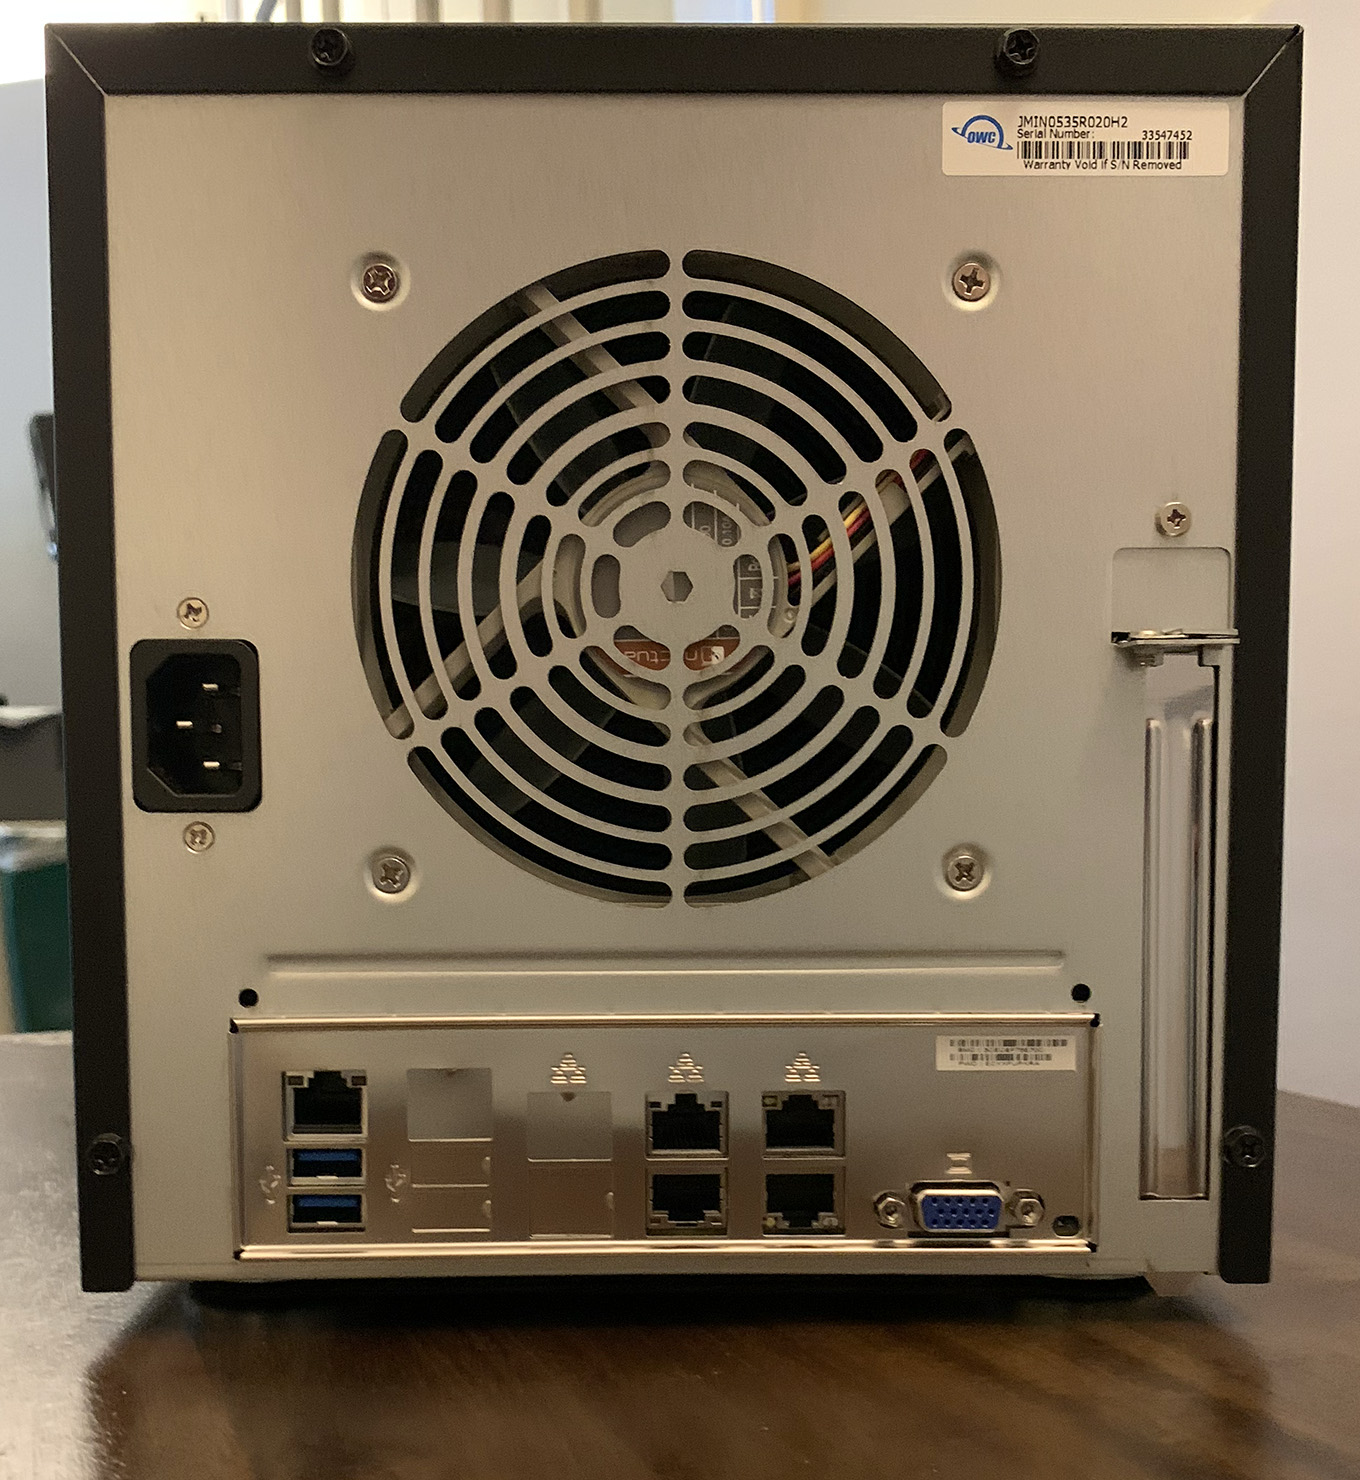
Featuring two built-in 10G Ethernet connections, the Jupiter Mini sits on a bookshelf, holds five hard disks and can be configured with a capacity ranging from 20 to 100 TB. It’s about 9 inches (22 cm) square and 13″ (33 cm) deep, solid black and, even when running, fairly quiet.
NOTE: Spinning hard disks always make noise, especially when they are actively seeking data. As well, the fan on the back makes a soft whoosh. Still the Jupiter is no louder than my two Synology servers. Besides, you would not generally put a server on your desk, nor would it be faster if you did.
The Jupiter Mini is the entry into the Jupiter server family. All other Jupiter servers are rack-mounted, with more drives. All Jupiter servers use the same operating system: TrueNAS.
TrueNAS is software I had not heard of before. However, it is widely used in the enterprise space. (Here’s a link to learn more.) TrueNAS supports Mac, Windows and Linus systems. TrueNAS uses the ZFS file system, another stalwart in the enterprise.
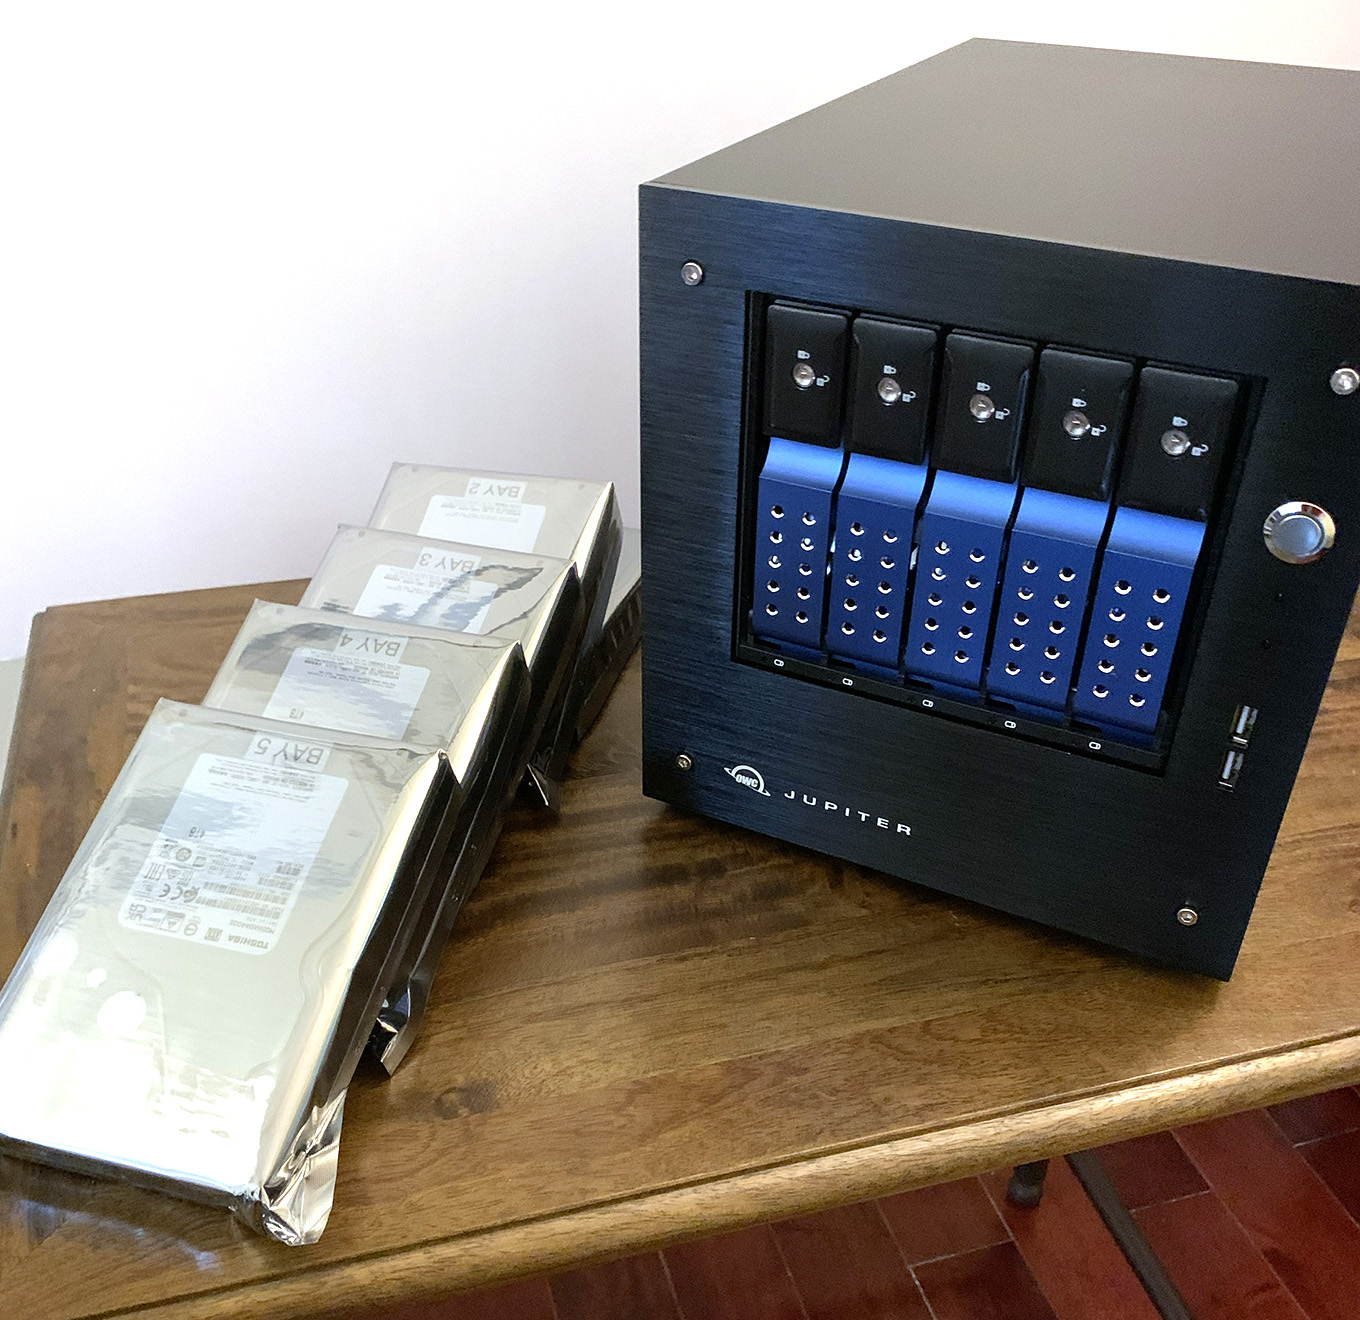
The unit arrived with all software installed and configured, along with five drives tested and labeled, but packaged separately.
OWC states that you can connect “50+ users without slowdowns thanks to [an] Enterprise-grade Intel Xeon processor and 32GB of ECC DRAM.” My testing shows there will be slow-downs if you connect a computer using Ethernet speeds of 2.5G or faster, however, for 1G connections or when working with smaller files, these slowdowns won’t materially affect performance.
NOTE: When planning storage capacity, the 20 TB of raw capacity formats to 15.82 TB. So, assume a 20% capacity loss after installation and formatting is complete. This formatting difference is true for all HDD systems.
Connecting the server to a network is non-trivial and the User Guide provides inadequate answers. However, once the unit is operational, its speeds are at least twice as fast as my five-drive Synology 1517+ server. It easily supports a mix of 1G, 2.5G, 5G and 10G Ethernet connections from multiple computers and works just as you would expect for any server.
If you are looking for a server optimized for high-speed video editing, consider the OWC Jellyfish. If you need a reliable server for everything else in your business, the Jupiter Mini should be one you consider. Just give yourself time to connect it to your network.
Manufacturer: OWC
Product: OWC Jupiter Mini
Website: https://eshop.macsales.com/item/OWC/N0535R020H2/
Price: $2,999 – $5,499, depending upon capacity
Price as tested: $2,999 (20 TB capacity)
Includes 3-year OWC warranty covering server and hard drives
THE RABBIT HOLE OPENS
I’ve owned and administered Synology servers for over ten years. In a past life, I worked in marketing for a company that made data networking hardware. When the unit arrived, I figured that setup should be simple.
Never tempt fate. It took me three days to get this working.
Once I got past setup, the server worked fine. But, it took far too long to get past setup.
SETUP
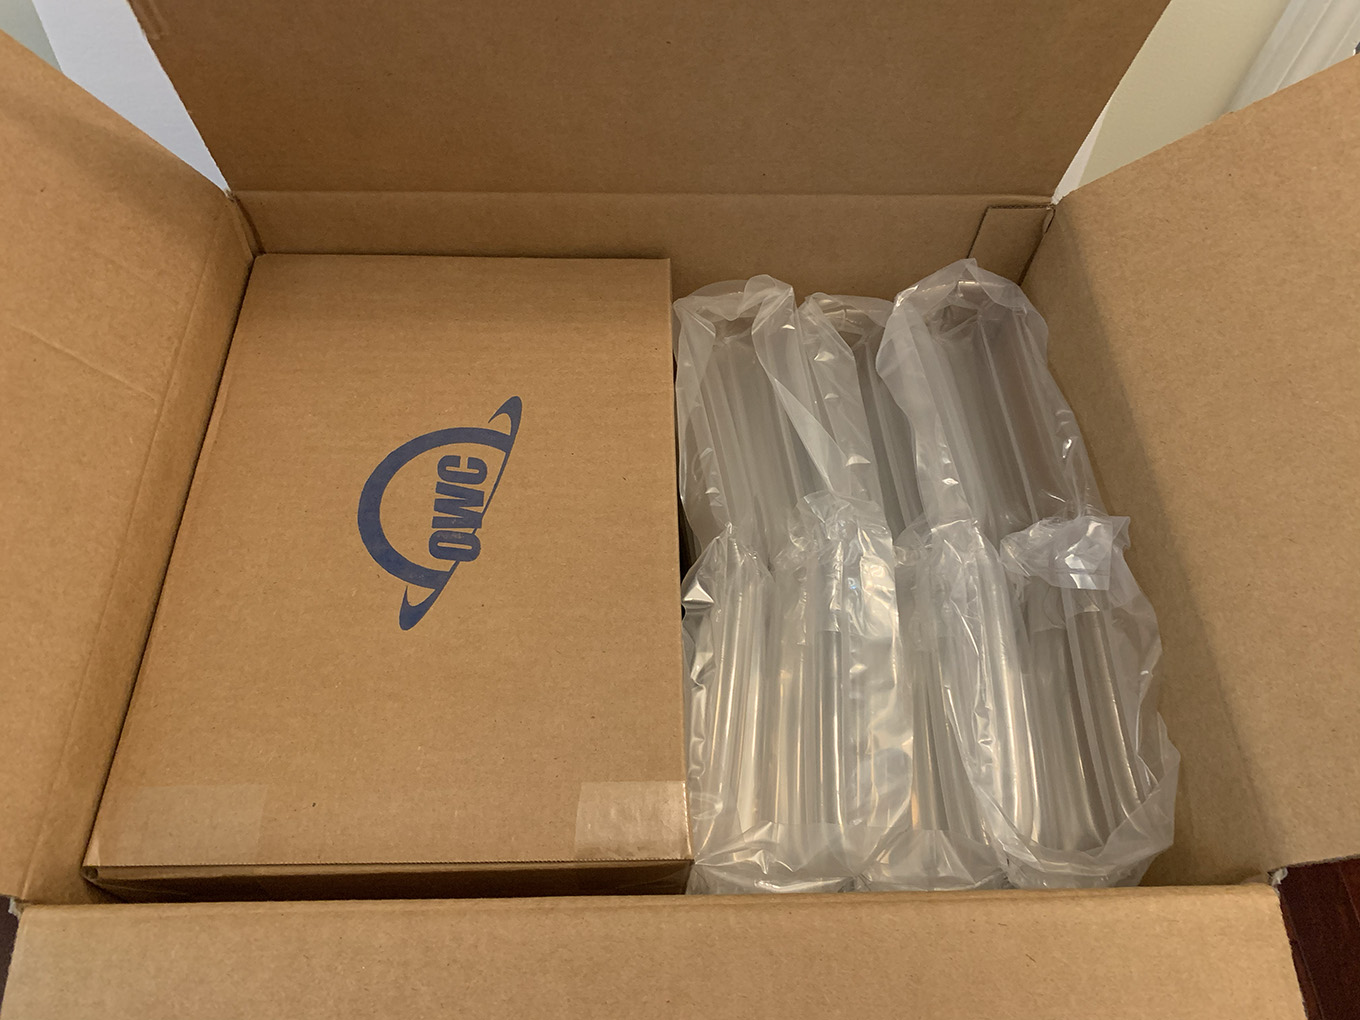
Like all OWC products, the unit ships in environmentally-friendly packaging. The cardboard box holds the server, the plastic puff-sleeves hold the five hard drives.
Because the unit is fully installed and tested before shipping, the drives are labeled for specific slots However, the User Guide does not explain if the drives are labeled to be inserted from left-to-right or right-to-left. Since the order drives are installed makes a BIG difference, this omission was a pre-cursor to the connection problems to come.
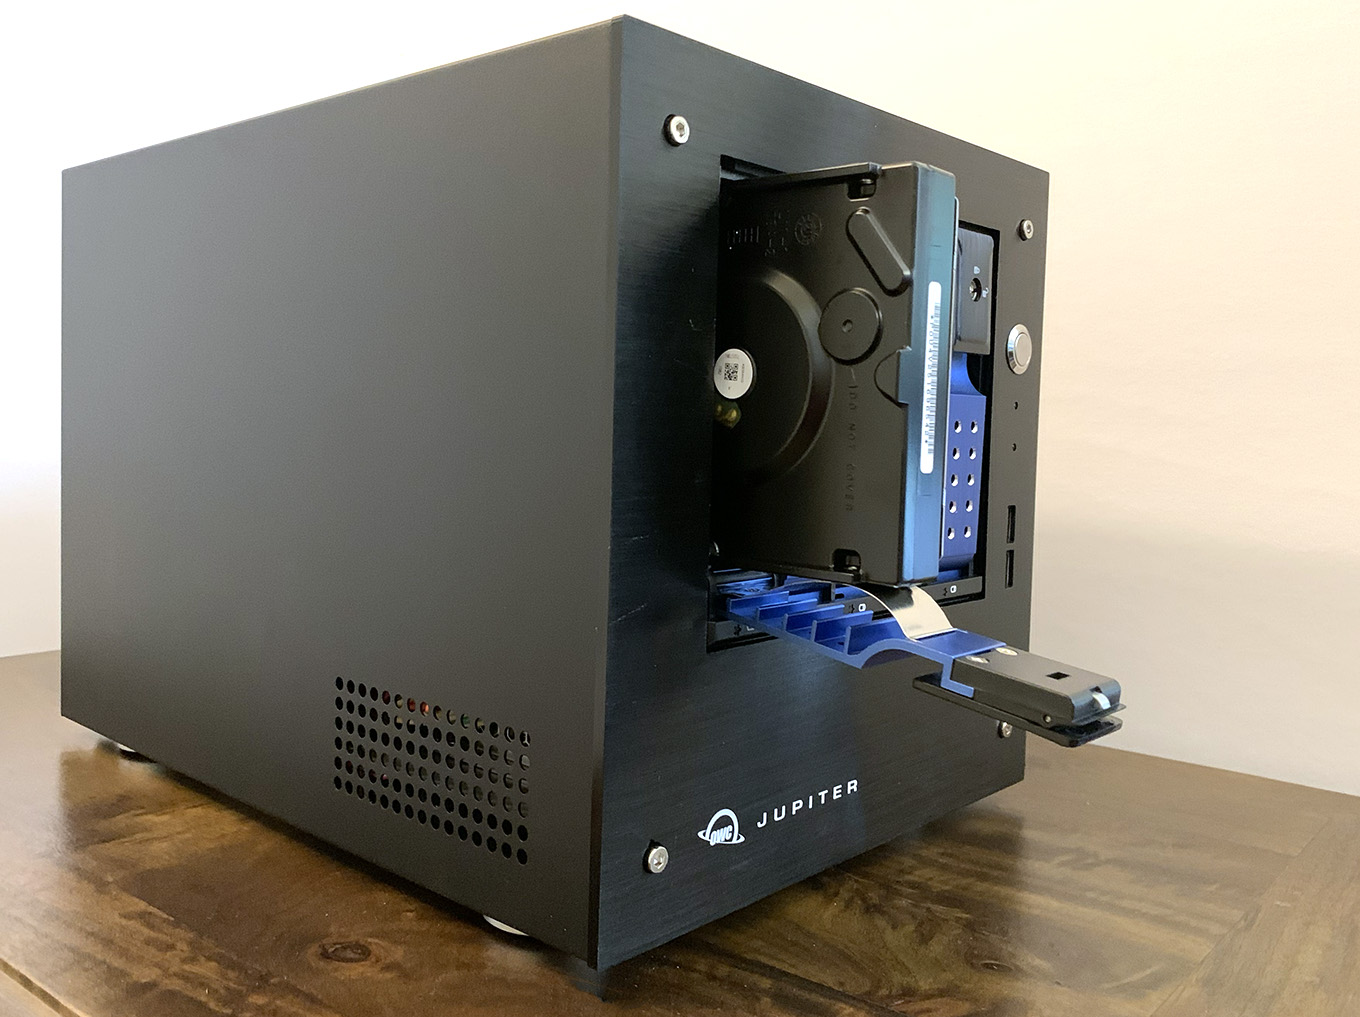
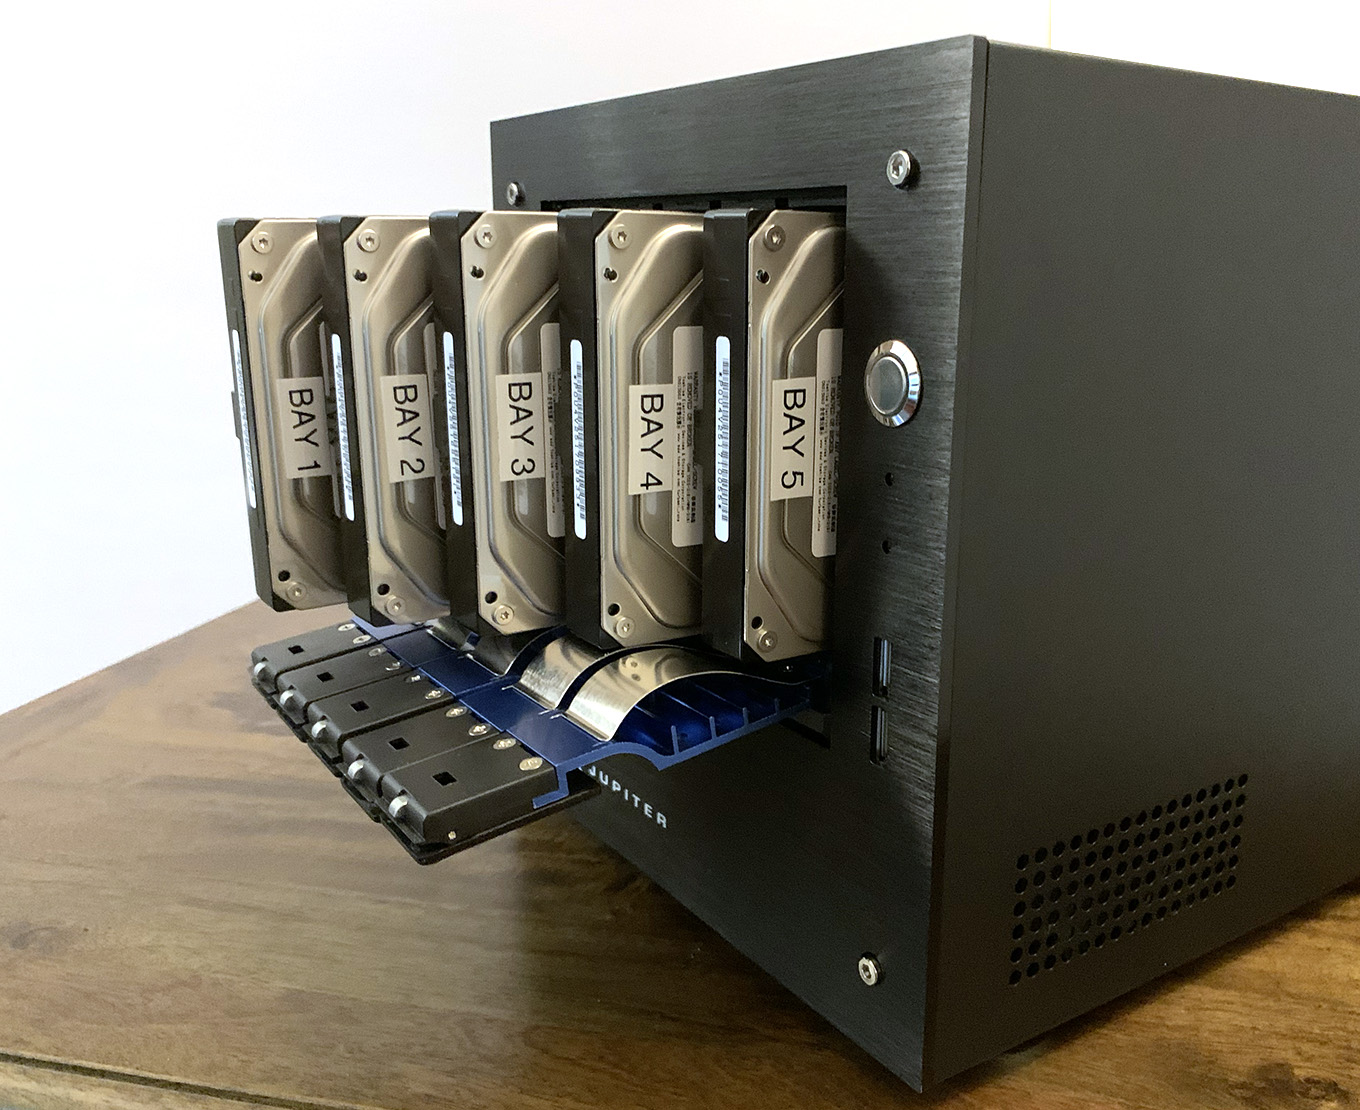
To insert a drive, lift the blue handle to reveal a drive slot. Slide the drive in, label facing right (another point missing in the User Guide) until you feel resistance, then lift the drive tray back up to firmly seat the drive.
NOTE: Drives don’t need to be locked, but it is a good idea to lock drives to prevent someone from accidentally disconnecting a drive. Not that a nine-year-old would ever wonder “what would happen if I lift this?”
I really like how easy it is to install drives. No sleds, no screws, no problems.
Once all the drives are installed, do NOT turn the unit on or connect the Ethernet cable…. Yet. However, power is on to the interface ports in the back and remains on, regardless of whether the server is powered on or not.
CONFIGURE YOUR COMPUTER
If your switch only supports 1G EtherNet speeds, you don’t need to change anything on your computer. However, you will get faster performance from the server if the server and switch supports faster speeds.
These faster speeds can be achieved two ways, both of which the Jupiter supports:
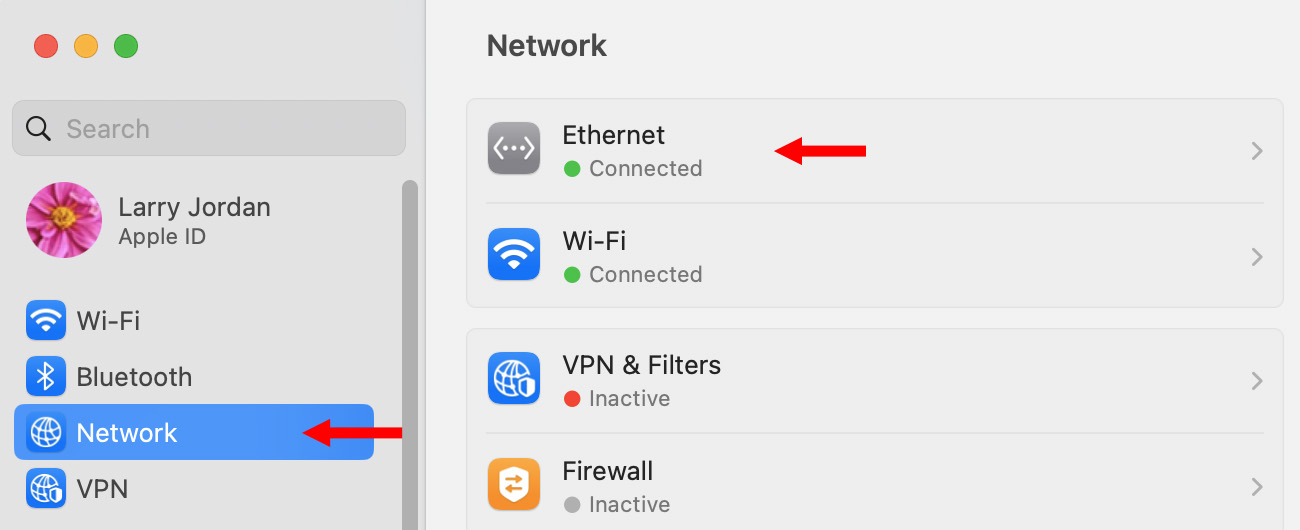
If your Mac connects to the switch at speeds faster than 1G – for example, 2.5, 5, and 10G are common speed options – you need to change one network setting on your computer.
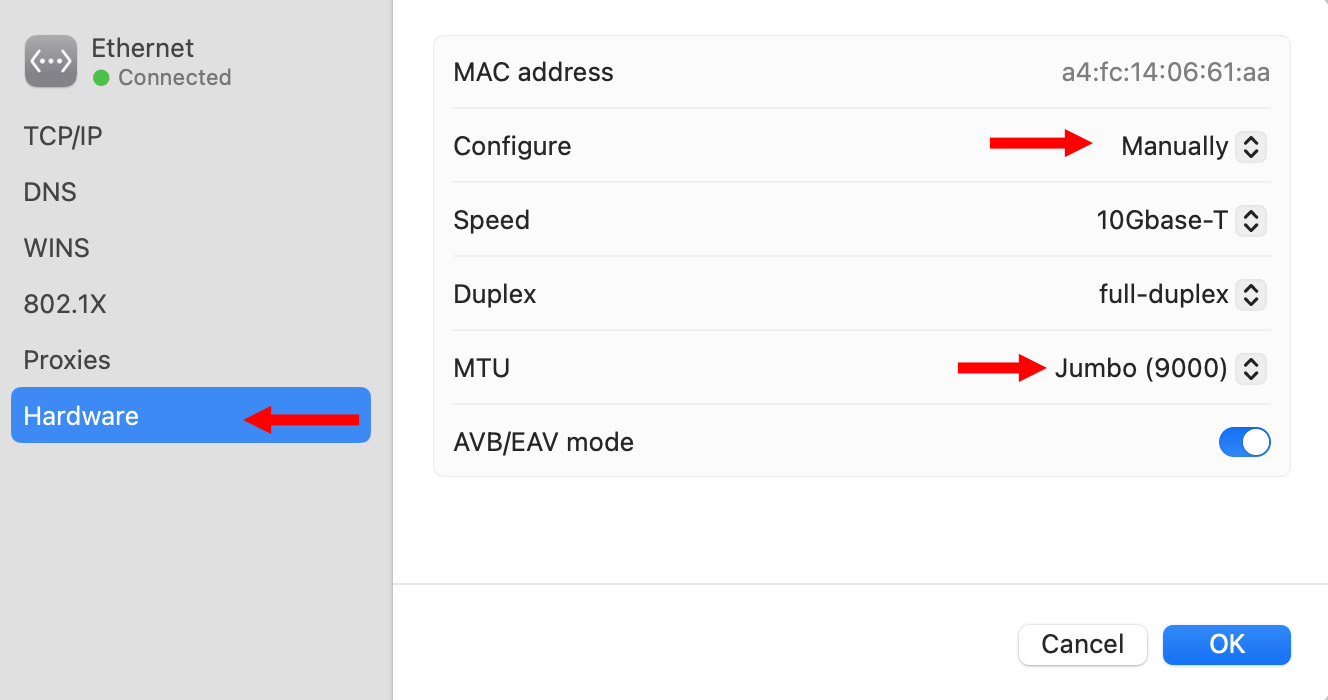
This setting increases the amount of data sent with each Ethernet packet, which increases the speed of data transfer between your computer and the switch up to 16%.
CONNECT THE SWITCH TO THE NETWORK
The User Guide does not explain this, but the Ethernet ports on the back of the unit are not the same. By default, the server uses a static IP address (one that doesn’t change when you turn the unit off and on) of 192.168.0.10. This is a perfectly fine IP address, but in almost all cases, it won’t match any of the addresses on your network, which means that you can’t connect to the switch.
The User Guide describes a series of steps to reset the IP address – none of which worked for me. The basic problem is that changing the IP address of my computer to connect to the switch disconnected it from my current network and lost access to the web – which I was using to read the User Guide on how to install the system.
Sigh…

(Click to see larger image.)
As you can see in this LANscan screen shot, the Jupiter (top line) has no assigned IP address; even though it did.
Theoretically, you can connect a laptop directly into one of the Ethernet ports on the back. I never got that to work, either.
NOTE: One of my hesitations in connecting a computer directly to a server is that the pin connections on Ethernet cables that connect to a server are different from those that connect to a computer. (The Tx/Rx lines are reversed.) OWC support told me: “Those days are long gone. The NICs on all modern computers (Apple and otherwise) auto-sense the Tx/Rx pairing and adjust accordingly.”
Tech support at OWC was exceedingly helpful and, ultimately, we got this connected. But it took a couple of days and one more purchase.
The easiest way to configure the server to connect to a network is to connect a keyboard and monitor to the back of the unit. However, most computer monitors today use HDMI, which is digital. The server uses VGA, which is analog. (You can’t use a USB-to-HDMI cable to connect the monitor.)
Instead, you need a $15 Benfei VGA to HDMI active connector from Amazon. Connect it to the VGA port on the server, connect an HDMI monitor to the adapter, connect a wired USB keyboard to either USB port, then turn the server power on.
Press the Enter key a couple of times, then sit back and watch a whole lot of text fly by as the system boots up.
After a couple of minutes, a text menu appears.
At this point you can disconnect the monitor and keyboard. Once the IP address is set, the server is ready to use as the other server setup settings from OWC are fine.
Knowing this one step – and having the right monitor adapter – could have saved me two days of failed effort, buying the wrong cables and lots of frustration. But the User Guide is especially obtuse on how to set the right IP address.
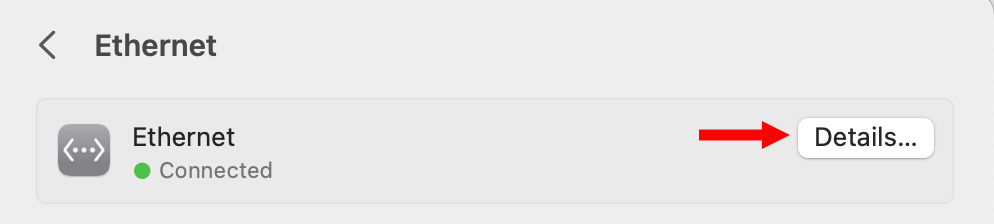
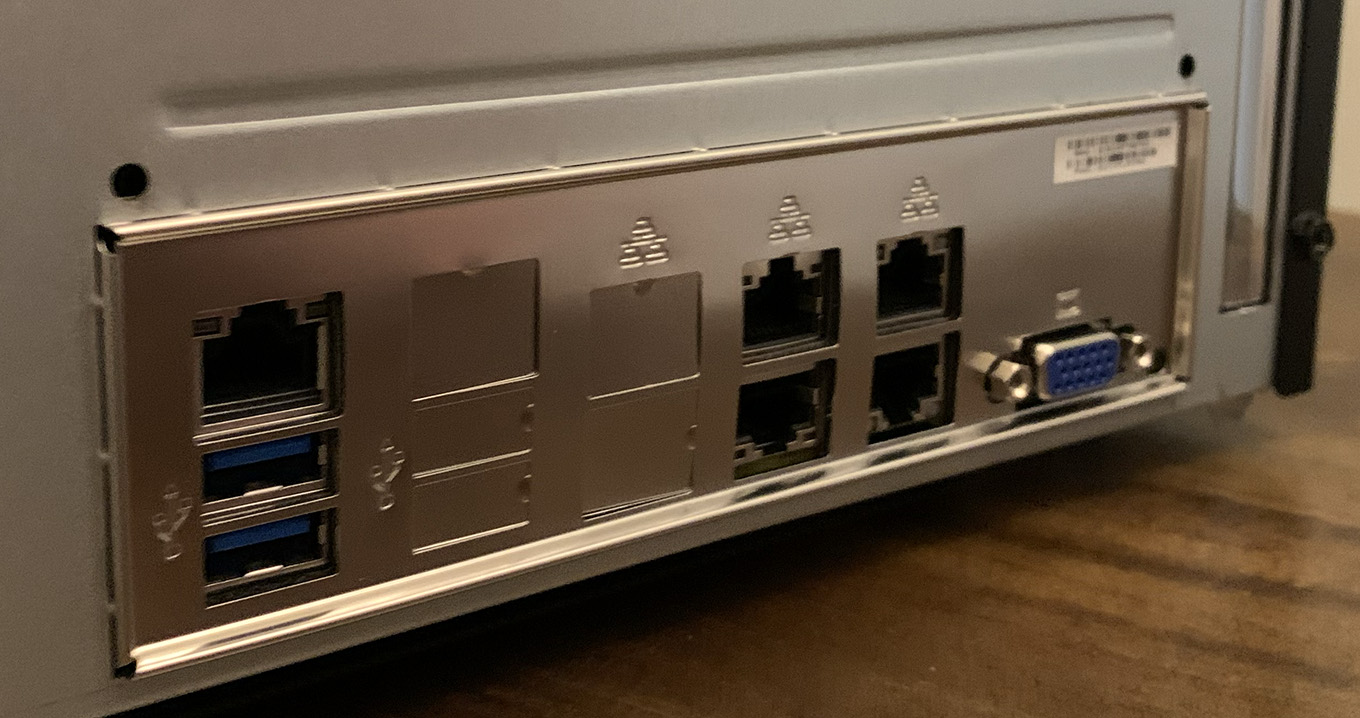
CONNECT THE ETHERNET CABLE
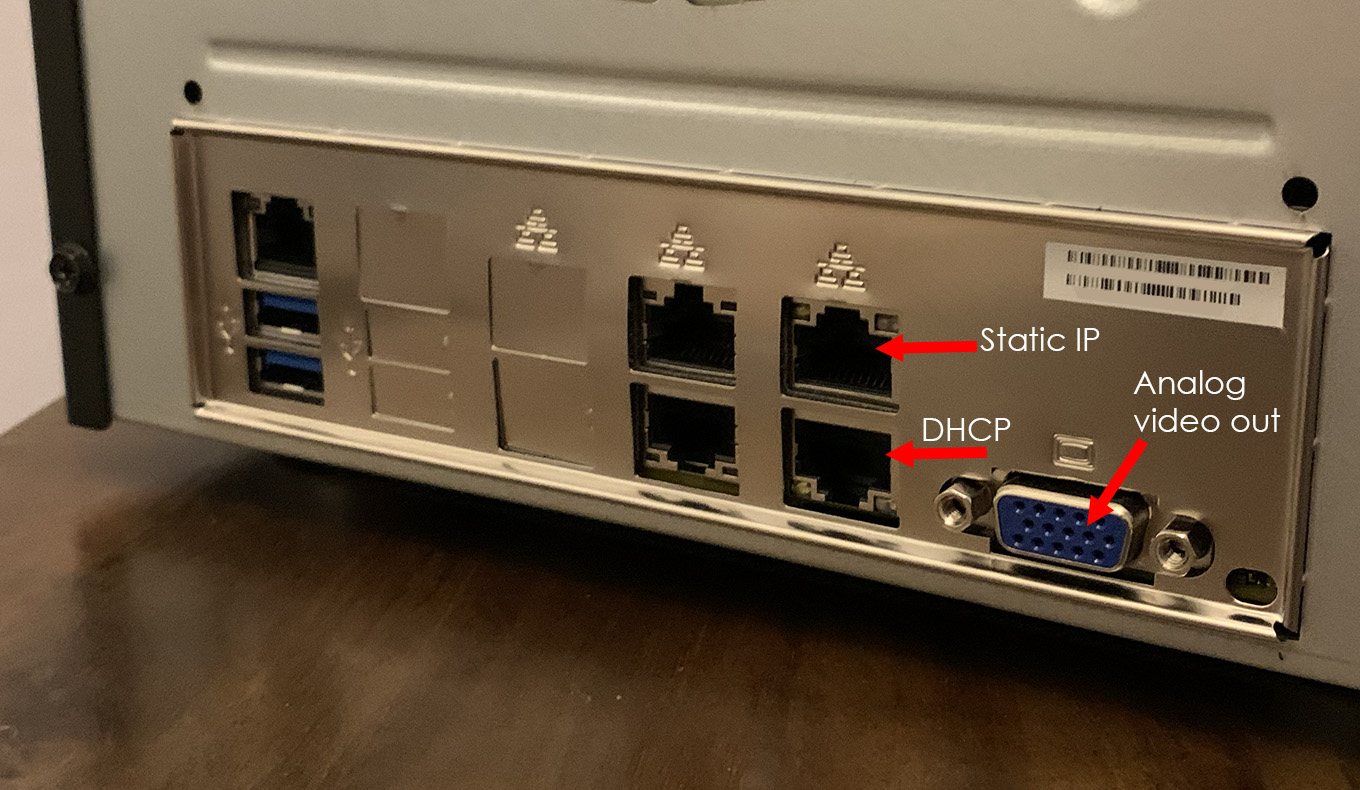
When you look at the back, make sure to connect the Ethernet cable to your switch to the top right port (“Static IP”). This is hard-wired to support the static IP address you just entered. Both the top right and bottom right ports support 10G speeds.
The bottom right port supports DHCP, which means the address could change each time you power up the server. DHCP is perfect for computers, but servers need to be locked to a single address. Connect the Ethernet cable to the correct port.
Turn the power on, then wait 3-5 minutes for the system to boot up, log into the network and get ready to run.
NOTE: OWC support told me that the remaining Ethernet ports are used for:
THE SERVER SOFTWARE INTERFACE
Servers are computers. They have operating systems with settings that run programs. The operating system for Jupiter is TrueNAS, running the ZFS file system. Both are installed on the server by OWC.
NOTE Synology is famous for all the different apps that run on their servers. The Jupiter system is designed more for serving data than running apps.
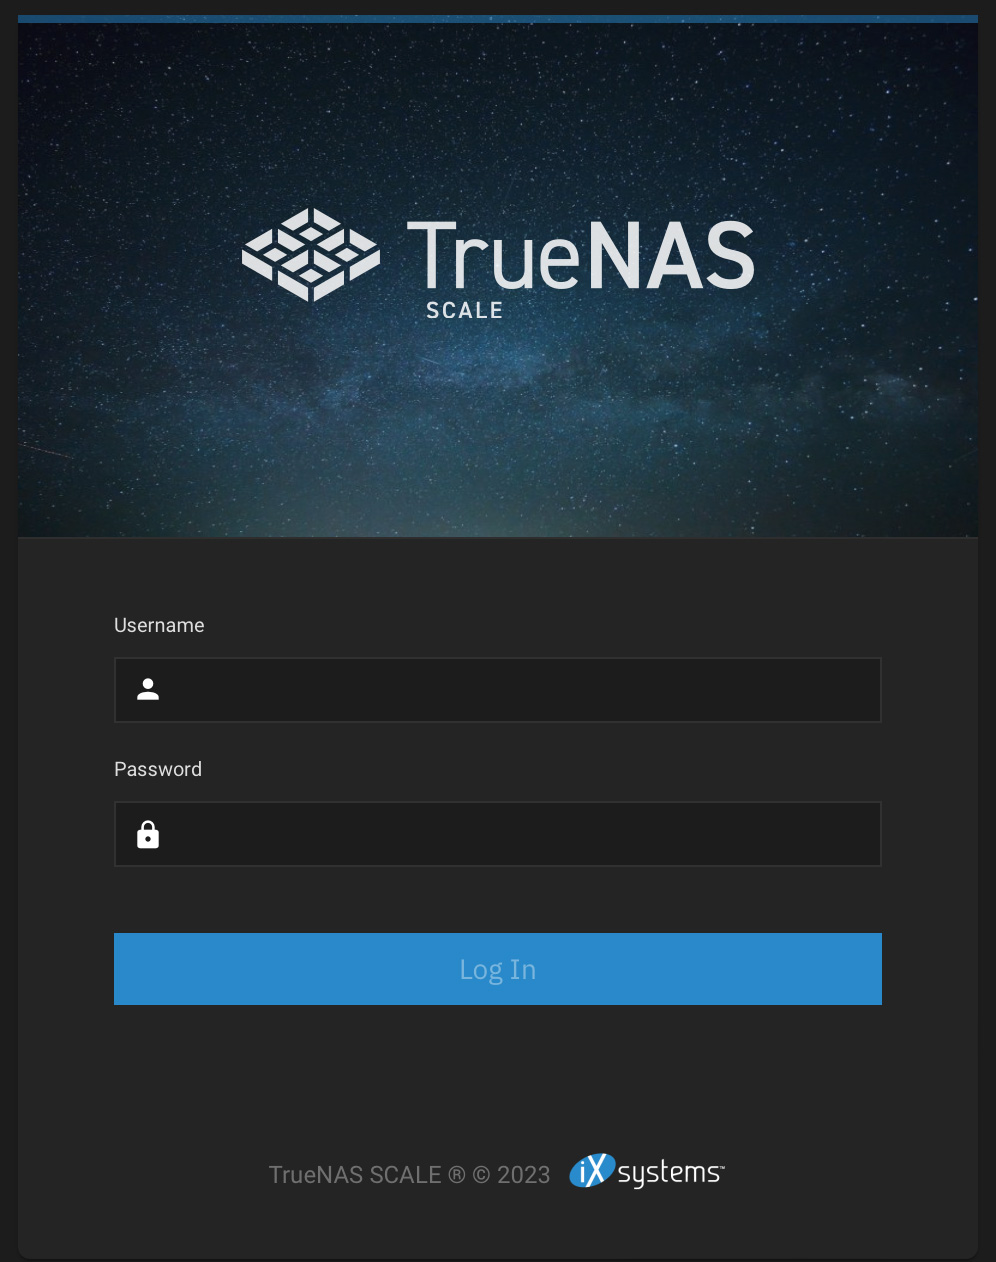
To access the network operating system, open a browser and type in the static IP address you created during setup.
Enter a user name and password. The defaults will be supplied by OWC when you buy the unit, as they changed them recently.

(Click to see larger image.)
This is the main dashboard. Relax. You will most likely never need to mess with this stuff. Whew! But here are three things to watch.
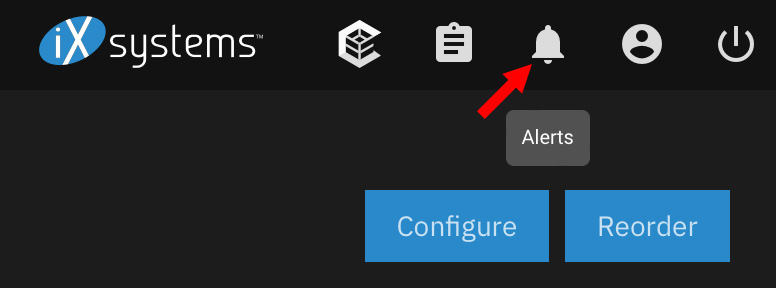
If something is happening to your system, an alert will appear (red arrow). Click this icon to learn more.
NOTE: OWC support recommends checking this icon at the beginning and end of each work week. In other words, regularly.
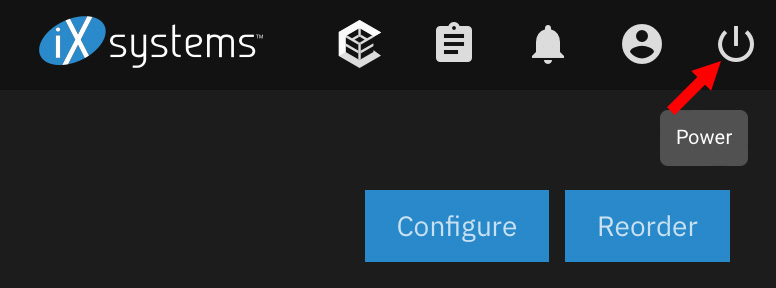
It is always a good idea to restart a server every week or so. This does NOT erase any data stored on the server, but it refreshes the system before problems start.
To do this, click the Power button (red arrow).

(Click to see larger image.)
Finally, if you want to see how busy your server is – and this is something I enjoy checking – scroll down and look at the dashboard. This shows current data traffic, how hard the system is working and other interesting stuff.
You don’t need to do anything here – just enjoy the view, then get back to work.
NOTE: Like all software, TrueNAS is updated regularly. OWC has locked the version of TrueNAS to 22.12.3 and will send out update recommendations if there is an update that affects relevant features/security. OWC’s Chief Solutions Architect, Tim Jones and his team, constantly monitor and evaluate updates from TrueNAS.
A NOTE ON TRUENAS AND THE ZFS FILE SYSTEM
The Jupiter Mini server uses the TrueNAS operating system which implements the ZFS file system. TrueNAS is a popular, powerful, and reliable operating system – even if you haven’t heard about it before.
However, ZFS is not the same as the file system used on our personal computers.
The drives in ZFS, as configured by OWC, are formatted equivalent to RAID 5 (called “RAID Z1”). They are designed to work reliably in the event one hard disk dies. Hard drives are hot-swappable. This means that if a drive dies, you can take out the bad one, add a good one and the server will continue serving data even while the replacement is taking place. You don’t need to power down. However, the new disk won’t be integrated into the storage pool until you change settings in TrueNAS.
I mention TrueNAS here simply that, when I looked at the interface, I understood none of the settings. Which is OK. Once the IP address is set, the rest of the default configuration is fine. I review the dashboard to see what’s happening, check the alerts, then go back to my normal work.
NOTE: Here’s another link to learn more about ZFS. This gets technical quickly and you don’t need to know ZFS to successfully use this server.
TEST GEAR
The Jupiter Mini was connected via 10G to a NetGear 10G switch. I used three computers for testing, all running macOS 13.5.1:
Data was either generated internally by AJA System Test, or from media files stored on an OWC Thunderblade SSD RAID. The bandwidth of the Thunderblade far exceeded the Jupiter server, so that any speed variations would be due to the network or server.
Most tests were measured using AJA System Test (full version – 16.2.5.2). Real-world tests were measured by averaging results displayed by Apple Activity Monitor.
PERFORMANCE TESTS
Servers are all about capacity (how much they hold), bandwidth (how fast they transfer data) and supported users. The server that OWC loaned me contained five 4 TB drives. This formatted to 15.8 TB of usable storage space.
Let’s look first at raw speed, then take a closer look at a variety of real-world situations.

Jupiter Mini speed test using a single 10G connection, with no other computers attached.
When connected to a network and computer that support 10G, the performance of this system is amazing – it transfers almost a gigabyte per second!

Synology DS1517+ speed test using a single 10G connection, with no other computers attached.
By way of comparison, using the same connections, my five-drive Synology 1517+ server (which is also 10G) is far slower; barely half that speed.
NOTE: For the Synology test, I used a 16 GB file to bypass an internal SSD cache. All other tests were run using 4 GB test files.
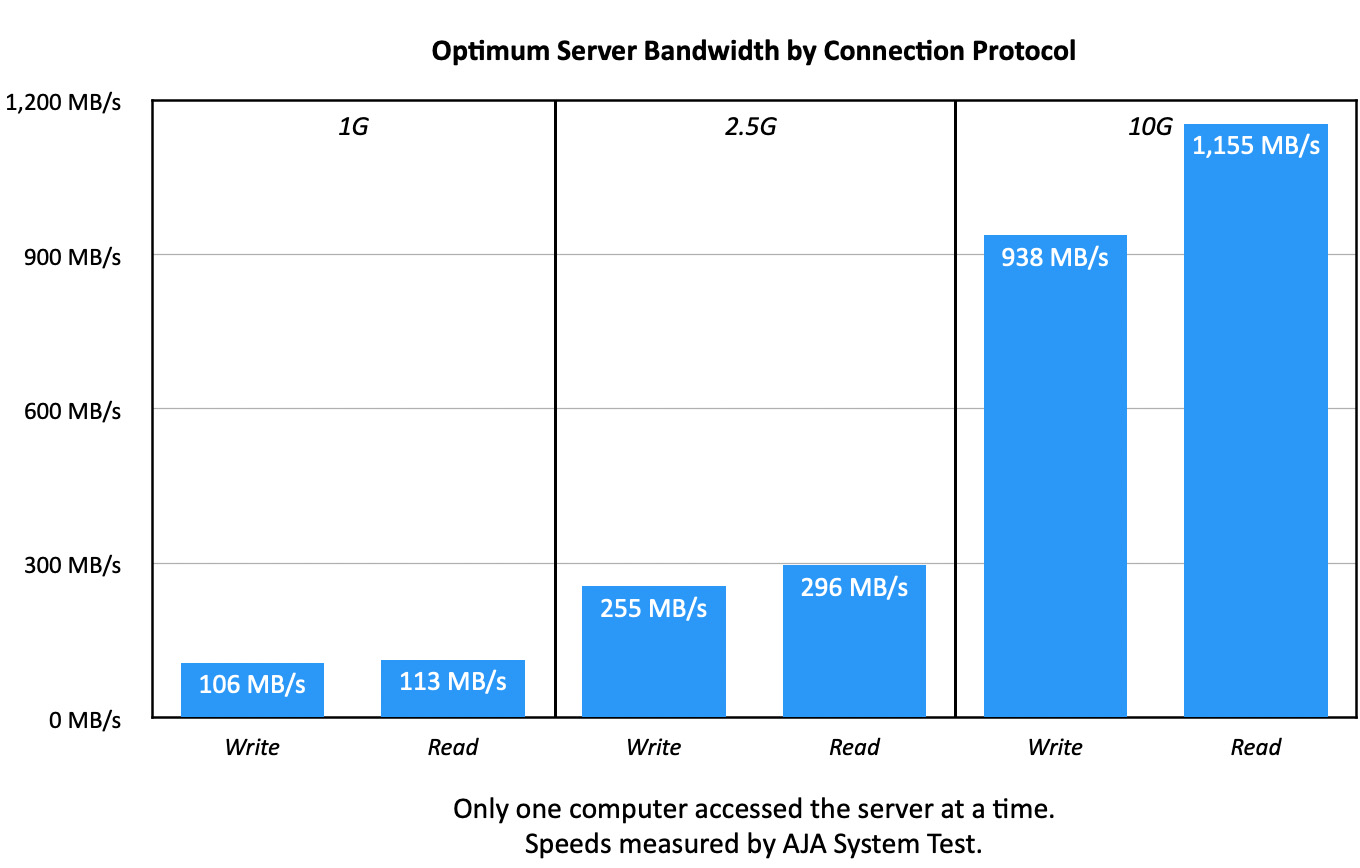
But not everyone has a 10G connection. This chart shows optimum read and write speeds based upon connection protocol. For this test, only one computer was connected to the server when the speed tests were run. It is normal for write speeds to be slightly slower than read speeds – especially for HDD storage.
Speeds were averaged across a minimum of three tests. Most times, I ran six tests.
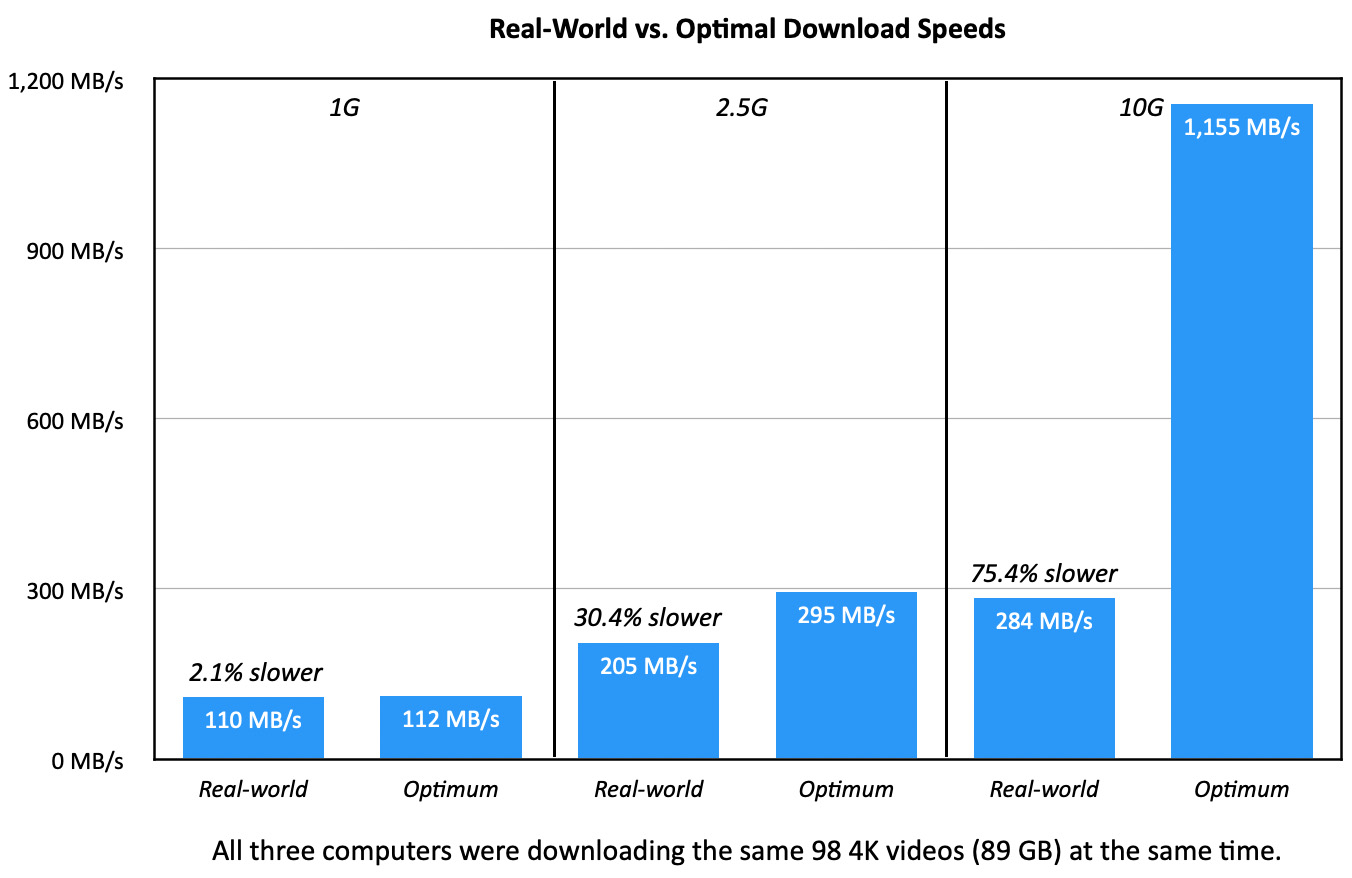
The first chart showed optimal speeds. For this test, I had three computers all accessing the server at the same time, all downloading a folder containing ninety-eight 4K ProRes 422 video files (89.7 GB). Results were measured using Activity Monitor and averaged across six tests.
The faster the connection, the greater the speed decrease when multiple computers are accessing data at once. This is an extreme case, but it shows that the faster the connection speed, the more the impact of multiple users accessing the server at the same time.
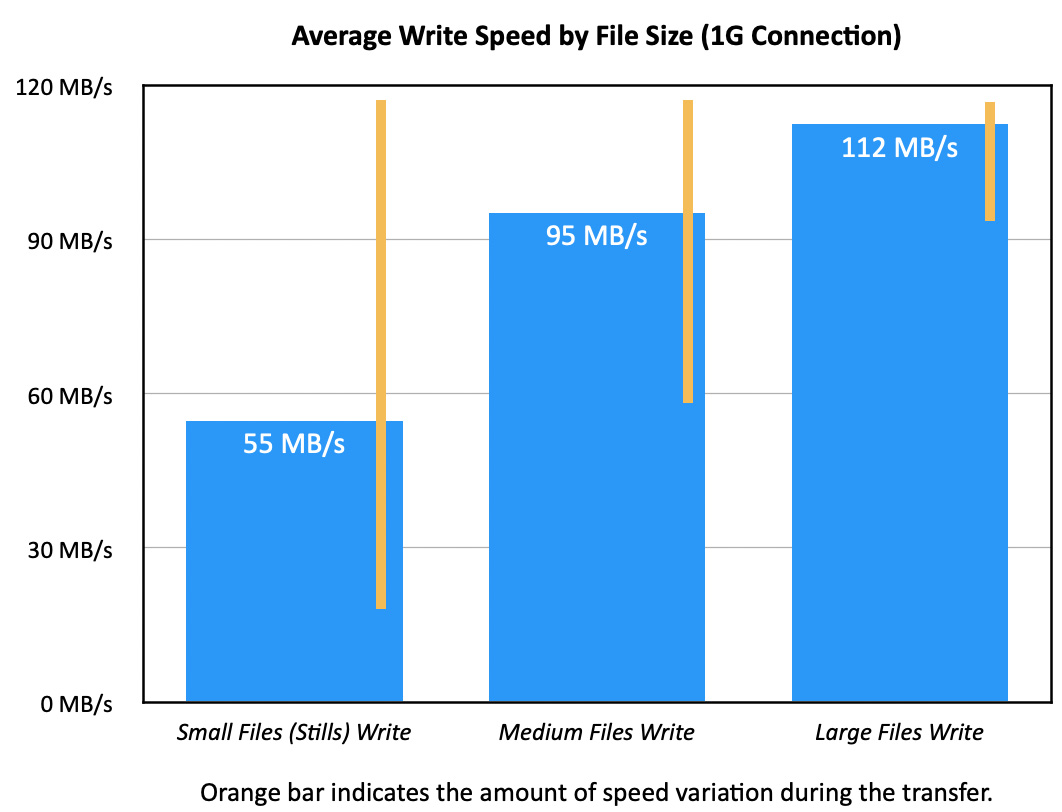
Not all files transfer at the same speed. This shows the average speed (blue bar) and variation (gold line) when transferring small, medium and large files. The larger the file, the faster the transfer.
NOTE: When writing a file, a hard disk needs to record both directory information and data. This causes the heads to jump around more when transferring lots of smaller files, thus slowing data transfer rates.
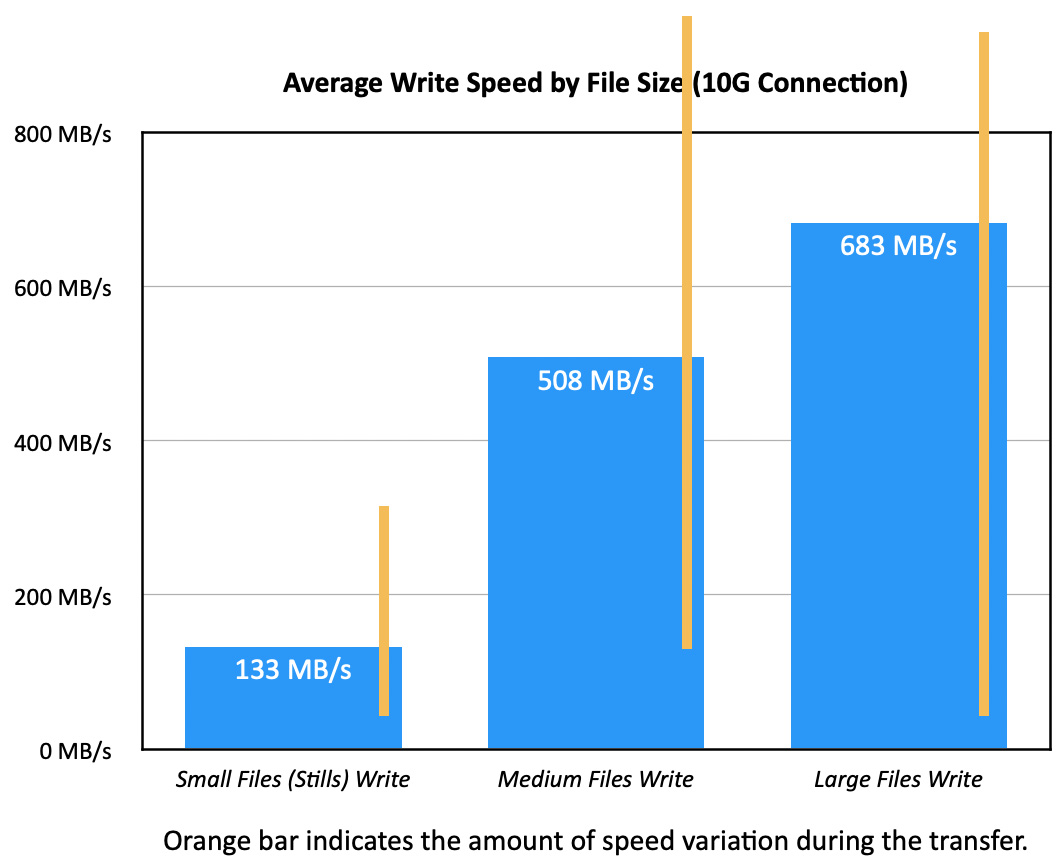
Speed variations were even more pronounced when the connection speed was faster.

A fact I was surprised to discover is this strange pulsing when transferring very large files at very fast speeds. Data would transfer at 1.2 GB/second, then drop to nothing. While the fast transfers were REALLY fast, the dead spots slowed the average substantially.
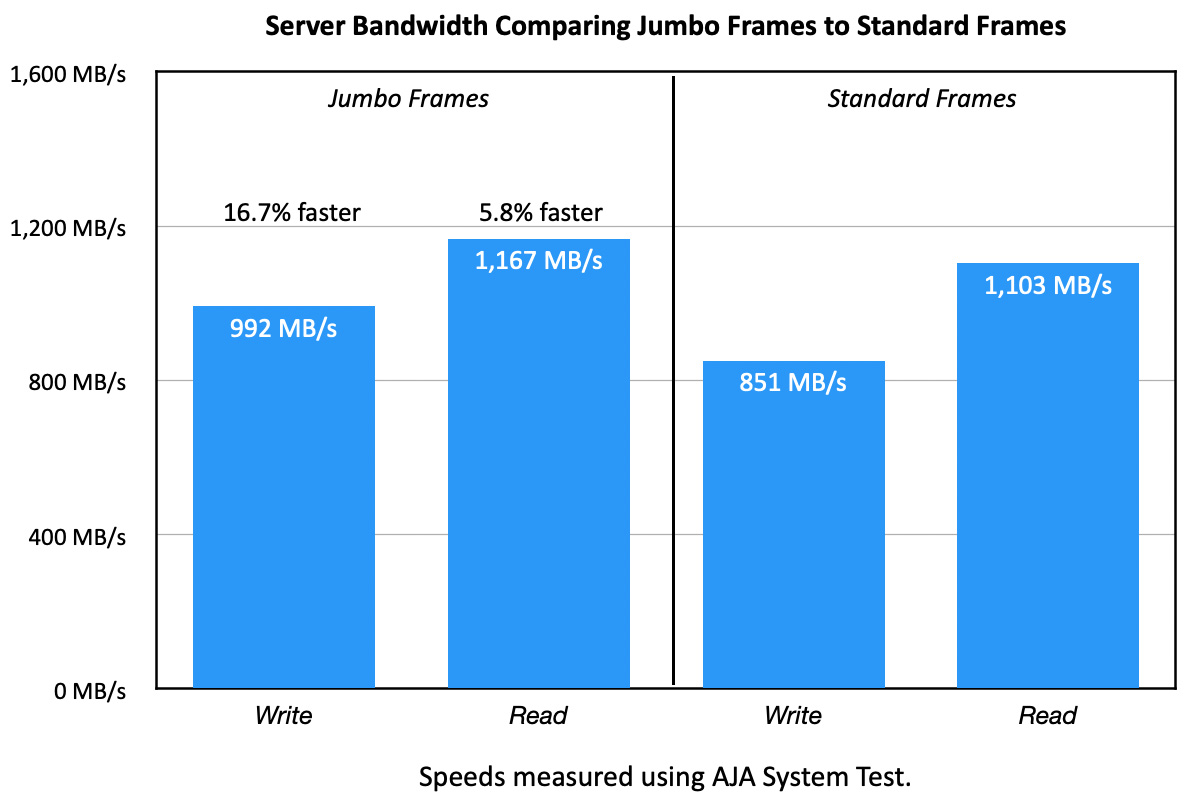
Earlier, I mentioned changing the MTU to Jumbo frames. Here’s why. When using Jumbo frames, writes are 16.7% faster, while reads are 5.8% faster.
NOTE: OWC support told me: “Jumbo frames help when working with live, large file access (such as 4K+ video). For most workgroups that use Jupiter, it provides latency reduction benefits for multi-user access. There are also additional benefits when you are direct linked (P2P) and editing live — however video playback is more optimized within our Jellyfish lineup.”
One more thing that I tested was how much of a speed drop there was when I pulled a drive, simulating a drive failure. After pulling a drive:
NOTE: OWC support told me: “While a drive is hot swappable while the unit is on, replacing the failed drive in the [storage] Pool is not automatic. The drive will need to be replaced in the pool via the WebGUI.” [That means the TrueNAS server interface.]
So, there is no performance hit if a drive dies.
SUGGESTIONS FOR OWC TO CONSIDER
The hardest documentation to write is that for the new user; especially for deeply technical products like servers. Why? Because, as an author, you don’t know what the user doesn’t know. The User Guide assumed the end user was far more knowledgeable than I was and left too many basic operational questions unanswered.
If the server is installed by a trained IT professional or someone who’s done it before, the system would be up and running within 15 minutes after the drives were installed. But, for users like me, coming to this installation cold, there’s a lot that can be improved.
UPDATE: After this review was published, the folks at OWC told me:
A NOTE FROM OWC MARKETING
I asked Adam Hokin, Category Manager for Software and Peripherals at OWS, to explain why should someone consider a Jupiter server when compared to QNap or Synology?” (In other words, what’s the marketing case for this hardware?)
Adam replied: Where our business customers find the most value with Jupiter over consumer brands is:
SUMMARY
 Once I got past setup – and you only set the system up once – I like the Jupiter a lot. It is fast, quiet, works like any other server. I am very impressed with its built-in support to 10G. This makes my network fly.
The unit did not get warm during my tests, the fan makes noise, but is not excessive. (And, besides, you don’t generally store servers on your desk. That’s why they invented closets.) And the deep blue and magenta blinking lights on the front remind you that it is working OK.
I currently have 90 TB of data stored on two older Synology servers. Servers which are growing increasingly slow the older they get. I have never gotten 50% of the transfer speeds from Synology that I got from the Jupiter Mini.
Getting this unit setup was not fun. But, once it was running, it’s pretty darn amazing – especially if you have a network that’s fast enough to support 10G. If your goal is streaming 4K media to multiple edit suites, I’d recommend a Jellyfish. For everything else, the Jupiter Mini more than meets the need.
EXTRA CREDIT
Here’s a PDF of my test results if you want to see specific numbers.
Thanks to Chas Boss, Senior Enterprise Field Engineer at OWC, for technical assistance with this review.