
![]() [ Please read my disclosure statement on product reviews. ]
[ Please read my disclosure statement on product reviews. ]
I’ve heard of SpectraLayers Pro 2, from Sony Creative Software, for a long time. So, when they asked me to review their software, I jumped at the chance.
In brief, what the software allows you to do is to remove individual sounds from an audio file without affecting the rest of the audio in the file. For example, it allows you to remove a siren from the background of dialog, or a saxophone from a live recording of a trio, or the sound of a jet flying overhead.
EXECUTIVE SUMMARY
SpectraLayers Pro does magic, but it isn’t automatic. Its manual is written for experienced users rather than beginners, the software takes time to learn, and results get better with practice. Sony’s training, while good, needs to focus on how to make users succeed with the software more quickly.
It is an ideal tool for repairing individual audio clips, or creating intriguing sound design elements. It is best used as an adjunct to your existing audio editing software.
Running on both Mac and Windows, the latest version of SpectraLayers Pro is tightly integrated with Sound Forge Pro 11, also from Sony Creative Software. However, SpectraLayers Pro is a stand-alone application that can be used with any audio software.
I installed and reviewed this on a late-model iMac, running OS X 10.8.5. (It requires a minimum of OS X 10.7.x.)
WHAT IT DOES
Unlike most audio software, SpectraLayers Pro displays audio as a range of frequencies, rather than waveforms, which display volume. Further, by allowing us to select specific frequencies, and their related harmonics, it allows us to isolate specific sounds either to make them louder, softer, or remove them altogether.
The good news is that what it does, it does really, really well. The bad news is that Sony makes it difficult to learn what the software does.
HERE’S WHAT YOU NEED TO KNOW
After reading the manual from cover to cover, and watching the entire SpectraLayers Pro Seminar Series videos, I’ve compiled a list of “What You Need To Know To Use The Software.”
PUTTING THE SOFTWARE TO WORK

This is the screen that greets you when you start the program. Here, a key definition is in order: “A Project contains Layers, and each Layer can contain an audio file or portion of an audio file.”
So, to get started, select “Import Layer,” which allows you to import an audio file.

This is the main interface for SpectraLayers Pro 2 and, to make the audio file easier to see, I set Options > Scales to MIDI (logarithmic). Notice that we are not seeing waveforms, we are seeing the audio displayed as a frequency range from 0 to 20,000 cycles. (The scale is on the right in small, white numbers.)

This is a narration voice-over, with a siren pulsing in the background. (The wavy line is the siren.) While most audio software has noise reduction capability, that noise needs to be essentially the same, not varying in frequency or level for the duration of the clip. The siren IS varying in frequency, which means we need to use another tool to remove it.
Worse, the siren is intermingled with the voice, which means we need to be very careful not to destroy the quality of the narration while removing the siren.

Before you do anything, you need to “focus” the audio (this is my term), by setting the Window Size. Your goal, in adjusting this menu, is to get the edges of the audio to appear as sharp as possible. While the default setting of 2048 is a good start, adjusting this before you start selecting audio will yield better results.

Whenever you want to modify a particular sound, you need to move it to a separate layer. This is just like a layer in Photoshop where individual image elements are stored and manipulated. So, to create a new Layer, click the New Layer button at the bottom of the Layers panel.
A RED layer is selected, a GREEN layer is not selected.
NOTE: A key rule in SpectraLayers is “Select something, then do something to it.” Before you can move audio into a layer, you need to select the layer, then select the audio.

Here’s where things get tricky. Virtually every sound in nature consists of a fundamental frequency (it’s lowest pitch) and a whole flock of higher frequencies (called “harmonics”). This means that if we want to remove a sound, we need to remove both the fundamental frequency AND all related harmonics. (You can see the harmonics as the fainter lines above the bright line at the bottom.)
This is where SpectraLayers excels. When you use the right tool (Extract/Harmonics) you can select the fundamental frequency, which is often the easiest to see, and the software will automatically select all the harmonics related to it.

So that we can keep things straight, rename the new layer we created to “Siren.” To rename a Layer, double-click on the name.
NOTE: There is no practical limit to the number of layers you can create.

Our goal is to select just the siren, and copy it to the Siren layer. We do this using the Extract/Harmonics tool. Extracting does two things at once: select the audio and copy it to the layer.
NOTE: COPY is the key word here. We are not removing the siren sound from the base layer. We are copying it to a second layer. This will become relevant when we need to remove the sound of the siren in a few steps.

This is the time-consuming part. We need to slowly trace, using the cursor, over the fundamental (base) frequency of the siren sound so that we select the siren and none of the narration. As you trace over the sound using Extract Harmonics, the audio that you’ve selected turns yellow. Also, notice that SpectraLayers is automatically selecting all the appropriate harmonics to the base frequency.
NOTE: SpectraLayers does allow you to use the harmonics themselves to select both fundamental and harmonic frequencies by changing the settings of the Extract/Harmonics tool.

NOTE: I recommend doing this selection in small steps. That way, if you make a mistake, it is easy to undo an errant selection. There is also a History panel that allows you to back up as many steps as you need, in case you find yourself totally lost. As far as I can tell, there is no way to unselect something once it is selected.

To avoid selecting more than just the siren, adjust the “brush size” by increasing or decreasing the Tolerance setting in the top right corner. (There are additional settings in the Toolbar that help target exactly what you need to select.)

Using the Extract/Harmonics tool, I selected just the siren portion of the clip (yellow lines). SpectraLayers also selected all the harmonics associated with the clip.
If you look closely, you’ll see that, by accident, I’ve also selected some of the voice that was very close in frequency to the siren. I have not found a deselect tool in the software, which is why you want to move carefully as you select the sound you want to remove.
To preview just the sound you’ve isolated to the layer, select the layer (to turn it RED), press the Home key, then press the spacebar. Voila! Only the siren.
NOTE: In audio terms, selecting a Layer solos that Layer.

However, we are not done — and this is the unintuitive part. In the Layers panel, click below all the layers so that none are selected (all GREEN). Press the Home key and play the clip.
Oh, dear!! The siren is still there! Don’t panic.
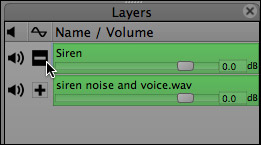
To remove the siren, DON’T slide the volume slider for the Layer all the way to the left. Instead, click the Plus button which inverts the phase of the audio.
NOTE: Digital audio consists of positive and negative numbers. When you invert the phase, you make all positive numbers negative and all negative numbers positive in the selected layer. Since the numbers in the base layer have not been changed, the numbers in the siren layer cancel out the siren numbers in the base layer and, poof!, no siren.
If it helps, you can think of phase cancellation as equivalent to “and then magic happens.” Just remember to play all layers in order for phase cancellation to work.

In the frequency display, the siren is gone and the voice is, essentially, untouched.
– – –
SpectraLayers allows us to select specific regions, areas of noise, single frequencies, even draw our own noise shapes, which is very helpful in sound design.
The keys to remember are:
ADDENDUMS
I need to apologize to the manual. Now that I’ve watched all the training movies, the manual makes much more sense. It acts like a Cliff’s Notes to what I watched. However, if you are starting new with the software, the video training is a far better start than the manual. What the manual is missing is a better overview of how the program works and a discussion of basic workflow.
One other weirdness. If you close a project, which I did because I wanted to start a new project, SpectraLayers will automatically quit. To prevent this, create a new project before closing the old project.
By default, SpectralLayers stores all Projects in the same location as the audio file used for that Project. I recommend that you ignore this location and create a folder for SpectraLayers projects in a location that makes more sense to you. Otherwise, you are likely not to remember to location of older SpectraLayers projects.
WHAT SONY NEEDS TO DO
If you invest the time, you can do things with SpectraLayers Pro that you can’t do with any other software. There are times where it approaches magic. But, the manual is essentially useless to people just getting started. (Also, the manual needs more proof-reading. There are keyboard shortcuts in the manual that either are not enabled in the program, or have not been converted from their Windows equivalents.)
The video training, narrated by Gary Rebholz, Training Manager for Sony Creative Software, has solid content and Gary is a good narrator. But it needs to refocus and emphasize the repair facility within the program, which is the principal reason people buy the software. In the current training the repair section comes at the very end, after watching several hours of video.
Organizationally, key concepts like setting window size and differences between copy and extract, need to be discussed far earlier. Divide the video into “What you need to know to get started,” and “What you need to know to be really proficient.” The current approach takes way too long to get into practical examples.
As for the demos, high-frequency example tones are hard to hear after compression. Obvious is better than subtle when training on how something works. Also, displaying audio logarithmically makes lower frequencies much easier to see. There is far too much black area in the display and far too much dead air during playback.
Also, whoever compressed the video needs lessons in compression. The image size was reduced from whatever size it was recorded at to 960 x 540, which made the playhead invisible and almost all numbers in the spectral view unreadable. The bit rate is set way too high, resulting in files which are gigabytes larger than they need to be. The cursor is almost impossible to see on normal wide shots. Fine details are also lost throughout the interface. These videos should be re-output and re-compressed at 100% size by someone who knows how to retain image quality while reducing file sizes.
SUMMARY
SpectraLayers Pro is an outstanding piece of software than can repair audio files in ways no other software currently available can. However, Sony needs to rethink their training and manuals.
Investing the time to learn this software will pay dividends in how you can modify your audio files. Just be sure to invest the time, and don’t get frustrated if it takes longer to get up to speed than you expect.
Publisher: Sony Creative Software
Website: www.sonycreativesoftware.com/
MSRP: $399.95

11 Responses to Product Review: SpectraLayers Pro 2 from Sony Creative Software
Larry – I concur with your assessments. As we all know as editors; audio can be way more unforgiving in post than video. There are so many tools and avenues to fix video issues in post, but once you have messed up audio your dead in the water. I was able to basically “pull this out of the box”, and get rid of a siren in a hospital zone that ruined a terrific interview. It was a patient, so no easy redo’s. But that is low hanging fruit for this software. Other aspects become more tricky. I did grab their YouTube video, however, and found it easy enough for this simple extraction. But a miracle nonetheless!
Hi Larry,
This genuinely looks to be a really helpful package for me. I do a lot of interview work in not fantastic spaces for some non-profits. After looking this software up online for purchase options, I discovered that there are what appears to be two versions at two price points; one at $299.95 and one at $199.95 (this is through B&H). The only difference I could see is that the more expensive version mentioned specifically it’s interoperability with Sound Forge 11.
What’s the scoop man?
Thanks for the heads up on this software and the great intro to it.
To the best of my knowledge, there is only one version – at least, according to their website.
The software was recently upgraded, so you may be looking at an earlier version.
Larry
As it turns out, according to the Sony Creative Software site; the lower priced version is in fact for the upgrade and the higher is for the full version.
I apologize for not doing my homework a bit better. The B&H listing doesn’t label the difference at all, although it is still $100.00 less for the full version than from Sony direct.
Thanks for the quick reply.
Larry, how would you contrast and compare this app against Izotope?
Mark:
From what I have seen/read, SpectraLayers Pro would match up against Izotrope RX3 — except that RX3 is not yet released. And, as we all know, unreleased products are perfect.
Larry
Larry,
RX3 came out over a month ago!
Justin:
Thanks for letting me know. I saw a pre-release version and was not aware it was now shipping.
Larry
I downloaded the demo of Spectralayers Pro 2 from Sony a couple of weeks ago. First of all, it’s not as good as the 3-year old program Isolate from Prosoniq/Sonicworx/Zynaptic . Isolate is pretty magical, especially on difficult stuff, including extraction of audio from mono files.
The main gripe I have about Spectralayers is that the workflow is just about the most non-intuitive thing I’ve encountered in a long time. What you can do in one step with Isolate is broken into so many steps with Spectralayers.
The downside to Isolate over the past few years is that it’s Mac only. While I realize there are many Mac lovers, I had to buy a Mac Mini just so I could operate Isolate. I was thinking that Spectralayers would be cool for me as at least a way to move my extraction workflow off of the Mac.
I believe that Isolate will appear as a windows program at some future point now that Zynaptic has purchased Prosoniq.
But for now, I just can not get my head around why the Spectralayers workflow is so complicated. I may try the demo again at some point, but for now…. and for any of you in the biz of audio extraction, Isolate and its inventor Stephan Burnsee have no peers imo.
I wrote an extensive comment with sound suggestions and lost the lot when I pressed ‘Submit Comment’ before entering the Captcha. I am not going to do it all again. Someone needs to provide a logic sequence to this page as well – put the “Submit” after the Captcha! content. Thank you Larry for one of the best and clearest examples I have seen.
PS In essence I said a fine tool for erasing overlaps of the trace (only) would be great. Then also provide a ‘sample’ tool to overlay the trace on the entire sections (or all the file) where the unwanted sound is.
Bill:
I’m sorry you lost the comment. Captcha is a separate plug-in from our website, so we can’t put it before the submit button. But, having made the same mistake you have MANY times, I’ve discovered if you click the “back” button on your browser, your comment should be preserved — at least it does on my system.
(And, as a note, Captcha has reduced the spam in article comments by about 2,000 messages a day.)
Larry