
![]()
One of the areas where Adobe has worked hard to improve Premiere Pro is trimming. Trimming adjusts the point where two clips touch; this is also often called the “edit point.”
With the Creative Cloud release of Premiere Pro, Adobe has added more options and simplified the entire trimming process.
WHY TRIM?
When we are editing, we look at all the different clips available in the Project panel and decide which one goes next in our sequence. We then “mark” the clip by setting an In and an Out in the Source monitor and edit it into the Timeline at the position of the playhead.
Editing is the process of getting all our clips in the right order in the Timeline. Trimming is the process of adjusting the point where we switch between clips so that both the action and the story flow smoothly from one clip to the next.
In my experience, trimming takes far longer than editing simply because there are so many potentially good places to make the cut. I can generally make an edit decision quickly, often in less than a minute. But trimming… Well, I can easily recall many times where I’ve spent 45 minutes trying to figure out the best place to switch shots.
As with all editing tasks, there is both a creative decision and a technical skill. While Premiere can’t help you creatively, it can make the technical process of trimming a whole lot faster.
In Premiere, there are five ways we can trim where two clips touch:

In the CS6 version, we needed to right-click the edit point to access these five options. But, now, there’s a better way.
A TRIMMING EXAMPLE

Here, for example are two video clips that we want to trim.

Using the cursor, if we click the edge of a clip at the edit point, the edge we click (in this case the Out) has a red highlight. This means we are Trimming the Out.

However, when trimming, we can only drag the Out to the left which makes the clip shorter, not to the right, which would make the clip longer. Worse, when we move the Out, we leave a gap. Gaps cause flashes of black, and producers frown heavily when there are flashes of black in their program.
NOTE: When trimming the In, we can only move the In to the right, to make the clip shorter, but not to the left, to make the clip longer. The only exception to this trimming rule is if there is a gap between two clips, in which case we can move the edge of the clip into the gap.
So, while it is nice that the cursor will automatically trim the Out, or the In, this actually provides very limited options. What we need is a smarter cursor.

New with the CC release of Premiere is a new preference. Go to Premiere Pro > Preferences > Trim and check the check box that makes the cursor context sensitive.

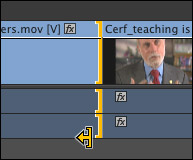
Now, when you go to trim an edit point, the cursor’s function changes depending upon its location. Click the left edge (the Out) and the cursor turns yellow, indicating this is a ripple trim to the Out.
NOTE: A “Ripple Trim” allows you to move the edge of the clip earlier or later, left or right, in the Timeline, which changes the length of the clip and adjusts the position of all downstream clips so that there is no gap.

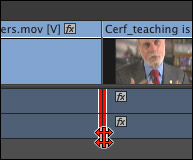
Or, click exactly between the two clips to move both the In and the Out at the same time, which is indicated by the red bar between the two clips.
NOTE: This is called a “Roll” trim and it moves the edges of both clips in the same direction to change the timing of the edit, again without leaving a gap. The Roll trim is my favorite trim.

Or, click the In to select it with a yellow highlight, which means you are making a ripple trim to the In.
NOTE: Again, ripple trims can move either left or right and automatically adjust the position of all clips to the right of the trim so that there is no gap. In other words, the effects of the ripple trim “ripple” throughout the rest of the Timeline.

You can still trim, as opposed to ripple, the edges of a clip, which is indicated by the red highlight. To do this, press both Option and Command when clicking the edge of a clip. This type of trim is most useful when adjusting the length of B-roll clip which doesn’t have another clip adjacent to it.
NOTE: Remember, when doing a Trim between two clips, you will always leave a gap. Rippling doesn’t.

You can also select how you want to trim by right-clicking the edit point and selecting the tool you need from the popup menu. (Red indicates trimming, Yellow indicates rippling.)
This new ability for the cursor to be context-sensitive is a big timesaver, because it means that as soon as I figure out what I want to do, moving the cursor into place allows me to do it.

NOTE: You can also access the Ripple and Roll trimming tools from the toolbar. Type “B” for the Ripple tool and “N” for the Roll tool. However, the new smart cursor is both faster and easier for most trimming.
MORE PREFERENCES

While there isn’t a keyboard shortcut that allows us to select the nearest edit point, there are a number of potential keyboard shortcuts that can make your trimming even faster. To see the options, go to Premiere Pro > Keyboard Shortcuts and search for “edit point”. You can assign your own keyboard shortcuts to any of these options.
TRIMMING AUDIO SEPARATE FROM VIDEO
Many, many times, we need to trim the audio edit to occur at a different time than the video edit. These edits, called “split edits,” allow us to hear one thing while seeing another. (They are also called “L” or “J” cuts.)
NOTE: An “L” cut is a trim where the video edit precedes the audio, forming an “L” shape at the edit point. A “J” cut is where the audio edit precedes the video, forming a “J” shape at the edit point. It is descriptions like these that make me realize that editors spend way too much time alone in dark rooms.
Notice that when audio is synced to video, selecting either the video or audio edge selects the entire edge of the clip.
To select JUST a single track of video or audio, press the Option key while clicking the edge of clip. This allows you to select a single track, which you can then Roll as you see fit.
To select the edit point of more than one track, but less than all of them, hold the Shift key while clicking the edge of the track you want to include in the selection.
To deselect everything, click in the gray area above or below whatever you have selected.
NOTE: When trimming just audio or just video, the best trimming tool to use is the Roll tool, where both edges are selected at the same time. A ripple trim risks moving the audio and video out of sync.
FASTER WAYS TO TRIM
Once you’ve selected an edit point, regardless of how you’ve selected it, there are three high-speed ways to trim, in addition to dragging:

* Put the playhead where you want to move the edit point and type “E“. This jumps the selected edit point to the position of the playhead. This works for both ripple and roll trims. (You can also do this in real-time while playing the Timeline.)
* Press Option+[left arrow] or Option+[right-arrow] to move the selected edit point one frame to the left or the right.
* Press Shift+Option+[left/right arrow] to move the selected edit point five frames to the left or the right. (The exact number of frames can be changed in Premiere Pro > Preferences > Trim by changing the number in Large Offset.
SUMMARY
The aesthetics of how to trim clips to maximize the story and emotion of a scene can, and do, fill books. But the techniques you use for trimming have continued to improve with each version of Premiere Pro.
Trimming is essential to good story-telling and now the tools are faster than ever.

3 Responses to Premiere Pro CC: Trim Edit Points
Thanks for this tip, Larry. Aloha, Dennis
Thanks to this article and your creativeLIVE class, you are now officially my hero. Congrats.
As a bigginer I got alot from your conturbution. Just keep it up.