
![]()
[This step-by-step tutorial provides an in-depth look at creating multicam clips. Once you understand how a multicam clip works, using this simple checklist will be faster. To see a video tutorial on multicams, click here.]
Adobe continues making improvements to multi-camera editing with the CC release, which they enhanced even further in the recent 7.1 update. An angle – think of an “angle” as a track – can contain audio, video or stills. In fact, a single angle can contain multiple clips. (This is a very cool way to use multicam editing to create a montage of stills.) A multicam clip can contain as many video streams as your system can support.
NOTE: The phrase: “that your system can support,” is very hard to pin down. Things that limit the number of video angles you can edit include: the complexity of the video codec, the data transfer speed of your hard disk, the speed of your CPU, the capability of your graphics processor, and whether all camera angles are the same image size, frame rate and codec.
As a general guide, you should be able to edit four streams of video using a single FireWire hard drive. A two-drive Thunderbolt RAID should allow you to edit up to eight streams. A five-drive, or greater, Thunderbolt RAID should allow you to edit more than 16 streams. (As always, these are estimates and reality has an ugly way of changing the situation. Experiment to see what works best with your system BEFORE you get on deadline.)
GET IN SYNC
Clips that go into a multicam clip (which Adobe calls a “multi-camera sequence”) need to have a common sync point. The sync point provides a common starting point so that all the clips play back together, in “sync.”
We can sync using five different sync points:
Syncing using Timecode is the fastest. If you use clapper slates, it is easiest to mark the clap with an In. If you use markers, all markers used to indicate a sync point must have the same name. Syncing on audio is easy, but requires all cameras to have audio recorded on them, which rules out syncing still images.
NOTE: I don’t sync still images. I drag them into the multicam clip after it is built and position them manually, using Open in Timeline which I talk about below.
Whichever one of these options you pick, all the clips need to use the same method of syncing. I tend to use markers and I name the marker “Start” to indicate the sync point.

Here I’ve imported four clips of ice dancers that I want to edit. (This is from a show called “Moscow on Ice,” and is courtesy of Greene HD Productions (www.greenehdtv.com)).

I marked the sync point for each clip manually, using a marker that I named “Start.” I could just as easily have used an In or Out, but the benefit to using markers is that I don’t lose access to media before the In or after the Out.

While you can set Ins and Outs using the mini-Timeline in the Project panel, you can only set clip markers using the Source monitor. Double-click a clip to load it into the Source monitor, position the playhead where you want to place a marker, then type the letter “M“.
To assign a name to a marker, make sure the playhead is parked on the marker, then right-click the marker itself and select Edit Marker (or, choose Marker > Edit Marker).

Give the marker a name in the Name field – in this example, I used “Start” – but as long as all clips use the same name for their marker, you can call the marker anything you want. Then, click OK.
NOTE: Unlike earlier versions of Premiere, the marker track is hidden if there are no markers in a clip. Once you add a marker, the marker track is displayed above the playhead in the Source monitor.

When syncing using clapper slates, it is often easier to sync by looking at the audio waveform than the picture. To see waveforms, right-click the clip name in the Source tab and select Audio Waveform. To switch back to viewing images, right-click the tab, again, to display the same pop-up menu and choose Composite Video.

As an example from a different show, the playhead is parked on the clap from the first of two clapper slates. I was using the waveform because the camera wasn’t able to see the slate, but I still needed to sync the camera.
BUILD THE MULTICLIP

Once you have sync points set for all your clips, select them in the Project panel by either Shift-clicking, or Command+clicking, the clips you want to include.
NOTE: The order in which you select your clips is the order they will be displayed in the Program monitor, though a new feature in Premiere now allows you to change this display order. I’ll illustrate that in a minute.
With your clips selected, choose Clip > Create Multi-camera Source Sequence. (You can also access this menu by right-clicking one of the selected clips.)
NOTE: You must select at least two media sources (audio, video, or stills) to create a multiclip.

This displays the “Create Multicam” window. Give your multiclip a name and select how you want to sync your clips. Because all the clips have markers and all the markers have the same name, Marker is automatically selected. The default selection is to sync on the In.
NOTE: A new feature with the update is the ability to change how cameras are named. These three choices appear at the bottom of the Create Multicam window. There’s no correct answer in selecting these. Try all three and see which seems to work the best for you.

A new clip, representing your newly-created multi-camera sequence, appears in the Project panel. Notice that now we can hover-scrub it, with a new badge – indicating it is a multicam clip – displayed in the lower-right corner.
TWEAKING THE CLIP
Another new feature now allows us to adjust the display order and active angles in the clip. Double-click the multicam clip to load it into the Source monitor. Click the Wrench icon in the lower right and select Edit Cameras.
NOTE: This adjustment can only be made when the multicam clip is loaded into the Source monitor.

This displays the Edit Cameras panel. Drag the name of a clip up or down to change the order in which angles are displayed. Uncheck a check-box to make an angle inactive (invisible). Check it again to make the angle visible. When you are happy, click OK.
This new window makes modifying multicam clips a lot faster and easier.
SET THE AUDIO
A multi-camera sequence is just that – a special sequence designed to contain multiple clips for editing. By default, a multi-camera sequence (which I’ll go back to calling a multicam clip in just a minute) only enables the audio on track Audio 1. This means that if you want to hear audio from any other track, you need to turn it on before you start editing the multiclip.
To do this, right-click the multicam clip icon in the Projects panel and select Open In Timeline. This opens the multicam clip into the Timeline and displays all the source files on separate tracks. This allows us to change which audio tracks are audible, add effects to individual clips in the multicam clip, or add additional clips to an existing track; for instance to add stills to existing clips.
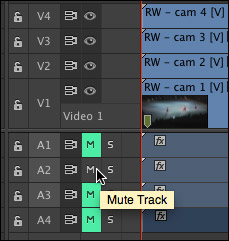
In my case, I want to only use the audio from the second camera, so I mute the audio for track A1, and unmute the audio for track A2.
NOTE: In addition to changing the active audio track, opening a multicam clip in the Timeline allows us to color correct a specific angle before it gets edited; for example, to correct a camera that was improperly color-balanced.

Once we’ve made all our adjustments to the master multicam clip, we can close the multicam tab at the top of the Timeline (this is optional, but decreases confusion).
EDIT THE MULTI-CAMERA SEQUENCE

Double-click the Multicam clip in the Project panel to load it into the Source window.
Set an In and an Out, as you would for any clip, and edit it into the Timeline. A multicam clip can be a sequence by itself, or part of a larger project. From the point of view of editing, it acts just like any other clip.

A multicam clip in the Timeline has a different color than other media clips.

In order to edit a multicam clip, we need to use the Multi-camera Monitor. To display this, click the Wrench icon in the Program monitor and select Multi-camera.

This opens a new view next to the Program monitor, where all the individual angles are displayed.

From the fly-out menu in the top right corner of the Program monitor, you can select whether audio will follow video; it is off by default. If you choose this option, the audio will change each time you change camera angles. For most of my editing, I don’t want this. Instead, I want the audio to stay with a single mixed audio track that I set when I opened the multicam clip into the Timeline.
NOTE: You can also find this option by right-clicking the multicam images themselves in the Program monitor.
Editing a multicam clip is easy. Position the playhead at the beginning of the clip, then, press the spacebar. As the video plays, click the image in the Program monitor to which you want to switch.

That cut is reflected immediately in the multicam clip in the Timeline.
NOTE: You can also switch shots by pressing the Control key and typing a number from 1 to 9 on the main keyboard.
TRIMMING

We trim edits in a multicam clip in the Timeline just like any other edit. Here, for instance, I was late in cutting back to the wide shot, so I am rolling the edit point to correct this.
To replace an angle in the edited multicam clip with another angle, put the Timeline playhead in the shot you want to replace and click the new angle in the Program monitor.
To create an edit in an existing shot in the multicam clip in the Timeline, put the Timeline playhead at the point you want to create the edit and Command-click the new shot. An edit point is created at the position of the playhead and the downstream shot will be replaced by the shot you click in the Multi-camera Monitor.
WHEN YOU ARE DONE
Because Adobe is playing all streams at the same time as you edit a multicam clip, this can be very taxing on your storage.

When you are done editing, select the entire multicam clip in the Timeline and choose: Clip > Multicam > Flatten. This disconnects all the clips in the multicam clip, so that Premiere only needs to play the actual clips in the Timeline. This significantly reduces the wear and tear on your hard disks.
Keep in mind that once you flatten a clip, you can’t reconstruct the multicam clip. So, save this step until you are sure you are satisfied with the edit.


42 Responses to Premiere Pro CC: Multicam Step-by-Step
← Older Comments Newer Comments →-
 Sandra says:
December 12, 2016 at 11:13 am
-
 Larry says:
December 12, 2016 at 6:54 pm
-
 Rob says:
December 14, 2016 at 11:10 pm
-
 Larry says:
December 15, 2016 at 7:14 am
-
 Gerald Webb says:
January 6, 2017 at 5:10 pm
-
 Andrikos says:
April 21, 2017 at 2:01 am
-
 Larry says:
April 21, 2017 at 9:22 am
-
 Stewart [RWS] Shevin says:
September 2, 2017 at 9:39 am
-
 Larry says:
September 2, 2017 at 11:23 am
-
 Stewart Shevin says:
September 4, 2017 at 6:05 am
-
 Anju says:
November 30, 2017 at 8:09 am
-
 Larry says:
November 30, 2017 at 8:38 am
-
 Anju says:
November 30, 2017 at 11:59 am
-
 Ryan says:
January 27, 2018 at 7:36 am
-
 Larry says:
January 27, 2018 at 7:48 am
-
 Ela says:
February 12, 2018 at 3:16 am
-
 Skye Seery says:
June 4, 2018 at 4:11 pm
-
 Larry says:
June 4, 2018 at 4:36 pm
← Older Comments Newer Comments →Hi Larry, I have 2 cameras with multiple clips each that I’d like to sync. Having a hard time finding more recent posts about whether this is now possible with Premiere Pro CC. Editing a feature length doc with 10 interviews plus 8 days of filming (2 cams at all times) and wouldnt be able to go the long route of looking for matching footage individually and synching clip by clip. Please help!
Sandra:
The answer is a solid “maybe.”
If both cameras have audio, then, yes, you can use Premiere to sync them into a multicam clip. However, you may find that Pluraleyes does the job faster.
If only one camera has audio, then you’ll need to sync using clapper slates, which will be more time-consuming.
Given the quantity of material, I’d recommend PluralEyes, from Red Giant software.
Larry
Hey Larry I have a video with 4 angles. I’ve created my Sequence but for the last shot I would like to use all 4 angles at the same time. How can I accomplish this?
Rob:
To see multiple images at the same time, you’ll need to stack them vertically in the Timeline.
In other words, create four separate clips, not a multicam clip, for the last shot.
Larry
Hi Larry,
Have a need to be on a Windows machine for a job, coming from FCX.
Had a quick play with Premiere but cant find how to color correct in the angle editor to match camera’s exposure/hue etc like in Final Cut.
Is it possible to show all cam tracks on timeline, with the multi viewer on top, highlight a cam, have a 3 way CC open on side, and make all adjustments?
cheers,
Love your work.
Hello Larry. Do you know why when i’m in multicam mode and i enter the trim mode (with T shortcut or manualy), then the program monitor turns to Composite video, and drives me so many times to do the right click and multicamera option. Thanks in advance!
Andrikos:
i can’t help with this question — I recommend you contact Adobe support.
Larry
Hi, When I create a multicam clip syncing 1 camera and wav + camera sound, the multicam clip creates a timecode start of 00:00:00:00 as opposed to the picture’s timecode. Is there a way to assign the correct metadata timecode to the multicam clip?
Stewart:
Very interesting. I would have thought, since a multicam clip is, essentially, a special form of a sequence, that we could easily change its timecode.
Theoretically, you can select a clip and choose Modify > Timecode. While this works for clips, the Timecode options are grayed out for multicam clips.
Perhaps another reader has a suggestion.
Larry
One other question on this subject… Once I create a multicam clip, then edit that into a sequence, I want to later highlight it, click Find Frame and see the associated multicam clip frame in the source monitor. Instead I get the picture only without high quality synced sound. How do I link the synced picture(s) and sound so they essentially become it’s own clip I can track? Avid has this function.
Hi Larry, I have edited a multi cam timeline on the same synced timeline. Now while color grading I need to balance camera 1 with 2. How can I select the clips from camera 1 alone (in an edited multicam timeline) and apply the color to those clips.
Anju:
Right-click the multicam clip icon in the Projects panel and select Open In Timeline. This opens the multicam clip into the Timeline and displays all the source files on separate tracks.
Select the clip you want to color correct, then correct it.
The changes you make to the master shot inside the sequence will then automatically ripple to your edited version.
Larry
This was very helpful. Thanks Larry 🙂
I loved your tutorial and am wondering if you know the answer to this question here?
https://video.stackexchange.com/q/23287/5657 (How to enable multi-camera in Premiere *after* I’ve already made tons of cuts)
You would be a lifesaver!
Thanks so much!
Ryan:
Nope. You can’t create a multicam clip after all your edits are made.
Larry
HEllo Larry,
thanks for this article and answers to comments ! It will be very useful when it comes to color correct.
I have started an multicam project with three cameras and all was fine.
But this morning when I opened the project and hit the “activate/deactivate multicam view” button in the monitor program, it only switches between :
-view of camera 1 only
-view of camera 1 on the right side +view of camera 1 on the left side
I no longer have :
-view of camera 1 (the one used in my project)
-view of camera 1 on the right side / choice of three views (camera 1to3) on the left side
do you have any idea of why does it do this ?
(I can see the three views in the source monitor but they are not liken to the timeline and the monitor program, if I hit them nothing will change)
thanks a lot for your help !!
Hi Larry, I am using a multi-cam with 10 clips. I am able to create a multi-camera source sequences from all 10, just using “Audio” and no ‘in-points’ or markers. However, only 9 of the clips are synching properly, 1 clips is out-of-synch in the sequence.
Does Premier have a capability of fixing one camera/clip in the sequence and synching it with the others?
Thank you in advance for your help! Greatly appreciate it.
Skye:
Absolutely. Re-read the section on Open in Timeline. Once you open a multicam clip into the Timeline, you can shift the position of any video or audio element.
Larry