
![]() There are several ways to change the speed of a clip in Adobe Premiere Pro CS6 – from still frames to variable speed changes. This article shows you the options and how they work.
There are several ways to change the speed of a clip in Adobe Premiere Pro CS6 – from still frames to variable speed changes. This article shows you the options and how they work.
There are also several places you can change speeds – keyboard shortcuts, menus, the Timeline, and Effect Controls. This article illustrates all of them, but not all the possible permutations; feel free to experiment.
STILL FRAMES
Creating still frames is not as simple as doing so in Final Cut Pro, but, as long as you don’t move your playhead, it isn’t hard.

For instance, here is a clip of two tigers playing. I want to freeze this to add a graphic describing the tigers. Here’s how:


As long as you don’t move the playhead from the moment you export the still frame until the moment you edit it back into the Timeline, this process will create a seamless edit between the clip and the still frame.

An Insert edit freezes the action, then allows it to resume where it left off. An overwrite edit replaces media at the point of a freeze frame. This would be appropriate when you want a freeze frame to stop the action, then fade to black at the end of scene before the start of the next scene.
NOTE: You can also do this in the Timeline and the Effect Controls panel, I’ll talk about both later in this article.
CONSTANT SPEED CHANGES
NOTE: This is the traditional way to do a constant speed change. I’ll show you two other cool ways to do this a little later in this article.
To change the speed of the entire clip by the same amount, select the clip and choose Clip > Speed / Duration (or type: Command+R).

This opens the Clip Speed / Duration dialog window.
You can’t have this both ways, either the duration of the clip changes, or the number of frames displayed changes.
NOTE: To change or reset the settings a clip with speed changes, select the clip and choose Clip > Speed / Duration. You can change the speed of a clip as often as you want; in all cases, Premiere refers back to the source media on the hard disk as the starting point for changes.
FIT-TO-FILL EDIT
It isn’t obvious, but you can do a fit to fill edit in Premiere. This is where the speed of a clip in the Source monitor is changed to fill the duration indicated by an In and Out in the Timeline. Here’s how:

VARIABLE SPEED CHANGE
Learning how to do variable speed changes also provides additional techniques we can use to create constant speed changes and still frames.

Edit the clip you want to adjust into the Timeline. Right-mouse-click the words Opacity in the header of the clip, and switch the rubber-band display from opacity to Time Remapping > Speed.

The yellow horizontal line displayed in the middle of the clip, now controls clip speed. To apply a constant speed change to a clip, drag this line up (to speed a clip) or down (to slow a clip). In this case, I’m slowing the speed of the entire clip to 65% of normal speed.
NOTE: As you change the speed of the clip, the duration also changes. If you need to freeze the duration of a clip, use the Clip > Speed/Duration dialog discussed earlier.
To vary the speed of the clip, we need to use keyframes.

Press the Command key to set a Time Remap keyframe. These are unlike any other keyframes in Premiere, because we only need one keyframe to change the speed of a clip.
Here, I added a Time keyframe, and raised the yellow line before the keyframe to 120% speed. Then, I dragged the yellow line after the keyframe down to 40%. The clip will play faster than normal before the keyframe and slower than normal after the keyframe. The speed change is instantaneous.

To ramp the speed from one speed to the other, drag the right side of the keyframe to the right. This creates a ramp between the two speed sections.

To ramp down to a still frame, drag the two halves of the keyframe apart, then drag the right side of the time remap line down to 1%. This slows the clip during playback to a still frame. (If you want the clip to freeze instantly, don’t separate the keyframes.)
You can add as many Time Remap keyframes as the duration of your clip will support.

You can also make speed changes – both constant and variable – in Effect Controls > Time Remapping.

Set keyframes using the Add/Remove Keyframes button. Navigate between keyframes using the small left- and right-pointing arrows. Adjust keyframes by splitting them as you would do in the Timeline.
Drag the white line up or down to change speeds.
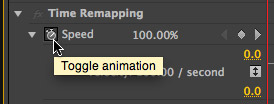
NOTE: To reset a clip to normal speed, click the stopwatch icon next to the word Speed in the Time Remapping section. This displays a dialog box where you can delete all keyframes and reset the clip to normal.
SUMMARY
There are a wide variety of ways to changes clip speeds in Premiere Pro CS6. I am especially impressed with how easy it is to set speed ramps between keyframes.
Take a few minutes to experiment on your own and discover what more speed can do for you.

6 Responses to Premiere Pro: Change Clip Speed
But what about Frame Hold in Premiere Pro? Why not just use that for a freeze frame and not have to export and reimport a separate image?
I agree. As a FCP switcher I find the Frame hold option much faster to work with and quick to use.
but when I use the Frame hold option, I find I’m not able to scale in or reposition the frame. am I doing something wrong?
to get around the steps of export/import as well as frame repositioning, i just slice the last frame of video (cmd-K or the razor), and set the speed of that single frame to 0% or 1%). this effectively makes a hold frame that will last several seconds if need be. then you can extend it as long as you like using the RATE STRETCH tool (x). works wonders for the workflow of edits that use a lot of hold/freeze frames.
Hey Larry, long-time student here. I’ve purchased, read and watched countless training materials from you and have attended a few training seminars. You’ve been a major part of the success of my career every step of the way. I just wanted you to know how thankful I am for all the hard work that you do.
So I have a question regarding CONSTANT SPEED CHANGES using command+R:
I would donate part of my kidney to figure out a shortcut for removing/resetting the speed change of a clip. If I have previously changed the clip speed to 50%, to get the clip back to 100% I have to hit Command+R > then type 100% > then check or uncheck ripple edit as needed _ then hit OK. I just want to be able to select a clip and use a single keyboard shortcut to restore it to its native speed. I know I can remove video keyframes with a shortcut when I use Time Remapping but I specifically need to be able to reset the Clip Speed/Duration quickly.
On the same topic, it would be so helpful to have a keyboard short cut that toggles on and off the “Reverse Speed” function of the Clip Speed/Duration menu.
Any ideas? I’d be immensely appreciative of your help.
Cooper.
Easy.
Shift-H restores the selected clip to normal speed.
There is no default keyboard shortcut to reverse a clip, but it is easy to create one in Command. Just search for “reverse,” then assign whatever keyboard shortcut you want.
Larry