
![]() Last week, Adobe released a major update to Adobe Premiere Pro CC, along with the rest of its Creative Cloud applications.
Last week, Adobe released a major update to Adobe Premiere Pro CC, along with the rest of its Creative Cloud applications.
NOTE: Here’s an article that details what’s new in Adobe Audition with this release.
Here’s a quick bullet list of the highlights:
NOTE: Here’s an Adobe blog with more detail:
helpx.adobe.com/premiere-pro/using/whats-new.html
Let’s take a look at these in more detail.
NEW HOME SCREEN

(Click to view a larger image.)
This isn’t Premiere’s most important feature, but it’s the first thing you see when you start the newest version of the application: a new Home Screen.
This now includes options to:
The nice thing is that this window is dynamic. As you work on more projects, the space devoted to tutorials decreases, while the room for your past projects expands.
NOTE: You can also access tutorials from the Learn panel. If this is not visible on your screen, open it by choosing Windows > Learn.
IMPROVED COLOR GRADING
The color changes are extensive and fall into three categories:
DISPLAY COLOR MANAGEMENT
In the past, it was necessary to manually set your OS display profile to be sure that you were seeing accurate colors, and sometimes it was not possible. Display color management takes away the guesswork and displays correct colors no matter what ICC profile your display is set to in the operating system. (Source: Adobe Help)
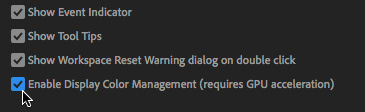
To display accurate colors on any system, go to: Premiere > Preferences > General and check Display Color Management. This automatically converts colors to the color space of your display (including Rec. 709, Rec. 2020, and P3).
NOTE: This requires GPU acceleration and will probably work best with recent hardware.
SELECTIVE COLOR GRADING

We are all familiar with the color wheel: Adobe calls these “donuts.” While the basic Lumetri color controls haven’t changed, in this release, Premiere beefed up its selective color controls.

What’s new is that Adobe has added five new color controls to Curves allowing us to make “selective” color changes. That is, where we want to change a portion of the frame, without changing everything. (These are often called “secondary color corrections.”)
Explaining how these tools work is an article in itself. However, here’s an example.

Let’s say that I want to make the green jacket of the person walking through the frame, indicated by the red arrow, darker, without changing the rest of the image. Here’s how:
The creative possibilities for these tools are vast. These enhanced secondary color correction tools are a very valuable addition to Premiere.
CREATE A STACK OF MULTIPLE LUMETRI EFFECTS
We can now create a stack of multiple custom Lumetri color effects and apply them to the same clip (or adjustment layer).

For example, I selected a clip and applied a color effect. Using the menu at the top of the top of the Lumetri color panel…

I added a second, and third, color effect by choosing Add Lumetri Color Effect, then used the Rename option to give them a more coherent name.
NOTE: In real-life, I might call these, for example, “Desaturate highlights,” “Boost skin tones,” and, perhaps, “Cool shadows.”
This technique allows me to create a color effect by stacking different effects, which provides more flexibility than trying to cram all the settings into a single effect.
I expect this feature to expand in future versions to allow me to change the stacking order of effects and save these building blocks so that I can create them once, then reuse them for other clips in my project.
EDIT PREMIERE RUSH FILES

Premiere Rush is a brand-new video editing program optimized for mobile devices. It was released at the same time as this update. Although Rush is powerful on it’s own, you can also open Rush files in Premiere to provide additional editing tools, as well as supplement them using Audition and After Effects. (Premiere Rush was called “Project Rush” during its beta testing.)
NOTE: Once you open a Rush project in Premiere Pro, you cannot open it again in Rush. Complete the entire workflow in Premiere Pro, then publish your video from Premiere Pro.
The easiest way to move a Premiere Rush file from your mobile phone to Premiere on your computer is to sync it using Creative Cloud, then open it using Premiere from the Creative Cloud.
The easiest way to open a Premiere Rush file is from the Start Screen: Open Premiere Rush Project; as illustrated above.
NOTE: By default, the file is saved to the Converted Rush projects folder on your system. If you want to save the file elsewhere, use File > Save as, and navigate to a location of your choice.
INTELLIGENT AUDIO CLEAN-UP

In my article on Audition, I talked about the new DeReverb and DeNoise effects. Those same effects are now available in Premiere. While the Audition effects provide more control, the Premiere effects are easy to apply and built-into the Essential Sound panel. Here’s how:
DeReverb: This effect estimates the reverberation profile and helps adjust the reverberation amount. The effect enables you to smooth out recordings with lots of reverb or short echoes, and includes a very simple interface. You can adjust the amount of DeReverb applied, control using processing focus buttons, and also adjust gain automatically or manually. (Source: Adobe Help)
This won’t make all reverb disappear, it will simply make the speaker’s voice sound more “present.”
DeNoise: This effect offers real-time, zero-latency noise reduction without noise prints or complicated parameters. Use this feature to remove unwanted hiss and hum. You can control the amount of noise reduced and adjust gain. Audition also lets you listen to the removed noise in isolation. (Source: Adobe Help)
NOTE: Noise reduction is NOT the same as noise elimination. This filter does an excellent job at removing hum and air conditioner noise, its reasonably good at reducing the general hubbub of background noise at a trade show, and didn’t remove a siren behind a speaker’s voice at all. The best way to get clean audio is to re-record it. This new tool, like other noise reducers, can help clean up bad audio, but it won’t make it perfect.
For more details on these effects, read this article.
EDIT AND TRANSFORM VECTOR GRAPHICS
New in the Essential Graphics panel is the ability to edit and modify vector graphics.
NOTE: A vector graphic is often created in Illustrator and describes shapes as mathematical equations, rather than the bitmaps used by Photoshop. Bitmaps have more texture, but vectors can be scaled to any size without losing resolution.
Since I don’t work in Illustrator, here are the instructions from Adobe’s Help files:
You can edit and transform vector graphics without rasterizing them using vector motion controls. This prevents pixelation and eliminates boundaries caused by undesired cropping.
You can edit vector graphics directly from within the Essential Graphics panel, or by using the Effect Controls panel.
NOTE: Make sure you do not click on one graphic layer item in specific, otherwise you select the layer and not the whole graphic.
FINE-TUNE MOTION GRAPHICS TEMPLATES
Thinking about graphics, Motion Graphic templates are designed in After Effects for use in Premiere. One of the big features in the last release of After Effects was the ability to create graphics based on spreadsheet data; called “data-driven graphics.” Data-driven Motion Graphics Templates can contain three types of data:
The designer, in After Effects, sets the data type for each column, and these data types cannot be changed in Premiere Pro.
Now, Premiere has the ability to add spreadsheet data to a properly designed Motion Graphic template, without having to open After Effects. All we need to do is link the spreadsheet data to the template and all values are updated automatically.
We can also now change:
Adobe has also made it easier to search for Motion Graphics templates in Adobe Stock.
VR ENHANCEMENTS
Adobe added the ability to create 180/VR video with optimized ingest, editorial, and effects, for either monoscopic or and stereoscopic content. We can also output finished videos in the Google VR180 format for YouTube, Facebook, or other platforms.

(Image courtesy: Adobe)
We can now place spatial markers on your media while wearing your HMD (Head Mounted Display). In earlier versions of Premiere Pro, we had to remove our headset to add markers
There’s also a new Theater Mode providing a portable reference monitor within the Adobe Immersive Environment. This acts as a virtual screening room for collaborating with your director or producer, whether for 2D or immersive content, or a combination of both.
When we view footage with Adobe Immersive Environment (AIE) active, we now enter a virtual room with a monitor in front of us that represents something like a home theater experience. Adobe Immersive Environment automatically switches to this “theater mode” when the Source or Program Monitor encounters traditional 2D, non-immersive footage.
TEAM PROJECTS

We can now invite people to join a Team project using groups, as well as individual email addresses.
A WHOLE LOT OF OTHER STUFF
Creative Cloud Libraries now allow us to:
Adobe added support for more file formats:
Plus new performance improvements
But, wait, there’s more:
ONE LAST THING

A new preference setting for Auto Save allows us to save the current project(s). This setting – Preferences > Auto-Save – is off by default. When we enable this option, Auto Save creates an archived copy of one or more current projects, but also saves the current working project.
Auto-saved versions have a suffix with the date and time it was saved (yy-mm-dd-hh-mm-ss) appended to the project name (for example, ProjectName-2018-10-31_09-53-41.prproj).
When an auto-save occurs, Premiere Pro creates a new backup project file and adds it to the auto-save folder as an emergency project backup. This file is always the latest saved version of that project.
SUMMARY
The changes in Premiere in this update are both pervasive and powerful; the new color tools in Premiere are especially welcome. I’m looking forward to learning more about them – and sharing what I learn – as I work with Premiere in the coming weeks.

8 Responses to New Features in Adobe Premiere Pro CC 2019
need to learn video editing
Is there a reason why dereverb is missing from my latest version of Audition? I’m running 11.1.1.3 and I have no option to update the software further through CC. I pay for the “All Apps” plan and get regular updates but I don’t see anything for Audition. Thanks for your help. Are these new features not available yet or am I just missing something here?
Matt:
Adobe Audition 12.0.x is the version that supports dReverb. As to why you can’t upgrade to it, I’m not sure. That’s a question for Adobe Support. My first guess is that you are running a version of the macOS that is too old.
Larry
my favorite update of Adobe premiere pro cc 2109 is new home screen. Last one was kinda boring.
Can we solo a video track yet? Premier is the only program in the world where you can’t solo any single track that you want.
Allen:
But we can solo any track and have been able to do so for a long time.
For audio, click the S button in the track header to solo any audio track.
For video, Shift-click the eye icon to hide all tracks, then click the eye icon for the track you want to view. Shift-click again on any eye icon to reenable all video tracks.
Larry
Hi, I’m a subtitler and I kinda hope the line spacing in open captions tool is included. Thanks.
Kabiru:
Hmmm… good question. Both SRT and SCC subtitles have very limited format control (SCC has none, actually). My suspicion is that SRT doesn’t, but I don’t know for sure.
Larry