
![]()
I was watching some TV promos this morning where a camera was moving around a series of images displayed on a wall. And I said to myself, Motion can create that.
Here’s how to create the effect. This tutorial takes about 30 minutes to complete.
NOTE: To better understand this tutorial, I included a movie at the end with the finished results.

Here’s where we are going. Moving video elements aligned to form a wall, with a distant background and a camera moving through space to ultimately zoom into a specific video image.
There are LOTS of ways you can customize this:
You name it. Still, let me show you the basic setup, then you can tweak as you see fit.
NOTE: There are templates that make creating the wall faster and, if you only have one image, using a Replicator is faster. FCP X has something similar, but the images are only stills. It’s nice to know how to do this yourself.
CREATE THE BACKGROUND

First, create a Motion project. Here are the specs I’m using. This effect doesn’t need to be long, since this is a transitional element. In my case, I’m using eight seconds.

In the Layers panel, create two groups (folders). Type Shift + Cmd + N and name them:
Naming is not required, but helps keep things organized. To rename a group, select it and press the Enter key. Press Enter, again, to accept the new name.
Select the Background group then, from Library > Content > Backgrounds select something that’s solid and kinda dark. I used Medium Blue Mottle.
NOTE TO APPLE: It would be REALLY nice to have more dark backgrounds!!!

In the Layers panel, click these small icons on the right side of each element. When the three graphic icons are side-by-side, you are in 2D space. When they are stacked, you are in 3D space. We need every element to be in 3D space, so you’ll need to change these groups as you create them.
NOTE: 2D or 3D applies to groups. Elements in a group inherit the group setting.
Finally, we need to add a light that will illuminate JUST the background. Why? Because it looks cool and allows us to play with lights.
Go to the Object menu at the top and choose Object > New Light.

Rename the light “Background Light,” and notice that new controls appeared in the top left corner of the Viewer.

Click Active Camera and change the view to Top. (We’ll switch between these two views a lot.)

This gives us a view from the top down – like an architectural drawing – of the environment – called a “set” – that we are creating. Here, you see:
NOTE: The easiest way to move things is to select and drag them in the Viewer, but the easiest way for me to give you directions is using the Inspector. Once you see how this works, feel free to grab and drag stuff.

In the Layers panel, select the light. Then, in Inspector > Light, change the Type to Spot and the color to light blue. (This color, too, is your choice.)

With the light still selected, go to Inspector > Properties and set the values for Position and Rotation that you see here.

This gives you a nice spotlight effect on the animated background.
We are now done with the background. However, if you want to get fancy, you can animate the movement of the light or use keyframes to change color or other light settings. We won’t get fancy here, or this article will become a book. But, definitely, feel free to play with different settings and see what happens.
CREATE THE VIDEO WALL

Go to the top right corner of the Viewer and, using the View menu, turn Guides on (shortcut: Cmd + ; )

Next, divide the screen into thirds. (For a 720p image each third is 426×240 pixels.) Get these as accurate as you can, but don’t obsess. To create a Guide, drag it from a ruler at the edge of the frame.
Select the Wall group and import the video clips you want to build into the wall. As we have nine sections, we’ll need nine clips. Make sure all the clips are stored inside the Wall group.

Select each clip, then scale and position it so that there is one clip in each grid position. The easiest way to adjust these is Inspector > Properties. Leave room around the edges of each image so we can see through to the background. (These are my settings for the bottom right clip.)
 (Images courtesy of Pond5.com.)
Here’s what my grid looks like with all shots sized and positioned. This will look best if you spend the time to make sure all the edges align.
NOTE: Putting all the video clips in the same group allows you to manipulate all of them using just the group. This especially simplifies animation.
At this point, you can hide the Guides – type Cmd + ;
NOTE: Motion does not automatically save. Type Cmd+S to save your work, then do so frequently from now on.
ADD A CAMERA, A LIGHT AND ADJUST POSITIONS
From the Object menu, choose New Camera.
Using the Active Camera menu in the top left corner of the Viewer, switch to Top view.
NOTE: If all your video clips suddenly got bigger and filled the frame, you forgot to switch the Wall layer to 3D. Do so now.

To better see what we are doing, let’s move our view up more. DRAG this icon until you can see the entire yellow triangle for the camera. All you are changing with this icon is your view of 3D space.
Select the Wall folder, then, in Inspector > Properties, adjust the Z Position so the Wall group moves closer to the camera. I moved it 400 pixels closer in Z space.
The background is now on the red line, the wall is closer to the camera and the camera hasn’t moved. But, in the inset in the lower right corner, the Wall disappeared as you dragged it – that’s because we moved it out of the light.
Go to the Object menu, and choose New Light.

Here are the specs I used – feel free to tweak. With the light selected, this is Inspector > Light – note that I made this a Spot light, which gives us more controls.

And this is Inspector > Properties.
Select the camera. Use Inspector > Position and adjust Z Position until the camera moves back enough to see the entire wall. For me, this was 550 pixels.
Select the Background group and scale it larger so it fills the frame now that the camera is in position. (I used 150% – ultimately we’ll need even more.)
Select Background Light and move it so it lights the left edge of the background.

Here’s what this looks like now. We now have all the elements built, lit and positioned. Now we need to animate the camera.
ANIMATE THE CAMERA
Select the camera and apply Behaviors > Camera > Sweep. Leave the Behavior at its default settings, but set the effect to end at 2:00 seconds.
With the camera still selected, apply Behaviors > Basic Motion > Motion Path. This moves the camera slowly to the right.Make sure it starts and ends at the same time as the sweep. You’ll need to adjust the distance of the motion path till the move feels right. (What you are doing is moving the camera to compensate for the wall moving to the right during the sweep. It won’t be a long move.)
Again, with the camera still selected, apply Behavior > Camera > Framing. Set the In for this Behavior to start at the Out of the Sweep effect. Set the Out for the Behavior around 5:00.
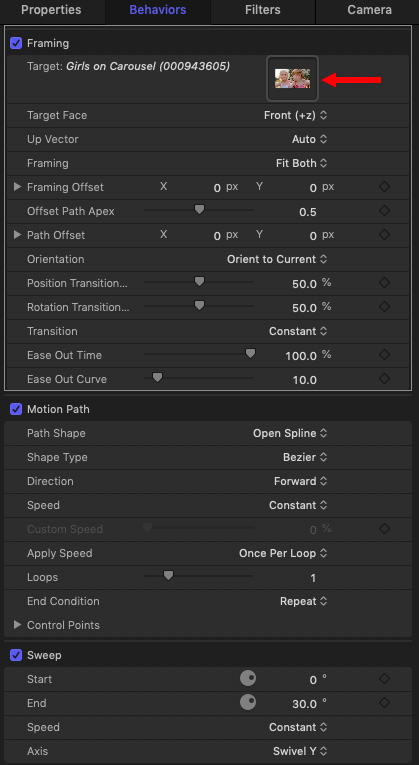
From the Wall group, drag the ICON for the clip you want the camera to travel to into the Image well at the top right corner of the Framing effect in Inspector > Behaviors.
This screen shot illustrates all the camera animation settings.
Whew! Done.
TWEAKING
As I played this, I adjusted the size of the background – and, in thinking about it further, might replace it with a particle effect.
I also added a motion path to the background and background light so they would move and separate more from the wall as the camera moves.
Additional changes could include:
But, you get the idea. This is a very flexible effect that, once you create it, gives you lots of ways you can reuse it on lots of different projects.
Here’s a link to my finished movie.

3 Responses to Motion 5: Create 3D Moves on a Video Wall
Great excercise, Larry. But I’m having a problem keeping the wall and the background traveling in sync. That is, they start and end in the same place in terms of position but in the interim, they drift apart. Is there a way to make them match each other throughout the move?
Thanks.
Philip:
Keep in mind that you really don’t want them to move together – it is the difference that provides a sense of 3D.
However, if you want them locked, put them both in the same folder (group).
Larry
Larry,
It worked! I simply added the movement parameters to the group folder. In addition, I was able to add a drop shadow to the wall by converting the wall from 3D to 2D. I’m not sure why that worked but it did. It was an experiment.
Thanks!