
 by Loren S. Miller
Loren S. Miller has edited one Oscar-winning short documentary, Karl Hess:Toward Liberty, two Oscar nominees, and three Student Oscar winners; all originated on 16mm film. Today, he’s fully digital, and remote edits from coast-to-coast, consults, reviews products, and teaches. Visit him at facebook.com/neotrondesign, say hello and tell him why.
[This article was first published on the MacSales.com blog. Republished here with the author’s permission.]

Author’s Note: For this article, I was educated by ever-patient Cynthia H., Tim E., and Liz at OWC’s Technical Experience and Sales sections respectively. Jeff J. in Product Marketing also helped, and included SoftRAID® founder Tim Standing in the investigation. Tim’s a driver builder since 1986!— and leads a crack engineering team. Their patience, clarifications, and wisdom are everywhere in this article. I’m nominating all involved for Life Achievement Awards.
The Big Need
Maybe your OWC ThunderBay 4 RAID is getting full, passing 15% free space. Or, maybe a series job is done but may return within a year or so. Or, maybe a new assignment has surfaced and will need its own storage.
Wouldn’t you like to unload a RAID set and park the actual disks on a shelf, for a particular client or project for several months? Then load a fresh bunch of disks into the box for a new client or project? And archive a bunch of these sets in loud color-coded cases, to reload when you need them?
I sure do! It’s pretty simple, and goes smoothly, if you follow a procedure.

Shelving must be sturdy; these spinning 4-drive sets get heavy- roughly 15 pounds per set. NVMe blades are much lighter, but spinners hold their data for much longer, without powering up. An NVMe charge depends on its use.
The Big Surprise
Some popular RAID products are dead-end RAID boxes— DERBS! Some even have drive doors and multi-disk slots—you might think these enable you to cycle out a RAID set and archive it, but try to reload it? Nope. You’re locked out, because they offer no persistent disk key or other disk cycling mechanism. Load it in and it’s overwritten with a new key.
TeraBytes of data could be gone. Utter disaster! Some sellers don’t tell you this.
It might have happened to me. But something told me to first reread the docs. Saw no reference to reloading sets. Emailed the maker’s tech support dept. and got the bad news. The doors are for swapping out failed disks and rebuilding a RAID- that’s it. Doors to nowhere. Cheaper, but thin thinking.
Enter OWC’s ThunderBay Series

A ThunderBay 4 box, bundled with SoftRAID—the hidden magic which binds a bunch of hard drives into a speed demon, backup beast, or both—met my expectation: follow procedure, and I could pull, shelve, or reload a RAID kit and spin it up, (or replace a failed disk).
To me this describes a Forever RAID system—FRS. Let’s set the stage.
What’s required for well-organized swapping and archival of drives with a ThunderBay 4 RAID?
An Example Workstation
For comparison, I’ll share my workstation environment which has been working without a burp since 2017, and with my ThunderBay 4 since 2019.
The engine is—don’t laugh—a 2013 Mac Pro 3.5 Mhz 6-core cylinder, stuffed with 64GB RAM (half the maximum allowed), and two medium power AMD D500 GPU’s, each with 3GB VRAM. I’ve set it up to boot into two partitions, the first for regular assignments, the second for advanced GPU work and testing of apps under new operating systems. Editing varies from old SD to HD to Ultra and DCI 4K video. From ThunderBay 4 my system delivers two smooth full rez 4K 24fps streams- in either Mojave or currently, Catalina.
These machines are wildly popular among small shops like mine. (Today’s equivalent priced offering is the 2022 Mac Studio with M1 Ultra.) The Pro sports 6 Thunderbolt 2 ports. They power my three displays. Two of the remaining three ports are given to a DERB, and to my ThunderBay 4.
For now, I must step down Thunderbolt 3 to 2, with a $50 Apple adapter.

Sometimes you have to adapt.
Power Security Is Important
For power security I plug both computer and drives into a capable UPS (Uninterruptible Power Supply), in my case a 1500-watt battery backup system which kicks in for several minutes when a lightning bolt strikes a local transformer. This allows me to shut down normally until a storm passes.
A stand-alone Line Conditioner cleans electric service which often varies, (brown-outs). Even those can wreck an unprotected hard disk directory. For “clean” electricity in an UPS, look for Automatic Voltage Regulation (AVR) in addition to surge protection and battery backup. Worth every penny.
Without devices like these between you and the wall outlet, you’re at the mercy of mother nature or your elecric utility.
The battery in the UPS should be refreshed every few years or so.
In this environment, performance of the machine and the TB4 box are so good, I began to see a need to archive a RAID set on a continuing project and start a new one for upcoming clients. Please note: I am not describing a “hot-swapping” procedure; your ThunderBay icon should be properly ejected, box powered down and disconnected from power and data ports as indicated.
And why not make a scrolling documentary about the procedure?
Enter SoftRAID®
Under Mojave, SoftRAID served me well since 2019, and now, thanks to a press license gifted me by OWC, I’ve installed a major upgrade to V. 6.3, which works very well in Mojave OSX 10.14, in Catalina 10.15, soon to be replaced by Monterey OS 12.5, applying the same license key. Here’s how:

Just fill in your SoftRAID serial number. Reboot back into the additional partition. No more 30-day trial. You’re good to go. Repeat in as many boot partitions as you’ve installed.
According to Tim Standing, SoftRAID® founder:
“SoftRAID is licensed for a single computer (regardless of which boot volume is used). This was the case for 5.x, is the case for 6.2.1 and will be the case for 6.3. The user does need to enter the serial number for each separate boot volume but the same serial number will work on all of the boot volumes on that one computer.”
With V. 6.x comes a new web-based OWC license management mechanism.

Establish an account with SoftRAID, enter your SR serial number, confirm it’s set for your computer, see status, and control activation anytime, from anywhere.
Great if you’re switching cutting rooms, or from a desktop to a laptop workstation for travel. (Be sure to pack the RAID carefully in a padded case before travel.)
KEY QUESTIONS
First question: Will my SoftRAID version work under multiple OS systems on the same computer?
Yes, within a defined “OS update sandwich,” which includes the earliest to most advanced OS supported. For more detail, refer to the SoftRAID ChangeLog of software releases.
The list specifies the most advanced OS supported in each release. For 6.3, as of this writing, it’s OS 12.x—Monterey—for all Macs, including those with new M1 chips. The earliest, indicated under V 6.1, is listed as MacOS 10.12—Sierra—two versions before Mojave. That’s all the way back to 2016!
NOTE: A SoftRAID Update is a dot-release such as 5.7 to 5.8. An Upgrade is a new version release such as 5.x to 6.x. Updates are free. Upgrades require a new-release license.
Second question: What Disk Format?
Years ago when I first set up the ThunderBay box, I specified disks be initialized as MacOS Extended (HFS+) and Journaled. This format co-exists nicely with the new Apple File System (APFS) on both my boot partitions.
Third question: Why shouldn’t I format my RAID sets using APFS?
OWC’s Cynthia indicated, if you’re using spinning disks, it’s best not to change from HFS+ to APFS; there is a performance hit (due to a difference in where critical file metadata is stored, causing too many hard drive seeks).
HFS+ on spinning hard drives communicates with APFS just fine. If, however, your RAID box uses SSD blades, you can initialize them to APFS—SoftRAID is optimized for it. (Just be aware of their more-limited unpowered shelf life.)
If you anticipate sharing the box on more than one Windows machine, you should format the RAID as ExFAT, well-supported on both platforms.
For one-to-one or small group file access, leave your source as HFS+, and on each Windows side, install OWC’s MacDrive software, which seamlessly enables HFS+ recognition under Windows 10 or later.
Now, fully prepped, we begin swapping RAID sets, a real world adventure.
HOW TO SWAP RAID SETS
Step 1: Set-up your first (and any new) RAID set
Latest SoftRAID drivers, desktop apps, and upgrades are downloaded from the website and installed on all boot drives, in each Applications folder. Launch the app to configure your fresh disks to your chosen RAID configuration. Serialize additional boot partitions as described above.

In the pop-up menu, choose the volume setup best optimized for your use.
I decided on RAID level 1+0, also known as RAID 10, fast file delivery plus mirror backup, and there it is. Details in the SoftRAID XT PDF manual.
There are other RAID levels, like RAID 4 and 5, and if you search the OWC website, you’ll find good articles and blog posts to help decide if they’re more useful for your work and your RAID box.
Larry adds: I personally prefer RAID 5 for spinning media. I get greater storage capacity combined with data recovery in case one drive dies. There are many options. I use RAID 4 for SSD RAIDs.
Step 2: Set-up for a Swap-Out: Labeling and Storage
Now we get a little obsessive, but it pays off. A perfect rainy day project.
I produce labels and plastic dust-free storage cases for both the original RAID set to be pulled and archived, and for the second set going in. Chosen case colors: green for outbound set 1, orange for incoming set 2.
My new orange storage set will be identical to the first, 8 TeraBytes, mirrored to a second 8 TB pair – four physical disks for the 4-slot ThunderBay box.

My new RAID set.
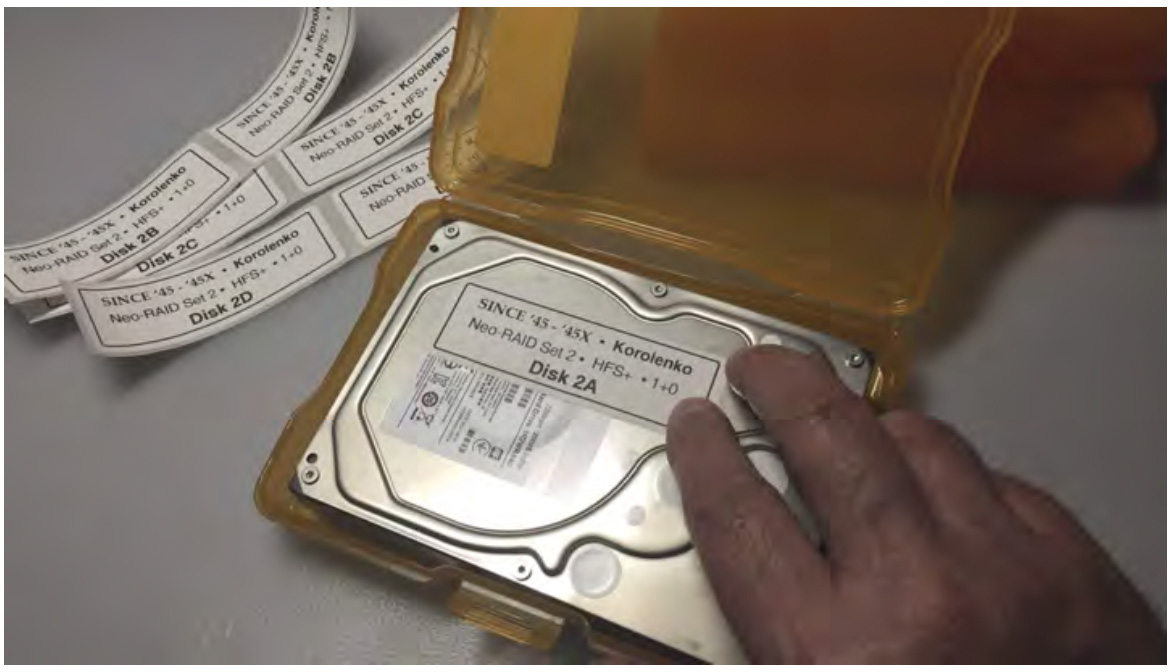
I use Brother P-Touch labeling to generate two 1” X 3” labels for each disk in a set, preparing a home for the first set before it’s pulled out of the box, and for the second set going in. One label goes on the shiny side of the bare drive itself, (avoid covering holes); the second on its dust case cover.
Labeling and Naming Conventions
Along with an erasable Date area where you record the archive date, add a prefix on the label indicating Project /Client name, then add to the first set—
1A (for slot A, first half of your 8TB Primary RAID pair) 1B (for slot B, the second half)
1C (for slot C, first half of the RAID Secondary or backup mirror pair)
1D (for slot D, the second half)
NOTE: As you’ll discover if you make each disk blink, the internal physical assignment for each disk may seem disordered; leave this up to the software. The important thing is to load and unload in a prescribed, consistent order.
And as you may have guessed, for your second set ID’s— 2A, 2B, 2C, and 2D.
Prepping the inbound set swap. First label goes on the drive.

Second label goes on the case. Isn’t this just neat as anything ever?
Step 3: Close Encounters of the RAID Kind
Now it’s time to eject your first RAID volume icon from the computer desktop, then power down your computer and ThunderBay. Disconnect both Thunderbolt and power lines. Wait a few minutes for the box to cool.

Note that each drive slot has an ID letter. Match your disk numbers to these.
I have labeled, green cases waiting for the outbound drives. I might be wearing anti-static gloves, an anti-static wristband, or have otherwise discharged any collected static by touching a metal table leg.
Ready to unlock and pull the original RAID set? It’s always a big moment. I don’t think we could ask for a more beautiful evening, do you?

A twist of the lock knob atop each drive sled and a gentle tug pulls out the drive. Vacuum off residual dust. Note waiting green case.
Right after pulling, slap a matching label on each vacuumed bare disk, based on the drive slot ID it just came from.
Don’t vary this procedure! If it’s boring, you’re doing it right.
Notice the disk is mounted in a well-built metal sled, secured with 6 drive screws. This assembly will not fit in the waiting plastic case (unless it’s modified. See Tips in Addendum, below.) So you must swap the sleds.
Use a small gauge Phillips-head driver. A few turns brings out each screw.

This is not the reason it’s called a “forever” RAID. It may seem so, but each de-sledding or re-sledding takes only a couple minutes. Each.

Handle the disk by its edges,

The labeled disk is promptly parked inside its waiting case, and the cover locked.
Flash forward—to the shelf with your first set!

Outbound RAID set archived. Note label’s Date area.
Each bare drive fits perfectly into a 4” X 6” plastic dust-sealed photo case with a snap-shut cover lock. These are available at local arts or craft stores, or… you know. They come in carnival colors, like avocado and mango. I like to keep each set in the same color. They even stand on edge, like books.
Step 4: Load Your New Incoming RAID Disks
We are ready to load and lock RAID set #2. The case color is orange, the labels were pre-applied. Now we sled disks.
Attach each labeled disk to its letter sled (or, if it’s a spare unmarked sled, any sled). Do not over-tighten screws: hand snug. Finally we —
HOLD IT!
If you’ve been operating your ThunderBay for any significant length of time (i.e. a few years), check the box for dust buildup. If there is any, don a mask.

From sublime to grime- note pointer noting unsightly dust in sled tracks (This might represent a year of accumulation. I had quite a bit more.)
Step 4A: Vacuum the box in and out
Use a slim nozzle attachment to carefully, gently vacuum out the dust clumps. Don’t let the nozzle touch the electronics at the deep end.
Do not use canned air— cold propellant can damage heated chips.
Also run a vacuum pass over the fan out on the back of the box. You should be able to dustbust most of it without removing the fan cage.
Step 4B: Now Load Your New Incoming RAID Disks
Double-check that sled A matches the Disk 2A label, etc.— slide it right into the first slot on the left along its guide channel. When you feel it stop, check to see if it still protrudes a bit, and if so, give it a gentle yet firm final push to seat it on the SATA connector. Engage the lock knob at top, hand- tighten.
Repeat with Disks 2B, 2C,vand 2D.

Three sleds removed for drama. Looks and feels better after a dusting, yes? I know! Like a brand new RAID box for a fresh RAID set- yet home to all.
When all disks are firmly seated, with each lock knob hand- tightened, close and lock the box. Reconnect it, switch it on, and boot up your computer.
Launch SoftRAID configuration panel, (refer to Step 1) select the fresh disks you want as part of your RAID. Initialize, format, and define the RAID level, perhaps as I do, RAID 1+0. Read the manual for instructions, they’re short.
That’s it! On your desktop the RAID shows up as a single volume icon, in the name you gave it during setup.
Step 4C: Check Your Speeds
Start using it. If your computer system is double-boot, then boot into the other partition and plug in your master serial number there, as described.
In checking my RAID speed using AJA System Test Lite or Blackmagic Design’s Disk Speed Test with a 4GB test file (an average 4K clip size), I get a write speed over 2528 Mb/s (316 MB/s) and 2592 Mb/s (324 MB/s) for reads.
Quite enough service for two smooth streams of 24fps 4K DCI ProRes 422 (HQ) in Premiere Pro CC, on a ten year old Mac Pro cylinder running Thunderbolt 2. I expect improved performance with a Mac Studio with M1 Ultra aboard.
Now we copy, capture, or ingest content into the RAID volume, which obediently copies it to the invisible mirror drive pair.
Now you can sleep easy. Eventually, it’ll be time to…
Step 5: Reload an Archived RAID set
Eject your current RAID desktop icon, shut down, disconnect. It’s time to pull the current orange project RAID set until a new season is financed.
Swap the sleds, (or see Addendum below), and reload the green, preconfigured first RAID set, following the letter sequence on each disk label, left to right. Load and lock, reconnect, fire it up, and boot up computer. Get to work!
That’s a Forever RAID system in action.
EXTRA CREDIT — ALTER SHELF CASES FOR PRE-SLEDDED DISKS
Yes! You can affordably buy empty drive sled kits from OWC to avoid literally screwing around de-sledding/re-sledding disks. You can presled your disks, archive or reload each set in minutes!
I ordered mine immediately.

Drive sleds come with two screw sets: short and longer. I used the longer.
These sleds are unmarked: you must either identify each with labels A, B, C, D, (or higher for a 8-bay box) or simply rely on the disk labels on the drives you install in the sleds for re- loading reference.
The only problem is, your affordable 4” X 6” storage cases are now too tight for storing a sledded disk. You can purchase bigger, 5” X 7” boxes, or … edit your cases, what else ?!
Why? Because it’s OWC Arts and Crafts Hour. And the payoff is pretty nifty.
Modify Cases with Mindfulness
The minute I indicate “razor knife” you know I’m going to advise caution.
Lay an empty sled in the case to see where the protruding knob will come through, and mark each side to outline a 1/4” notch, which you’ll cut out.
When I modified my cases, I used a couple of trigger-clamps to immobilize a case onto the worktable to keep it from jumping or flipping under a cut.
These craft cases vary in softness, often due to color dyes in the plastic mix. In some the slicing will be easier, almost like dense cheese. Others will be older, tougher, brittle — and under pressure the knife may suddenly plunge through the plastic in the wrong direction, with a crack!
Pre-score the Notches
For those, “pre-score” the two notch outlines with a razor knife, making several passes on harder plastics to make cuts easier to get through. Keep fingers away from the cutting path, and wear protective eyewear.

First mark and carefully cut a notch through your outlines in the box base and lid – the protruding locking knob will emerge here, taking up full width.
Cut the base notch sides first, then vip the case over, re-clamp it, and cut the lid sides. To snap each off cleanly, push a screwdriver tip against the notch vap, then work it to and fro to snap it off.
Keep in mind, this needn’t be fine sculpture; my own work attests to that. Go slow and you’ll get through each case. Push for speed and you may injure yourself, the case, or both. If not confident in your use of a razor knife, find someone who is. Check for missing fingertips.
Dremel Moto-Tool users: Several cutting and grinding bits can be used to notch and smooth plastic edges, but Moto-Tool bits at any speed generate heat, and melted plastic can wind around the bit shanks. Take breaks to scrape the plastic away while still warm. I use a standard razor knife.
The Second Operation

To add space for the sled chassis, mark and excavate the back middle section including curved ends between the hinges. Leave lid intact.
For extra ease in removing the back rectangle I first carefully scored the bottom inside edge: about 5 easy passes with the razor knife to weaken it.
Once each side cut has been made, push the rectangular flap to and fro on the weak bottom edge until it either falls off or allows you to pull it off.
Next case: repeat, rinse, dry.

Voila. A snug fit, yet festive, functional storage, and fast access.

Dated and shelved. Eat your hearts out, Marie Kondo, Home Edit, etc. Swap pre-sledded RAID sets in four minutes or less.
Closing the Case: Disk Health Cycling
Research disclosed many points of view regarding the reliability of HDD’s over SSD’s for archive. Some sources sidestep the issue entirely: use M-Disks.
You’ve read the article. If you proceed, you must, as I did, assume all risk!

4 Responses to How to Swap and Archive Hard Drives With a Forever RAID Set
Hi Larry:
Sooooo, this procedure only works for ThunderBay (Thunderbolt) OWC Raids? I have an OWC Mercury Elite Pro Qx2 4 bay (USB3, eSATA, FWire 800) box.
hey – are you related to Coert?
Alan:
The answer depends upon how the RAID is constructed. The RAIDs that Loren wrote about use SoftRAID as the RAID controller, which makes this technique possible.
However, it seems to me that this technique should work with other RAIDS, PROVIDED! that you always insert the same drive into the same RAID slot. Otherwise, everything will break.
Check with OWC, who manufactured your RAID, and confirm this technique will work with your gear.
Larry
Gotcha… will do!