
![]() Adobe introduced Auto-Reframe in the latest update to Premiere Pro CC 2020. What Auto-Reframe does is convert existing clips or sequences into different aspect ratios – automatically. A typical reason to do this is to convert a 16:9 video into a 1:1 snippet to post to Instagram, or convert a horizontal video into vertical to post to a website.
Adobe introduced Auto-Reframe in the latest update to Premiere Pro CC 2020. What Auto-Reframe does is convert existing clips or sequences into different aspect ratios – automatically. A typical reason to do this is to convert a 16:9 video into a 1:1 snippet to post to Instagram, or convert a horizontal video into vertical to post to a website.
In the past, we could do this manually through cropping, then manually applying Motion keyframes to change the position of the video in the frame. The benefit of the latest update, though, is that this conversion process happens quickly and automatically. Even better, by harnessing the power of AI, which Adobe calls Adobe Sensei, Premiere attempts to keep key action in the frame, even after resizing. Plus, as you’ll see, it also automatically repositions graphics.
NOTE: This process is, essentially, cropping an image. Taking something big and making it smaller will look fine. However, converting a vertical video to horizontal 16:9 will result in very low image quality due to a lack of pixels in the source image.
AUTO-REFRAME CLIPS
We can auto-reframe individual clips or completed sequences.
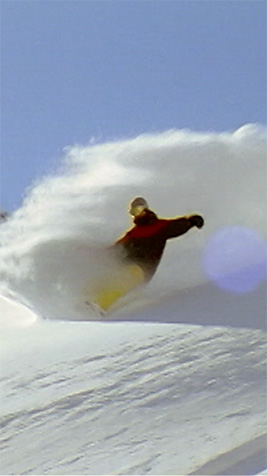
Footage courtesy: Standard Films (www.standardfilms.com)
To reframe a clip, FIRST, move it into a sequence that uses a different aspect ratio than the clip itself. For example, here’s a 4:3 clip that I edited into a 9:16 project.
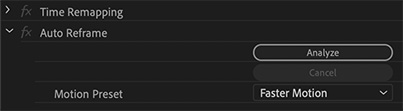
Select the clip you want to reframe and go to Effect Controls > Auto Reframe (it’s at the bottom of the window). Because there is a lot of action with the snowboarder sliding down the mountain, I changed the Motion preset to Faster Motion.
NOTE: For some reason, sometimes this option does not appear when a clip is selected in the Timeline. I’m not sure why.
Then, click Analyze. This allows Premiere to determine what it wants to feature in the reframed shot. Basically, it “pans-and-scans” the clip so that the action stays in the frame, even though the snowboarder was moving across the frame from right to left.
If you don’t like the results that Premiere came up with, you can over-ride them using keyframes in Effect Controls > Motion.
NOTE: None of the changes to a clip are permanent.
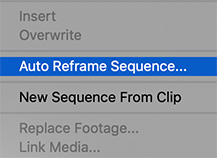
AUTO-REFRAME SEQUENCES
Unlike clips, when Premiere auto-reframes a sequence, it creates a new sequence, leaving the original sequence untouched.
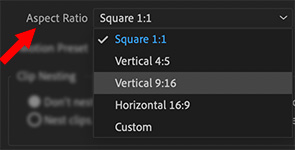
To auto-reframe a sequence:
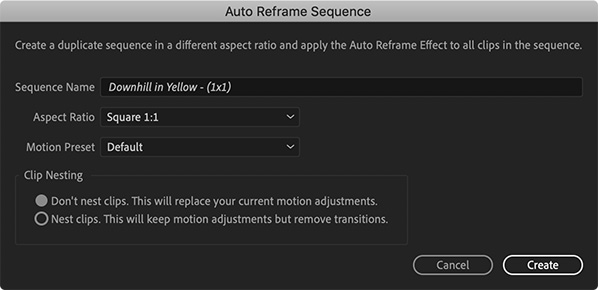
NOTE: As with clips, you can over-ride any Reframe settings by applying custom Motion settings. If you need to animate them, use keyframes.
EXAMPLES

Let me illustrate the results. This was the source 4:3 image, with a title added on a higher track.

Here’s the 1:1 version (with the playhead on the same frame). Note the shifted position for the title and that the snowboarder is now centered.

Here’s the 16:9 version. Again, both title and action have changed position.

And here’s the 9:16 version. Notice how the text changed in size and the snowboarder moved to the center again..
SUMMARY
I was impressed with how this worked, especially because all the changes were non-destructive and could be over-ridden using Motion settings. For those of us who need to repurpose projects for multiple platforms, this new feature could save all of us a lot of time.

18 Responses to First Look: Auto-Reframe in Adobe Premiere Pro
Thank you for this assessment Larry. This is a very useful feature and I admittedly use another NLE as my primary tool. I’d like to see something like this in both FCP X and DaVinci Resolve. It can be time consuming having to reposition and resize content.
Hello,
I agree about having something like this for FCP X. I don’t think it would work with titles and generators. Especially ones that come from 3rd parties. Some of those were built for landscape aspect ratios. You may have to re-add the title or generator and build it from scratch for the portrait aspect project. What do you think Larry?
Marco:
Like most projects, you would have the best results if you knew before you started editing, that you needed different aspect ratios. There are many titles in Premiere that won’t convert aspect ratios successfully. These titles were picked because they could.
For example, a lower third that spans the entire width of a 16:9 frame won’t look good squeezed into 1:1.
Larry
Auto reframe is not showing in my version
Prabhat:
Auto-reframe appeared in the Oct. 2020 update to Premiere. It may be that you are not running the latest version.
Larry
do you know any plugin to create effect for image in Adobe Premiere?
Luc:
In addition to After Effects, there are hundreds of 3rd-party effects and templates that can be used in Premiere. What, more specifically, are you interested in doing?
Larry
Thanks Larry.
Now i know i should be looking for a template
I love you 3000
Luc:
Happy to help!
Larry
Thank you for the great article. I’m using the feature for the first time today, and am having problems. When I auto frame a sequence I get a new sequence with the correct aspect ratio, but it looks like no framing has been done. There is no “auto frame” effect in the effect controls window and no keyframes have been created in my motion settings. I have to manually keyframe all of the clips so I’m wondering what exactly has been done besides it changing sequence settings?
Matt:
I’ll look into this and get back to you.
Larry
Thanks, Larry. I really appreciate it. I’ve asked the question on the Premiere support forum as well, along with a screenshot to clarify: https://community.adobe.com/t5/premiere-pro/auto-reframe-sequence-help-request/td-p/11904096
Matt:
I just tried this myself and it seems to work. Control-click the project you want to convert in the Project panel and choose: Auto-Reframe Sequence. (or select it and choose Sequence > Auto-Reframe Sequence).
In the dialog that appears, select the new frame size and whether you want clips nested or not. (I tried both).
The new sequence appears with the new frame size. I did not see position keyframes, however, it may be that Premiere did not think they were necessary.
If this doesn’t work for you, it’s time to call Adobe Support.
Larry
Larry, do each – or any – of the clips in your new sequence have a “Auto Reframe” effect applied to them in the effect control pane? Mine do not…and this is the part that makes me think that nothing’s happening except a new sequence being created with a particular frame size.
I contacted Adobe support via Twitter, and they say I should see that effect applied in the effect control pane. Guess it’s all in keeping with my ability to find silly Adobe bugs to waste my workday!
Thanks again for having a look.
Matt
Matt:
Yes, when I apply Auto-Reframe, that effect is applied to the clips inside the sequence.
Have you tried trashing your Premiere preferences? (Google to learn how.)
Larry
I’ve previously used Auto Reframe successfully, but my last two projects have reframed in the wrong size.
A 1920×1082 sequence should Auto Reframe(1×1) at 1080×1080. Instead I have had very small square sequences of 248×248 or other random sizes. I have tried returning to an older version of Premiere (22.6.2) and the same thing happened. I can’t see anything in the settings to change the default size of 1×1. What’s happening here?
Shan:
This is a great question. And I don’t know the answer. When you reframe a sequence, it doesn’t ask for the new frame size, only the aspect ratio.
Premiere SHOULD reframe this to the largest frame possible. But, in your case, it isn’t. This requires a call to Adobe support to figure out.
Larry
[…] In Adobe Premiere Pro, you can choose to reframe individual clips or whole sequences. Reframing clips keeps their original framing and positioning. This is good for certain shots or scenes.2 Reframing an entire sequence, however, does this for all content automatically. This saves you a lot of time and work.5 […]