
![]() This puzzle on solving a typical problem in production was suggested by Mark Suszko, who also provided the images I’m using in this article.
This puzzle on solving a typical problem in production was suggested by Mark Suszko, who also provided the images I’m using in this article.
NOTE: This article describes a specialized method of creating a “garbage matte.” Here’s an article that covers garbage mattes in general.

This is Bob Fletcher. Bob is retired from the Illinois State Police, where he once consulted/liaised with the crew filming The Blues Brothers on location shoots.
And, like many, MANY shots of speakers in front of a window, the window is blown out. (Alright, yes, Bob is a bit orange and the overall exposure is gray. Let’s stay focused on the window, please.)

This is the finished effect. While there are a number of techniques that can solve this, I took as my challenge creating an effect that required a minimum of key-framing and that could be applied quickly for the entire clip.
PRODUCTION PREP
The easiest way to replace a background is to shoot the talent in front of a green screen. However, for a variety of reasons – lack of time, lack of space, lack of a green screen or ethical considerations – that may not be possible.
In which case, it is critical that you lock the camera so that it doesn’t move. Motion tracking a background to match a zoom on the talent is not for the weak. Avoid zooming.

Next, before getting the talent on the set, Mark shot a properly exposed and slightly out-of-focus background. Ideally, set the exposure and focus and shoot several minutes of material. This allows us to see movement in the background. However, in the worst case, we can work with a still frame.
The process of creating this effect is the same whether the background is moving or still.
SEPARATE THE FOREGROUND WITH A LUMA KEY

A luma key removes either the brightest or darkest parts of a frame. Here, for instance, I’ve applied a Luma key and adjusted the settings so that the bright window background disappears.
The benefit to using the Luma Key is that it is designed to work with bright or dark portions of an image, where there is almost no color saturation. The chroma-key effect is designed to work with highly saturated colors, though it can be tweaked to achieve a similar effect.
NOTE: This black-and-white image displays the alpha channel of a key, where that which is white is opaque and that which is black is transparent. The background is totally gone, but we are losing significant sections on the camera-left side of his face.

Here are the Luma Key settings I used. Specifically:
To fill the holes created by the key, we’ll add a copy of the image on top of the existing talking head.

Holding the Option key, I dragged a copy of Bob from the Primary Storyline up to create a second Connected clip.

In the Connected clip, I removed the Luma Key effect and added a Draw Mask effect. Then, I clicked just INSIDE the edges of Bob’s image to create a rough outline of his head and shoulders.
NOTE: The goal here is to be just inside the edge, not at the edge.

The Draw Mask defaults to Bezier curves, which means that we can minimize the number of points we create by adding curves to the mask lines. To do this, right-mouse click on a red control point and set it to Smooth.

Then, drag the white control handles to create the shape of the curve you want. Again, we don’t need to be perfectly accurate EXCEPT where the key removes part of his head.
NOTE: To adjust one control point without moving the other, press the Option key while dragging the control point. Shift and Command also affect how control points move.
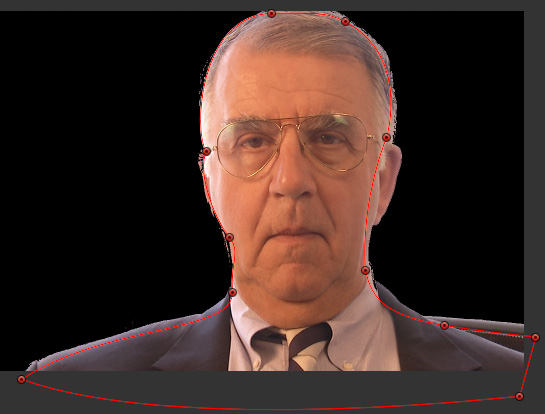
Here are my finished control points. I removed six from the original drawing and added curves just about everywhere.
BIG NOTE: The only part of this mask that needs to accurately trace the edge of his face is that portion where the Luma key tears out.

Here’s the finished effect, except the black chair was recorded twice: once with the talent, then, again, as part of the backplate. The problem is the chair position and color don’t match.

To fix this, I scaled the background up to 117%, which made the chair disappear. Ideally, the backplate should be shot without any foreground elements in it.
ADDITIONAL COMMENTS
Using the Luma key removed the background without using any keyframes. And, for the top, right and bottom edges of Bob’s face, the key was clean enough that we didn’t need to do anything else.
However, the camera left side of his face disappeared because the white levels of that portion of his face matched the white levels in the background. To fix this, we duplicated his clip and applied a mask so that his face on the second clip filled in the holes on the clip below it.
Since the key will continue to successfully remove the background automatically throughout the clip, we only need to adjust the mask – using keyframes – as he turns his head.
This is a much faster technique than trying to rotoscope (mask) the entire image of Bob’s face, because you’ll end up having to keyframe almost every frame in the interview.
Color correction, if needed, should be done before applying the Luma key (as it will affect the key settings). Here’s a summary of the effects applied to each layer; the stacking order makes a difference:
Connected clip
Primary Storyline
Backplate

One last note. There was a section of the background, just over Bob’s camera-left shoulder, that would not key out properly.

I added a copy of the background plate above all the other layers, applied a Draw Mask to it and masked just the portion of the background plate so that it covered the part of the image that would not key properly.
SUMMARY
And we are done.
This seems like a complex effect. And, in many ways, it is. However, it is HOURS faster than trying to draw a mask around every edge of a subject’s face, then keyframe every frame so that the finished effect looks natural.
Or, you could remind your production crew that neutral density gel placed on a window can save hours in post-production.
(Thanks, Mark, for the examples and the question that sparked this article.)

2 Responses to FCP X: Making Blown-Out Windows Look Good
The very top layer of Bob’s head is independent of the luma key mask layer, so you can actually do secondary color correction on him there to remove/reduce the reddish cast and make him look more natural.
There are so many times you walk into a “shoot from hell” where the key person to record only has a few minutes to work with you, you’re up several stories with no way to hang external window filtration and no way or no time to cut and mount interior ND gels to the windows, you don’t have powerful HMI lights to match the outside daylight… but of course, they want to make a big deal of the outside view in the shot. It looks “normal” to a human eye, so clients expect this to be easy to shoot for a camera. It isn’t. Over the years, I’ve had to use this technique a few times to save a shoot and deliver the kind of shot that was expected.
When I sent this idea in, it was based around use of FCPX’s draw mask tool, which I really, really love, for the ease and flexibility it offers. If the subject sits exceptionally still, and you don’t have moving limbs to mask, the draw mask can also solve the blown out backdrop problem, though you will have to do more keyframing than with Larry’s hold-out-matte system.
This garbage masking technique can also be helpful in real estate videos, where you want to show off a classy interior AND still see the gorgeous views outside the windows.
I predict a future time when cameras record z-depth information of each pixel routinely, and we can key in post or real-time just based on relative z-depth from the lens. It will offer many new ways to shoot and post and solve a lot of problems.
This is a pretty clever work around for sure. Was the talent lit with tungsten? Definitely appears like it, why was the lighting not matched to the source (daylight)?
Also, while I was pretty skeptical, when it was first added as a feature, I have used the HDR-X setting on my RED Epic in a pinch and if there is only a moderate amount of movement (not super fast movement like someone running) it actually works really well to solve this very problem. The real estate video example you mentioned would be a perfect time to use HDR-X and it would work flawlessly. Definitely shouldn’t be used as an excuse for lazy lighting but in a pinch works well.
This article explains how it works: http://www.red.com/learn/red-101/hdrx-high-dynamic-range-video
Anyway, cool article and tip! Best part is that it carries no risk. Shoot the background plate and if it doesn’t work out, didn’t cost anything to get it!