
![]()
Have you ever wondered what the two conforming options do in Final Cut Pro X:
This article has what you need to know.

Conforming is the process of changing something in your video to match a different setting; for example, frame size or frame rate.
NOTE: Spatial Conform allows us to change (“conform”) different image sizes. Here’s an article that describes how this works.
When a clip’s frame rate differs from the project’s frame rate, Final Cut Pro offers a variety of different methods to change the clip’s frame rate to match that of the project. By default, Final Cut chooses the fastest method. However, we can select different frame-sampling options in order to minimize visual stuttering and/or artifacts.
The problem with changing frame rates is that elements that are moving in your clip may develop stutters or visual artifacts. Doubling frame rates, or cutting frame rates in half, yield the fewest problems; almost none, in fact. All other frame rate changes can create issues.
NOTE: Conforming frame rates is only necessary when you are editing clips with different frame rates.
SEE WHAT YOU’VE GOT

You can see the frame rate of a clip by selecting it in either the Browser or the Timeline, then looking in the Info tab of the Inspector. The frame rate is listed immediately to the right of the image size. This screen shot is for a 25 fps clip.
NOTE: The letter “p” indicates the clip is “progressive;” “i” indicates “interlaced.”
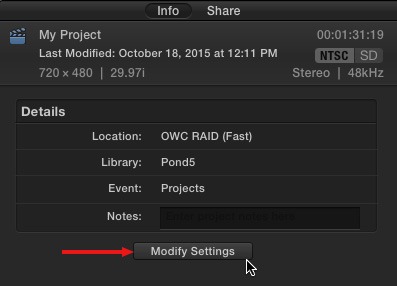
To see the frame rate of your project, type Cmd + J, then click the Modify Settings button that appears in the Inspector.
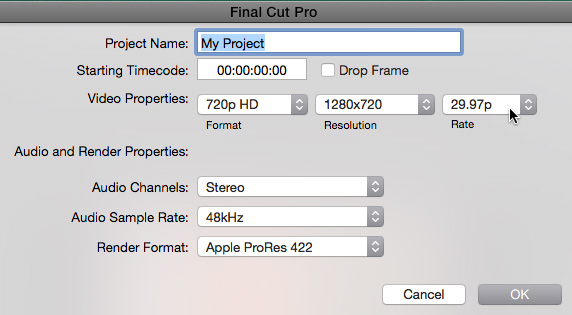
In the Project Settings window, the frame rate of the project is displayed in the Rate popup menu.
A BIG CAUTION!
Changing the frame rate of a project after you have edited clips into it is a big deal, because it will change the location of all your existing edit points. In most cases, this means you will need to reedit everything you’ve already edited.
ALWAYS set the frame rate to match your final deliverable before editing any clips into the project. If you don’t know the frame rate of your final deliverable, set the frame rate to match the majority of your media.
NOTE: You can change the frame size of your project at any time with no problems.
SELECT THE RIGHT METHOD
After editing a clip that has a different frame rate into the Timeline, select the clip, or clips.
Then open the Inspector (Cmd + 4).
Scroll down until you see the Rate Conform menu and change the Frame Sampling menu to meet your needs.

Here’s what the four options mean:
Floor: The default setting. Final Cut Pro truncates down to the nearest integer during its calculation to match the clip’s frame rate to the project’s frame rate. This is the fastest option, but doesn’t necessarily yield the best results.
Nearest Neighbor: Final Cut Pro rounds to the nearest integer during its calculation to match the clip’s frame rate to the project’s frame rate. The Nearest Neighbor option reduces artifacts at the expense of visual stuttering. Rendering is required.
Frame Blending: Creates in-between frames by blending individual pixels of neighboring frames. Slow-motion clips created with Frame Blending appear to play back more smoothly than those created with the Floor or Nearest Neighbor setting. This setting provides better reduction of visual stuttering, but you may see some visual artifacts. Rendering is required.
Optical Flow: A type of frame blending that uses an optical flow algorithm to create new in-between frames. Final Cut Pro analyzes the clip to determine the directional movement of pixels, and then draws portions of the new frames based on the optical flow analysis. Choosing the Optical Flow option results in better reduction of visual stuttering, and Final Cut Pro spends a significant amount of time to fix visual artifacts. This will generally yield the best results, but you will spend a LONG time rendering. Use this option only when other options don’t work.
HOW TO CHECK YOUR CLIPS FOR QUALITY
Verifying the quality of your conform is easy: if it looks good, it is good. If motion is smooth and images are clean, you are good to go.
If movements seem jerky, or you see weird visual artifacts in your clips, try a different setting. Pick the one that yields the best results, even if it isn’t perfect.
SUMMARY
Ideally, don’t convert frame rates at all. But, for those situations where conforming is required, pick the frame sampling option that works the best for your clips.

9 Responses to FCP X: Conform Different Video Frame Rates
Great article Larry. I use the “Spatial Conform” alot, but learned about the “Rate Conform” Thanks for another great, easy to follow article.
Hi Larry,
I’ve got a 1080/29.97 XDCAM timeline into which I’m dropping 720/25 H.264 material from a videoconference stream. On the latter clips, I see the spatial conform options only. Is one particular rate conform method being applied by default — one that I can’t change? I’ve got a honkin’ monster of a Mac Pro here that would love to apply optical flow to those clips…
And–
Many, many, many heartfelt thanks for your years of dedication to helping us tell our stories, and best wishes for all that lies ahead.
— Dan
Fantastic help, and opened my eyes to an important feature of FCPX.
Thank you so much.
I don’t see a Frame Conform option whatsoever. Just the Spatial Conform.
Bendis:
Frame Conform only shows up when the frame rate of the video does not match the frame rate of the project.
Larry
HI Larry,
I’m trying to view 50fps clips in slow motion in the fcpx browser? I don’t want to retime them in the timeline. I want to choose in and out points by viewing them in slow mo first. I used to cinema tools years ago. Is there a work around ?
Thank you
Simon:
Sorry, no. Retiming can only be done in the Timeline.
Larry
I’m trying to use the 24 over 60i footage from a Canon camera’s dreaded 24P setting. I want to use it in a 23.98 project. My understanding is that footage is actually originally 24p and I can reverse telecine it to get rid of the extra frames. I used to reverse telecine these clips with Cinema Tools although didn’t always love the results.
Given this info, any suggestions for best settings in FCP X? Would you recommend converting it in Compressor or something else first, especially since ins Mojave I can no longer use Cinema Tools?
Noam:
FCP X won’t remove these frames, I don’ think. All it will do is play them at a rate to match your project settings.
As an experiment, set your project to the frame rate you want, drop in the video and see how it looks. If it looks OK, it probably IS OK.
Otherwise, you may need to look at other tools – perhaps Compressor – to get rid of the excess frames.
Larry