
![]()
I first wrote this article when Apple Final Cut Pro X was in version 10.2. Since then, FCP X has gone through a major interface overhaul, and many minor tweaks. So, I decided to take the first article and update it for today.
NOTE: Here’s a link to the original article from 2014.
Did you ever have a problem where the audio levels you recorded for your talent are too low, or vary wildly in level? Yeah, me too. All the time. We can add audio keyframes to each clip and try to smooth things out, but, frankly, life is too short. Though, truthfully, keyframes are the most accurate way to change audio levels – they just take a lot of time.
A while ago, I discovered and audio effect that can make this task a LOT easier: the Limiter. In this article, I’ll show you how to use it in Final Cut Pro X.
NOTE: Personally, while the audio processing effects in FCP X aren’t too bad, I find that the precision and control Adobe Audition provides is superior to both. While learning an audio app can be intimidating, the time you invest pays major dividends in making your audio sound really, really good. (Here’s a link to my training on Adobe Audition.) ProTools is another excellent audio package, but I’ve never had success working with their iLok copy protection so I haven’t used it in years.
EXECUTIVE SUMMARY
The Limiter effect is my tool of choice in FCP X for boosting and smoothing levels, combined with roles and compound clips. What we will do is assign roles to all dialog clips, then build that role into a compound clip and apply a Limiter filter to it.
Also, while it is a good idea to boost and limit dialog, interviews and narration, it is generally not a good idea to do the same with either sound effects or music.
NOTE: Here’s a companion article I wrote that is the second half of the “good audio” equation: using EQ to shape your sound to make it warm a voice and make it more intelligible.
BACKGROUND
The human voice is unquestionably a challenging instrument to record. Whether singing or speaking, it has a huge dynamic range; meaning that it can vary from loud to soft back to loud in an instant. If you are lucky and working with professional voice actors, that dynamic range is fully under control. Most of the time, though, we’re just hanging on for dear life.
There are two key rules you need to keep in mind about audio when you are mixing:
This means that during our final audio mix, we need to make the levels consistent so that we can clearly hear what’s being said, yet make sure all levels always stay below 0 dB.
AN ASIDE ON MEASURING AUDIO
 Audio pros, and those folks that need to deliver audio for professional distribution (broadcast, cable, or digital projection), measure levels using “average levels,” or the relatively new standard of LKFS. Current standards in both the US and Europe mandate that levels not exceed a specific LKFS for program content; generally around -24 LKFS for a broadcast program.
Final Cut Pro X does not provide built-in meters for measuring average levels, though it should. I consider the lack to be a major limitation. However, there are plug-in effects from MeterCast and Waves among others that you can use.
NOTE: Premiere and Audition both provide LKFS and peak audio level measurement built into the application. This is one of the reasons I prefer using Audition for my mixes, rather than Final Cut.
For this reason, this article will talk about “peak” levels, which are suitable when mixing audio for the web. Final Cut measures peaks using dBFS; which stands for “deciBels Full Scale.”
GET STARTED
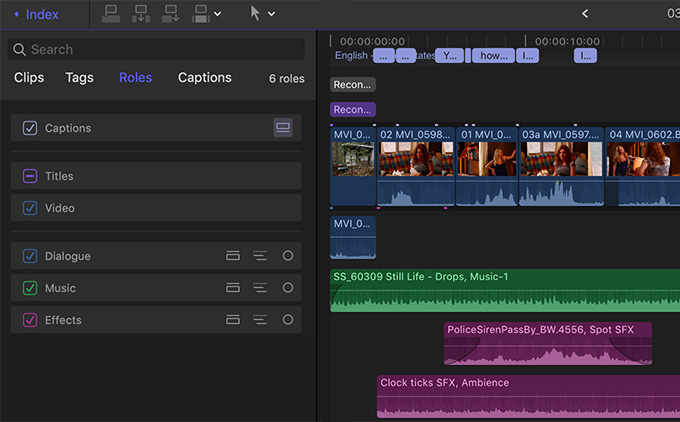
Here’s a portion of a short dramatic scene. It has a dialog track synced with video, along with multiple effects and music tracks. I’ve assigned a role to each clip: dialogue, effects or music. (This technique can be used for far more clips and tracks, I’m just keeping this simple to explain the process.)

Once you’ve assigned Roles, a fast way to get a sense of your levels is to uncheck both Music and Effects roles. This silences all clips assigned to that role, allowing you to hear just the dialog. Since dialog is what we tend to be most concerned about, this is good way to make sure levels are set correctly.
NOTE: Changing audio roles has no effect on video clips.

When I played the project, the selected audio levels peaked around -20 dB. This is WAY too soft for principle dialog!

Here’s where roles can really help. Click the Show or Collapse Lane button for Dialogue in the Timeline Index.

This groups all the dialog clips together.

Select them, then choose File > New > Compound Clip.

In the Compound Clip dialog name this group something that makes sense to you. If you are creating a lot of these, put them all in a “Compound Clip” event. For simpler projects, like this one, I’ll store them with project files.
The selected clips in the Timeline are now replaced by the compound clip.

Now that we’ve prepped the clips, it’s time to apply and adjust the Limiter effect.
NOTE: You can still access the individual clips in a compound clip by double-clicking the compound clip. This opens it for editing. To permanently break the compound clip, select Clip > Break Apart Clip Items.
WHAT THE LIMITER EFFECT DOES
What the Limiter effect does is boost softer passages of audio more than louder passages, without having any audio level exceed the maximum level you specify in the effect. (This is where it gets it’s name: it “limits” how loud your clips can get.)
In our example, limiting has the effect of making all dialog levels louder and more consistent, without any risk of distortion. AND, without affecting any of the music or effects audio.
There are two limits that I recommend:
NOTE: The reason I don’t limit to 0 dB is that I’ve been told that MP3 compression is optimized for levels around -6 dB. Also, leaving a bit of headroom is always a good idea in general.
APPLY AND ADJUST THE LIMITER EFFECT

Select the compound clip, if it isn’t still selected, and open the Effects Browser (Cmd+5). Scroll down and select the Levels category. Drag the Limiter effect on top of the selected compound clip.
NOTE: There are several “Limiter” effects. Pick the one that is NOT at the top of the list.
This applies the effect to the group of clips contained by the selected compound clip.
NOTE: You could also apply this effect to individual clips. The problem is that you would need to adjust the settings of this effect for each individual clip. Using a compound clip allows you to apply the effect once and have it apply to all clips in the compound clip.

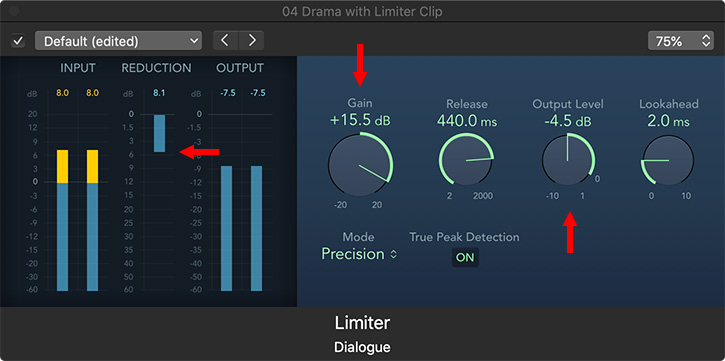
Again, with the compound clip still selected, click the Audio Inspector button at the top of the Inspector. Click the small icon to the right of the Limiter effect.

This opens the Limiter effect interface.
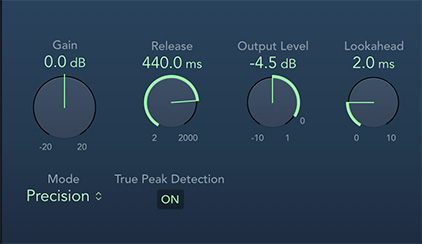
There are six settings we need to tweak:
There are two critical settings that vary with each project:

Here’s the secret to adjusting the filter. Play your clips. Then, while the clips are playing, adjust the Gain so that the Reduction setting, in the middle, is bouncing around 1 – 3 dB. This provides maximum amplification, without excessive limiting, which can sound fat and “blatty.”
That’s it. Try this and you’ll be amazed at how much better dialog, interviews and narration can sound.
NOTE: Remember to adjust the filter when all other tracks are silent or muted.
EXTRA CREDIT

In some cases, you’ll still need to adjust a few individual clips which may be a bit loud or, more likely, soft. The good news is that now, you are only adjusting for the exceptions, rather than the entire mix.
What I generally do is open the Compound clip and adjust the clips inside as necessary. I almost never apply keyframes or adjustments to the Compound clip, just the clips inside it.
SUMMARY
I am a huge fan of the Limiter effect and its cousins, the Compressor and Multi-band Compressor, because they simplify the process of setting levels and preventing distortion. While I prefer to use multi-band compressors in Audition, I’ve found that, in Final Cut, the Limiter effect is more effective to use.
For simple projects like this, creating compound clips and applying the Limiter effect makes my audio life easy and helps me get projects done on time and without excessive audio stress.
34 Responses to FCP X 10.4: Boost and Smooth Audio Levels – Revised
Newer Comments →-
 Craig says:
September 16, 2019 at 5:04 am
-
 Larry says:
September 16, 2019 at 7:59 am
-
 Constance says:
September 16, 2019 at 7:48 am
-
 Patrick Flaherty says:
September 16, 2019 at 12:49 pm
-
 Kit Laughlin says:
September 16, 2019 at 2:11 pm
-
 Larry says:
September 16, 2019 at 2:26 pm
-
 Sandra Vieille says:
September 16, 2019 at 2:42 pm
-
 Larry says:
September 18, 2019 at 4:57 am
-
 Harriman Nelson says:
February 17, 2020 at 11:12 am
-
 Larry says:
February 17, 2020 at 12:42 pm
-
 Rob Parker says:
March 23, 2020 at 10:31 am
-
 Larry says:
March 23, 2020 at 10:33 am
-
 Danny Spiegel says:
April 7, 2020 at 7:08 am
-
 Larry says:
April 7, 2020 at 7:16 am
-
 Danny Spiegel says:
April 7, 2020 at 9:29 am
-
 Caleb M A Short says:
May 2, 2020 at 11:24 pm
-
 Larry says:
May 3, 2020 at 6:48 am
-
 jeffrey says:
July 22, 2020 at 11:14 am
-
 Larry says:
July 22, 2020 at 1:18 pm
-
 samtenpa says:
July 23, 2020 at 9:26 am
-
 Larry says:
July 23, 2020 at 9:47 am
-
 samtenpa says:
July 23, 2020 at 10:51 am
-
 Larry says:
July 23, 2020 at 11:20 am
Newer Comments →Hey Larry!
Great update to the previous article. Where does the Limiter generally fit in the audio effects chain when you are also using EQ and Compression?
Thanks!
Craig:
Generally, you would use either compression or the limiter, but not both. In terms of processing, do EQ first. Compression/Limiting is always the LAST thing in your audio processing chain.
Larry
Great tutorial. Thank you!
Thanks I needed an update to this because since FCPx had updated the limiters look I wasn’t setting release high enough. Very helpful being able to use roles and compound clips.
Excellent, Larry. I will be trialling a purchased effect called Voice Leveler for exactly the purpose your article explores. I wish I’d seen your article first—I might have saved myself $49!
Anyhow, I look forward to testing boat approaches, and I will report back if you’re interested.
Kit:
I’m ALWAYS interested in what you learn.
Thanks,
Larry
Larry
Thanks for limiter info. Along with this my last project had hollow sounding dialogue.
How can I warm it up?
Sandra:
“Hollow” is caused by echoes, not EQ. Or when your mic is too far from the subject – which is pretty much the same thing.
These are REALLY hard to fix. Take a look at RX6 from Izotope.
Larry
FYI: In FCPX 10.4 I had to choose the LOGIC Limiter effect. The FCPX Limiter only had one preset, “Brickwall”
Harriman:
Both Limiters work the same way, the KEY is to click the small icon to get access to the control interface, rather than using Presets.
Larry
Thank you soooo much, larry. These lessons are incredibly useful. I’m always trying to get better!
Rob:
I’m glad you like them.
They are fun to write.
Larry
Hi Larry,
I am on an email list that sends out new plugins and I just got one for Crumplepop’s Levelmatic. I watched the tutorial and it looked great (I’ve had good luck with another audio plugin they have as well), but then I came across your article and I’m wondering if, in your opinion, that this plugin offers anything different than the process you describe here in terms of both quality and/or ease of workflow. Can I ask for your thoughts?
Many thanks,
Danny
https://www.crumplepop.com/
Tutorial: https://www.youtube.com/watch?v=4VD8iTRGuCY&utm_source=newsletter&utm_medium=email&utm_campaign=levelmatic
Danny:
This is impossible to answer because Crumplepop doesn’t provide any information on their website about what they plug-in does. (Though, I agree with you, then tend to make good plug-ins.)
My GUESS is that they are doing something similar to what I write about but making the interface easier for people to use that don’t know how to use audio filters.
Larry
Thanks, Larry! That’s kinda what I thought too. And thanks for such detailed articles like this; they’re a big help and include a lot of “connecting” material that I don’t see elsewhere.
Hi Larry!
Very informative. Thank you so much for this article as I put the finishing touches on the academic submission of my undergraduate thesis film. In trying to apply the limiter — I still have a question, which is twofold:
1. the reduction rate, either due to interface lag, or something… fails to always populate, even after the gain is loud enough to see it
2. most importantly — is it not necessary to break the compound clip so as to change the gain per scene if the volume of the dialogue/diagetic environment varies per scene?
thank you for your time and insight,
Caleb
Caleb:
Your first question I can’t answer without seeing it.
If the variation between scenes is moderate, you should need to make changes. If the variation is extreme, or the sound starts sounding “blatty” or unpleasant, then, yes, cut the compound clip at scene changes and readjust the values.
Larry
Hi Larry
I have been going through your videos like I am back in school. I appreciate your teaching approach and advice. I finally purchased my first pro-ish level computer (MBP 16) and am working with FCPX as part of my work. Reading your comments helped me with this decision and I am very happy with my (expensive) purchase.
Here is my question:
I produce tutorials and short video essays, most of my footage is 4k, and I do a combination of voice over and miked dialog (senn 416). We use a tiny bit of sound design, a swoosh here and there, some foley, some background music.
Narration and talking head is the main audio. My question is: do you think FCPX has enough capacity to handle the sound editing, or do I NEED to plan on learning a DAW to get a professional sound. If I did, I would probably only opt for Logic Pro X. I don’t want to go back into the Adobe world.
Some people think FCPX has all the tools needed, and yet I have a nagging sense that it may not. I don’t have complex audio, I just want very good sounding narration. Learning FCPX has been a lot of work, and I don’t want to invest the time in a complicated DAW if I don’t absolutely need to to achieve my goals of solid, educational, modern video content.
thanks so much
Jeffrey:
For reasons that I don’t understand, there is no direct connection between FCP X and Logic X. I would not advise using Logic to mix your FCP X projects.
Yes, given what you are doing, FCP X has the audio resources to mix your projects. The real challenge isn’t editing, but getting a good recording. If you have good, clean narration, FCP X is more than good enough.
It is weak in noise removal, buses, and overall mixing tools.
Larry
That is good to hear. I began to suspect that Logic was not paired with FCPX the way Audition is paired to Premiere. Seems like a loss.
Anyway, I am glad to hear that FCPX can take care of my needs. I understand the importance of getting a good recording, and my environment is usually controlled enough that I can do so.
thanks
Samtenpa:
It is a loss. There’s no reason for them not to talk to each other. It is very similar to Avid and Pinnacle – they should interchange data, but they don’t.
Larry
Larry,
That reminds me of something I have wanted to ask you.
As I said, I have been learning FCPX, and it is an enjoyable experience. But i keep hearing about Davinci Resolve, with its integration of Fusion, Fairlight, and the impressive color grading tools.
What is your impression of this system? I notice you don’t offer tutorials. As someone new to the world of editing, I wonder if Davinci has a better system for me to start with, so that I learn an entire system bit by bit.
Do you think FCPX has advantages over Davinci for a new learner? should I switch now while I am still new to video editing and not too sunk in to one app?
Samtenpa:
FCP X is earlier to learn, comes bundled with more creative options and is optimized for speed. I consider it to be a more complete video editor.
DaVinci Resolve is a world-class color grading application that continues to improve its editing, audio and effects capabilities. Both are used for professional editing, though Resolve easily wins on color grading.
If you plan to edit professionally, learning more than one tool will be essential. If you plan to edit as a hobby, FCP X will do more than you need.
Larry