
![]() Patrick asks:
Patrick asks:
I record a audio-only interview show with our superintendent. It is in an office and I use a microphone for each person. It could be 2 or 3 people. I record each person on a discrete track of the digital recorder so when I take them all into Audition they have their own track. My workflow is to delete each person’s sound when they are not talking. I then tighten them up as I go. Is there a more efficient way.
This is the right approach, but there are some shortcuts that can make this a lot faster. I do all my editing in the multitrack editor. This allows me to see and adjust all my clips at once. And I find myself using these techniques every week. .

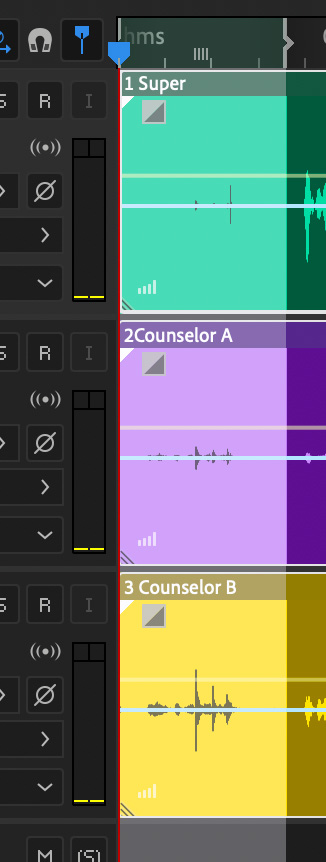
I asked Patrick to send me some sample audio so I can illustrate the process using his audio Here’s a typical edit:
I used a similar format each week when editing the Digital Production Buzz podcast.
Notice how uneven the levels are for each guest. The Host is low, Guest 1 is REALLY low and Guest 2 is really loud. As you start to use automated tools to help you edit, it is important to pay closer attention to recording levels.
NOTE: Each of these clips needs EQ and the Multi-band Compressor added to shape the sound and, more importantly, to boost and smooth audio levels. Here’s an article that explains how to use EQ to shape the sound of a voice. And here’s an article on how to use the Multi-band Compressor.
VERIFY YOUR CLIPS ARE OK

Before you start editing, make sure your source media is OK. Double-click each audio clip to open it in the Waveform editor. DON’T edit in this window, as all edits are destructive (meaning you can’t change your mind later). but do use this to review your clips.
Choose Windows > Amplitude Statistics, then click Scan Selection.

This analyzes the loudness of your clip. While all these numbers are helpful, the key is Possibly Clipped Samples. This should be 0. Any number greater than 0 indicates potential distortion. Click the small white flag to the right of the number to jump to the first clipped sample.

Play the clip and make sure it sounds acceptable to you. If it sounds distorted, you’ll probably need to edit it out of your piece. But, you may be able to fix the problem by repairing the clip:
Then, press 1 to return to the multitrack editor. This will also load the repaired clip back into your edit.
NOTE: 1 toggles between the Waveform Editor and the Multi-track Editor.
EDITING TO VIDEO
If you are editing audio that will be matched to video, it is ESSENTIAL that clips not get out of sync during the audio mix.

Select all the clips (Cmd + A), then Control-click any selected clip and choose Lock in Time. This prevents clips from shifting horizontally, which would knock them out of sync.

NOTE: I use this feature so much I created a keyboard shortcut for it: Control + L. Locked clips are indicated by the small lock icon shown in the screen shot above.
NOISE GATE
While the “best” way to get rid of audio you don’t want is to delete that portion of a clip, many times you can accomplish the same thing using a noise gate. What this does is suppress audio output if the audio level in a track falls below a certain level.
This works really well when there isn’t a lot of background noise and when the speaker is recorded at a good level.
NOTE: Noise gates should not be used in noisy environments or where you want the audience to hear the background noise, such as recordings made on location. Recordings made in offices, homes or studios will sound the best with a noise gate.

Select the track you want to apply the noise gate to (if you don’t use busses, you’ll need to apply this to every track).
NOTE: For simple mixes of, say ten tracks or less, today’s computers have ample power to apply effects to each track. Buses are not required simply to save CPU cycles.
Go to the Effects Rack and click one of the small white right-pointing arrows. Select Amplitude and Compression > Dynamics.

In the Dynamics window, select Presets > Noise Gate.
While the defaults are not bad, I recommend you change:
The LED meter is green when audio passes through the gate. The meter turns red when there is no audio passing, and yellow during the attack, release, and hold times.
If background noise is getting through, adjust the Threshold until it disappears. In the example, Guest 2 needed the Threshold raised to -20 dB to remove the background.
FASTER TRIMMING
Tightening reduces the space between clips. I use this to remove long pauses, breaths, coughs… anything that the audience doesn’t need to hear to get meaning from the interview. I also use this to get rid of portions of answers that are not necessary for the interview.
NOTE: You can’t tighten clips that are locked. For video interviews, it is better to edit them in Premiere or Final Cut so that the content is correct, then polish the audio in Audition as part of the final mix.
First, the obvious: cutting a clip. To cut a clip, position the playhead where you want to make a cut and type Option + Cmd + B to split (cut) all clips in all tracks under the playhead. (I use this so much, I changed the shortcut to Cmd + B.)
But there’s a much faster way: The Time Selection tool.

In the Toolbar, select the Time Selection tool (Shortcut: T).
Drag to select the region – across ALL TRACKS – that you want to remove. Then type Shift + Cmd + Delete (the big Delete key).This deletes the selection and closes the gap.
Selecting media across all tracks keeps everything in sync. (Remember, this won’t work for locked tracks.)
NOTE: You can do the same thing by setting an In (Shortcut: I) and Out (Shortcut: O). But the Time selection tool is MUCH faster.
SUMMARY
Nothing makes audio editing super-fast. But these are the techniques I use each week in my programs to improve the quality of my sound without wasting a lot of time.
HELPFUL KEYBOARD SHORTCUTS
| Shortcut | What It Does |
|---|---|
| T | Time Selection tool |
| Option + Cmd + B | Cut all tracks at playhead position |
| Shift + Cmd + Delete | Deletes selection and closes the gap |
| Cmd + A | Select all clips |
| Cmd + D | Deselect all clips |
| Cmd – scroll wheel | Zoom into / out of the timeline |
| Page Up/Down | Move left/right in the timeline |
| \ | Fit entire timeline into window |
| Option – click | Create a volume or pan keyframe |

2 Responses to Faster Multi-track Audio Editing in Adobe Audition
Hi Larry,
Seems to have been e revolution with sound with the arrival of LUFS and their levels recently.
Adobe Essential Sound panel applies Loudness or match audio first and I think it only to Broadcast levels -23 LUFS whereas today Youtube’e is -13 LUFS and Web content -15 or for safety -16 LUFS. Big differences for listeners.
Then there is the loudness Radar Meter which you can use to mix according to Adobe.
Life is now all so different and I think better but confusing Webinar on this topic would be useful.
Sincerely
Janette:
I agree – it can be confusing. The really good news about LUFS is that is it an average level – rather than peaks – which means our audio levels are more consistent over time.
Each distributor specs are different. I recommend -16 LKFS for any video posted to the web. YouTube says nothing LOUDER than -13 LKFS, but softer is OK. Broadcast is -24 LKFS. It all depends upon the infrastructure use to display the media.
I use the Loudness Radar CONSTANTLY for all my mixes. It is invaluable, but, like the audio meters, it only displays levels, it doesn’t control them.
As for a webinar, I’ve done several:
https://larryjordan.com/store/294-an-overview-of-adobe-audition/
https://larryjordan.com/store/283-the-basics-of-editing-in-adobe-premiere-pro-part-3-audio-transitions-text/
https://larryjordan.com/store/237-how-to-mix-adobe-premiere-projects-in-audition/
Larry