
![]() A LUT (Look-Up Table) instantly converts the pixel values in a source frame – or video clip – from one set of values to another. The intriguing features about Look-up tables are:
A LUT (Look-Up Table) instantly converts the pixel values in a source frame – or video clip – from one set of values to another. The intriguing features about Look-up tables are:
LUTs are a great way to take log or RAW images and convert them into something pleasing to look at. You can even use this technique for Rec. 709 media, which we use every day in HD projects.
There are a number of utilities on the market that create custom LUTs (remember, LUT stands for “look-up table”). However, recently, I discovered that we can easily create our own LUTs using Photoshop. This technique works for media in Final Cut, Premiere, even DaVinci Resolve.
Let me show you how this works using Final Cut, but you can do the same by exporting a still frame from Premiere Pro, or DaVinci Resolve.
NOTE: Here’s a video that shows this same technique using Premiere.
START INSIDE FINAL CUT PRO X
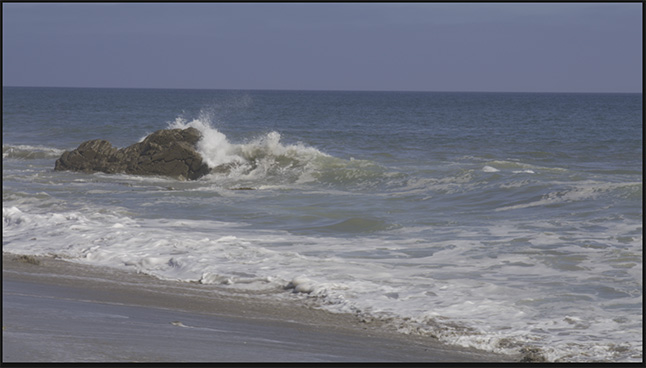
Here’s an example. This is a Rec. 2020 HLG project, with a V-Log clip loaded into it. It was shot in HLG format – to preserve the highlights – on a Panasonic EVA-1 camera. Notice that it looks gray and washed out.
First, whenever you are shooting RAW or log files, you should apply a camera LUT that matches the camera that shot the footage.

You’ll find these in the Info Inspector. Set the menu in the lower left corner to Extended or Settings. Then, pick the correct camera LUT. This will automatically make your image look better.
But, for this example, I’m not going to do this so I can illustrate this new technique more simply.

In Final Cut, put the playhead on a representative frame of your clip. If everything looks blown-out (over-exposed) apply a camera LUT first, there needs to be some detail in the image you are exporting.
Then, choose File > Share > Save Current Frame. This will export the frame under the playhead. For the highest quality and compatibility, I recommend you export a TIFF image.
NOTE: For this example, I named the file: “Sample for LUT.” You can call your adjustment frame whatever makes sense to you. The name does not matter.
INSIDE PHOTOSHOP

(Click to see a larger image.)
Open Photoshop and import the image.
First, before doing anything else, select Layer 0 in the Layers panel. Then, choose Layer > New > Background from Layer.

This converts the Layer into a Background, which “locks” much of the image from being changed. (The left screen shot above shows what Photoshop looks like when you first import the image. The right screen shows what the layer looks like after it is converted into a background.)

Next, from the icons at the bottom of the Layers panel, click the Adjustment Layer icon. All changes to this image MUST use adjustment layers, you can’t change the image itself. While you can select any adjustment layer to start, I always start by adjusting Levels.

Just by adjusting levels, we have already made a major difference in the look of the clip. We could stop here and jump to the next section of this tutorial – exporting the LUT.
But, let’s pretend we are working on a post-apocalyptic disaster epic and need something a bit more, um, depressing. So, let’s add another adjustment layer, this one for Hue & Saturation.

Let’s go for a desaturated, pink, radioactive look. You can use as many adjustment layers as you want, and change the image in any way that you like.
NOTE: You can make your images look however you want. I decided to pick something dramatic so that you can clearly see the change when we bring this back into Final Cut.
CREATE THE LUT
Here’s the magic part – as long as you convert the image into a background and use adjustment layers, you can take your look and convert it into a LUT which can be opened in Premiere, Resolve, or Final Cut. Watch.
In Photoshop, choose File > Export > Color Lookup Tables.

Give it a description that makes sense to you. Then, and this is a KEY step, select the CUBE format. This is the format required by our NLEs.
Click OK, give the file a name and location, and save it.

NOTE: At the top of the Save dialog, you’ll notice this gives the file a .lut extension. Delete this extension, Photoshop will apply the correct CUBE extension when it saves the file.
At this point, we are done with Photoshop. You don’t need to save your image, unless you want to come back to make changes to your LUT.
IMPORT THIS CUSTOM LUT INTO FINAL CUT PRO X
In Final Cut, select the clip or clips you want to adjust.

In the Effects Browser, search for Custom LUT. Drag the effect on top of a single clip, or double-click it to apply it to all selected clips.
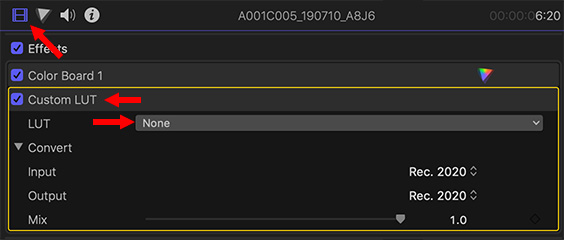
Now, go to the Video Inspector and click the LUT menu.

At the bottom it allows you to apply a Custom LUT. Navigate to the LUT you created in Photoshop and select it.
NOTE: LUTs are stored in two places, depending upon whether they are a camera LUT or a custom LUT.
[ User Library ] > Application Support > ProApps > Camera LUTs – or –
[ User Library ] > Application Support > ProApps > Custom LUTs

And, voilá! The clip is instantly transformed with a post-apocalyptic, radioactive disaster look. Without requiring any rendering AND without loosing any detail in the original image!!

And, just to reassure you that we can make things look beautiful using LUTs, here’s the same shot, with a different LUT and totally different look.
This points out a key benefit of using LUTs: you can change them at any time to create exactly the look that you want without any rendering and without changing the quality of the source image.
Very, very cool!
SUMMARY
LUTs can be used on any footage, though you have the most latitude with log and RAW footage. Most of the time, use a LUT to get you close to your look, then tweak with the Color controls until you are happy.
As with everything creative, give yourself some time to play and experiment. Since LUTs can be reused between projects, you can quickly build a series of looks that become part of your standard editing tool kit.

6 Responses to Create Custom Video LUTs Using Photoshop
Really cool tip to use. I love it.
Larry…Brilliant! Thanks for this. I’m using this technique already. Cheers.
When you say, “get rid of” the .lut suffix before you save it, will PS save a file without a suffix?
And, where should you save it to so FCPX has access to it?
Brian:
The extension is just text. Delete it, and the period, as you would any text. Photoshop will supply the correct .CUBE extension when it saves the file.
LUTs are stored in two places, depending upon whether they are a camera LUT or a custom LUT.
[ User Library ] > Application Support > ProApps > Camera LUTs – or –
[ User Library ] > Application Support > ProApps > Custom LUTs
Larry
Thanks for this. I wondered if it is possible to create a custom LUT in Affinity Photo. As it turns out the answer is yes, and you can select the folder you want to save it to.
https://affinity.help/photo/en-US.lproj/index.html?page=pages/Adjustments/export_3dLut.html&title=Exporting%20custom%20adjustments%20as%20LUTs
Gerry:
This is good to know – thanks for sharing it.
Larry