 After the next major macOS upgrade, some older media formats may not play on your Mac computer. Developers have been working on this for several years, but, now, producers and editors need to pay attention.
NOTE: Here’s an article on how we got here.
BACKGROUND
“As part of the upcoming transition from 32-bit to 64-bit technology in macOS, you may see an alert in Final Cut Pro or Motion about legacy media files that won’t be compatible with future versions of macOS, released after macOS Mojave.
“These incompatible media files were most likely created using formats or codecs that rely on QuickTime 7—an older version of QuickTime that is included in macOS Mojave for compatibility purposes. However, because versions of macOS after macOS Mojave will no longer include the QuickTime 7 framework, you’ll first need to detect and convert legacy media files to continue to use those files in Final Cut Pro.
“Before you upgrade to the next major version of macOS after macOS Mojave, make sure to convert all incompatible media files. After you upgrade, the option to convert the incompatible files will no longer be available.” (Apple website)
NOTE: Here’s a link to media formats that will soon be incompatible.
Converting files using Final Cut Pro X is the easiest way to work. However, Compressor is a better choice if you:
Here’s an article that illustrates how to use Final Cut Pro X to convert files.
SPOT INCOMPATIBILE FILES
Unlike Final Cut, which pops up a big warning when you open a library or import a file with incompatible media, Compressor is much more subtle.

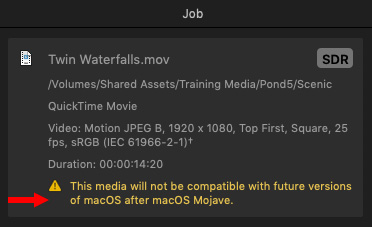
This yellow text is displayed whenever you import older media that won’t play in the future. (It’s displayed at the top of the Job panel, on the right.)
NOTE: While the operation of Compressor is the same since version 4.0, the yellow warning is new with Compressor 4.4.4, or later.
The problem is that this message is only displayed when you select a single file.

Here, for example, two of these files in the Batch list are incompatible. One is not. Can you spot the bad ones? Nope. Neither can I. There needs to be some way for the Batch List to highlight problem files as well as in the Job panel. (For the record, “Barn Grand Teton.mov” is a ProRes file and, therefore, doesn’t need conversion.)
With media imported, you can convert the media into any codec and format supported by Compressor. This process is the same as transcoding any other media in Commpressor.
CONVERT TO PRORES 422
To convert any file to ProRes 422, which is Apple’s recommended conversion format, select all the files in the Batch list to which you want to apply a compression setting.

From the Settings panel on the left, twirl down ProRes, then drag Apple ProRes 422 on top of the file name of any of the selected files.

This compression setting is then applied to all the selected files.
NOTE: You use this same technique to apply ANY compression setting. Generally, I use ProRes 422 for anything shot by a camera and ProRes 4444 for anything – like screen captures or After Effects projects – that was created by the computer. (Motion projects are automatically saved as ProRes 4444.)
CHANGE THE LOCATION

By default, Compressor stores compressed movies in the same location as the source. (A Location could also be called a “Destination.”) Since I can never remember where my source movies are located, this is not a good option for me.
NOTE: To see this menu, Control-click the Location text, i.e. Source, in the Batch list.
Instead, I create a custom destination for all my compressed files.
NOTE: You can also create a different destination for each project you are converting. Whichever you prefer. I like compressing all files into the same location, then moving them after compression to their final storage location.

To create a custom Location, click the Location text button at the top of the Settings pane.

At the bottom of the Location pane, click the plus icon. This opens a file picker dialog that allows you to specify the folder in which to store compressed files.
In this case, I created a folder on my second drive called “Compressed Files.” You can name your folder anything you want and store it anywhere.

This creates a custom Location that can be applied to any file, or group of files, as the place to store converted and/or compressed files.
AUTOMATE CONVERSION
However, to save time, I would like to automate this process as much as possible. There are two ways we can do this:
NOTE: Droplets are stand-alone software which contain compression settings and locations. Compressor does not need to be running to use a Droplet.
To set a default compression Location:


To create a Droplet:


I use Droplets every week.They are a great time-saver.
THE MISSING PIECES
Ultimately, Compressor will be the best option for converting media. But there are still two key missing pieces:
My hope is that Apple can add these features – especially the search function – in an update
SUMMARY
When you need to convert media from one format to another, Compressor is a very flexible tool. And, now that it warns you when you are working with older media, it becomes even more useful.
12 Responses to Convert Legacy Media Using Apple Compressor
“Here, for example, two of these files in the Batch list are incompatible. One is not. Can you spot the bad ones? Nope. Neither can I. ” ONE way to distinguish them is that the one file that’s compatible has an actual photo from the media that’s created as part of the icon next to the filename, while the other two just have a generic “Q” icon that would be applied to any Quicktime media.
Shawn:
This is a great comment. Thanks!
Larry
Thank you Larry! This time Apple is planning to make a major change in their software and they are giving us a heads-up beforehand. I guess that’s progress.
I just reviewed my media original files and project archives going back several years and confirmed that I had converted or saved them as .mov files.
Now I wonder, should I convert all of these proactively to a version that a post-Mojave Apple OS will read or just know that I’m going to keep a Mojajve OS computer online so I can do this as needed in the future. I wonder where this leaves Windows people (and wonder regularly if I should rejoin them.)
I would probably start re-coding in AME since I don’t use FCP X or Compressor. Thanks for following and educating on this topic.
Best,
“Robert W”
Robert:
I do not KNOW anything, but Apple traditionally introduces their new OS in June at the WWDC, then ships it in September. So, we have time.
That being said, I would begin the conversion process now AND plan on keeping a system running Mojave for a year or two, just to be safe. And, AME is a fine program for transcoding to ProRes.
Larry
Thanks, Larry. I remain just slightly confused since we are now talking about transcoding from ProRes (32bit) to ProRes (64 bit).
I wonder which version of AME can perform this trick, and if I and all archives and libraries that have archived files in ProRes (32 bit) need to do it to all our files. Maybe only if we will want to use a post-Mojave Apple machine to access them.
It’s an object lesson in the risks of proprietary software and codecs.
Thanks for all your researching and education!
Robert
Robert.
ProRes has never been 32-bit. So you don’t need to worry on that score.
Larry
Hi,
We’ve just updated our 2013 Mac Pro to Mojave (10.14.5) a few days ago.
I’ve noticed that now in Compressor if I transcode a file to Apple Prores, the Prores file will be in .mxf instead of .mov.
Is this related to the legacy media file update ?
A large majority of our files are coming either directly in Apple Prores 422 10 bits or 4444 12 bits in .mov (more than 90%) the rest has been shot in other format (ARRIRAW, XAVC, CINEMA DNG) and then transcoded to Apple Prores files proxys for editing.
Thank you
Arnaud:
This isn’t caused by your update. ProRes is natively a .MOV file. However, it can be used as part of an MXF container. The only way to create a ProRes file with an MXF wrapper is to select that option in Compressor.
ProRes is an entire folder, separate from MXF, in the Settings panel above the custom settings.
Larry
Hi Larry,
What about all the media files in your training webinars that we have bought – do these also need to be converted before upgrading to OS Catalina?
Thanks,
Jamboe
James:
Nope. Those should be fine.
Larry
Hi Larry, I have stumbled along without using Final Cut for about 1 year and am on the latest version of the OS Catalina. I did not do the upgrade to the files and now have horrid red warnings on the incompatible files.
Question: is there any easy way to do the conversion at this point. I have found an app Elmedia so I can play the clips but this does not convert the files. There are about 30 clips that are affected and would like to convert individual files if needed for future projects.
By the way love your tutorials.
Many thanks
John
John:
The problem with your media isn’t a Final Cut issue, it’s an OS issue. Catalina does not support 32-bit codecs.
Your best option is to copy all the files you need to convert to an external drive, then connected that drive to a system running an earlier version of macOS. (Anything before Catalina is fine.) There’s nothing you can do on a Catalina system, that I’m aware of, that will work.
And, if these need to be relinked into an existing Premiere or FCP X project, be sure to keep the file names the same.
Larry