
 After the next major macOS upgrade, some older media formats may not play on your Mac computer. Developers have been working on this for several years, but, now, producers and editors need to pay attention.
NOTE: Here’s an article on how we got here.
BACKGROUND
“As part of the upcoming transition from 32-bit to 64-bit technology in macOS, you may see an alert in Final Cut Pro or Motion about legacy media files that won’t be compatible with future versions of macOS, released after macOS Mojave.
“These incompatible media files were most likely created using formats or codecs that rely on QuickTime 7—an older version of QuickTime that is included in macOS Mojave for compatibility purposes. However, because versions of macOS after macOS Mojave will no longer include the QuickTime 7 framework, you’ll first need to detect and convert legacy media files to continue to use those files in Final Cut Pro.
“Before you upgrade to the next major version of macOS after macOS Mojave, make sure to convert all incompatible media files. After you upgrade, the option to convert the incompatible files will no longer be available.” (Apple website)
NOTE: Here’s a link to media formats that will soon be incompatible.
Converting files using Final Cut Pro X is the easiest way to work. However, Compressor is a better choice if you:
Here’s an article that illustrates how to use Apple Compressor to convert files.
SPOTTING INCOMPATIBILE FILES
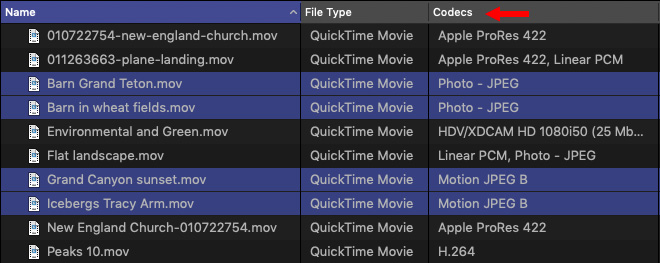
In the List view in either the Browser or Media Import panes, control-click one of the column headers and select Codecs. This displays the codec used by each file. Here, for example, I’ve highlighted four files that may be incompatible in the future.
In order for me to future-proof my library, I need to convert these. Here’s how.
NOTE: This technique requires FCP X 10.4.6 or later.
CONVERT FILES USING FINAL CUT PRO X

When you open a library or try to import a file that will be incompatible, this error message appears.
NOTE: Skip is a good option if you only need to work with this media for a short time, you’ll finish the project before you upgrade the OS and you don’t intend to use this media in the future.

When you click convert, all media displayed in that dialog is converted into Apple ProRes 422, as tracked in the Background Task window. When conversion is complete, the source file remains unchanged in its original location.
But… where is the converted file stored? Well, that depends….
LOCATE CONVERTED MEDIA

Select the Library containing the converted media in the Library List.

Next, open the Inspector (Shortcut: Cmd+4) By default, all converted media will be stored in the Library. This is a good choice if:
However, in most instances, it may be wiser to create a separate media folder OUTSIDE the Library to store all converted media.

NOTE: When you import media, the Media Import window gives you the choice to “Copy Media to Library” or “Leave files in Place.” If you choose to copy media into the Library, this media, too, will be stored in the separate media folder you are about to create.
In the Inspector, in Storage Locations click Modify Settings. (You can see this button in the screen shot above.)

Using the Media popup menu, click the Choose option. Then navigate to a folder where you want to store converted media.

In my case, I created a new folder, called “Converted Media,” on my second drive. You can see it selected it here.
NOTE: You can name this folder anything the macOS will accept. There is no magic to the folder name.

Now, when you convert media, Final Cut creates two folders:
In addition to these two files, the master file remains in its original form and location. This means you need to allocated extra storage space for converted media files.
NOTE: If you look closely, you’ll see that Final Cut named the folders that contain the media with the data the media was shot. This helps prevent confusion over which files are stored where and allows the same Converted Media folder to be used between multiple libraries.
SUMMARY
The good news is that this technique works, it is simple to do, and it protects you from an inability to access your media in the future. But, this also assumes you are editing using Final Cut Pro X and that you simply need to convert files to safely finish this project.
A better, more flexible way to convert media is to use Compressor for conversion. I explain how that works here.
5 Responses to Convert Legacy Media Using Apple Final Cut Pro X
Hi, I’m losing the alpha channel in keyed footage when I convert. This is disastrous…
Regan:
Not all codecs – in fact only two – support alpha channels.
When you convert footage, make sure you are converting it to ProRes 4444.
Larry
Hi,
I have old family videos that I had transferred from VHS to DVD, then ripped to H.264 .mp4.
Now, I’ve imported them into FCPX 10.4.6 on OS X High Sierra 10.13.6 and transcoded them with optimized media at ProRes 422 .MOV.
What should I do to make sure these are compatible with OS X Catalina?
Any help would be appreciated.
Thanks.
Zack:
These should be fine. The optimized ProRes files are definitely fine. The H.264 files are probably file. The easiest way to check is to copy one of them to a thumb drive and see if they play on a system running Catalina.
Larry
That seems to work. Thanks!