
![]()
NOTE: If you need an introduction to Compressor, check out this online training.
Job-chaining is designed to save time during compression by taking the output of one compression process and make it the input to the next compression process.
Here’s a typical example: You have a master file ready to compress. To that master file you want to add a watermark and gamma correction (to adjust the mid-tone gray setting), then create three different versions of that master file at three different image sizes to support low, medium, and high-bandwidth connections.
Well, you could simply create three different compression settings for each output format. Each compression cycle would add the watermark, add the gamma correction, scale the movie and compress it. Sure, you’re repeating the color correction and watermark process each time, but this works fine.
But, what if you needed to do this a hundred times a day? Or two hundred? Or you have a slower system? In this case, the time needed to repeat the watermarking and gamma correction is slowing down your entire compression process.
What we need to do is add the watermark and gamma correction once to create a new intermediate file, then compress it into the three versions we need. This will save a ton of time.
That process is called Job-Chaining and Compressor 3 and 4 both support it.
THE SETUP

Import your file into Compressor. The easiest way is to either drag it in, or click the Add File button in the top toolbar.

Click the Plus icon in the top right corner of the Settings tab and select QuickTime Movie. This creates a custom setting to transcode (convert) the master file from its source format into an intermediate format containing the gamma adjustment and watermark.

In the Inspector, give this new setting a name (I used “Intermediate QuickTime File”) and a description to indicate what it does (I used “Watermark & Gamma Adjustment”). These names are totally optional and arbitrary.
Change the Audio pop-up to Pass-through. This means the audio will be copied, without any changes, from the old file to the new.
Make sure Streaming is set to None. Streaming only affects video posted to the web, and is not relevant for what we are doing here, because this intermediate file will not be posted to the web.
Then, click the Settings button next to Video.

For absolutely the highest quality, set the Compression Type to ProRes 4444. However, the file sizes can be enormous. For me, a better compromise is ProRes HQ. The file sizes are still large, but this codec is nice balance between extremely high quality and reasonable file sizes.
NOTE: To make sure you have sufficient hard disk space, one hour of ProRes 422 HQ takes around 100 GB. The actual file size depends upon frame rate and image size. When compression is complete, this file should be deleted.
ADD FILTERS
In our example, we want to add a gamma correction and watermark. The gamma correction is easy.
In my compression, I’ve found that compressed movies look better if I make them just a shade darker, without making any color adjustments. (This is absolutely a matter of personal taste. If you hate the look, then don’t mess with gamma.)

Click the Filters icon in the icon bar at the top of the Inspector.

Check the Gamma Correction checkbox to enable that filter. To make the compressed movie just a bit darker, increase this setting. For my work, I tend to use settings between 1.05 and 1.10.

To add a watermark, check the Watermark checkbox to enable this filter.
However, watermarks need to be created before they can be applied.

So, in Photoshop I created the watermark I wanted to use. Several notes:

Back in Compressor, click the Choose button at the bottom of the Inspector and point it to the Watermark file you just created.
Change Position to Lower Right, this makes sure your image shows up in the right place. (Feel free to experiment with other choices in this menu, if the position isn’t to your liking.)
Scale determines the size of your watermark. 1.0 is the size at which you created it.
Alpha determines the transparency of your watermark. .5 is 50% opaque, which is a setting I generally like. I may go as high as .6.
At the bottom of the window, click Save to save your new setting file.
CREATE THE CHAIN

Drag the Setting on top of your imported task. This setting creates the master file, now we need to set up the chain.

This is the only tricky part. Select the compression setting you want to use as the source of a new compression setting. The setting itself, not the task, must be selected. (See the screen shot.)
Then, either choose Jobs > New Job with Target Output or right-click the name of the compression target (the compression setting) and choose “New Job With Target Output.
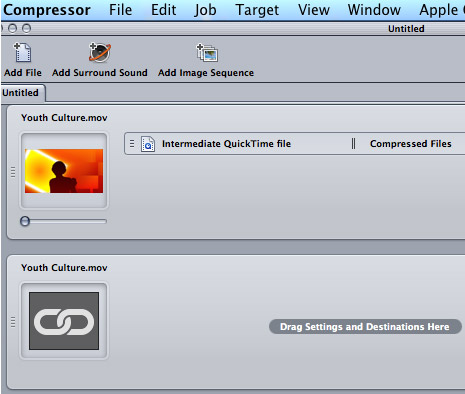
A new task appears with a chain icon. This means that the output of the previous setting becomes the input for this task.

Drag the compression settings you want to create into this new intermediate file. In this case, I added three different iPhone compression settings.
As I’ve mentioned in earlier articles, I set my preferences so that all my compressed files go to the same folder, called “Compressed Files.” This means all the files created in this process will be stored in the same folder.
After the chain is created, compress as normal.After this job is complete, I can go to that folder, delete the intermediate file to save space, and transfer the final compressed files to the web.
SUMMARY
The cool part about using job chains is the time they save. If you only do one or two files a day, there’s no big benefit. But, if you are doing lots of files, or need to create lots of variations on a single file, this hidden feature can save you a LOT of time.

2 Responses to Compressor 3/4: Job Chaining
One additional question about job chaining and audio passing through please:
I use Compressor 3.5.3 and have made the experience that chaining jobs and passing through audio don’t work together.
I’ve three chained jobs in a batch file. In job one and two some video preprocessing things are made. In the last job encoding with different encoding settings should be made. The Audio should be passed through the first two jobs.
In the first jobs it works. The output file after job one has the audio. But in job two it isn’t possible to set the pass-through option. You can set it but after selecting anything other and reselecting job two the option “deactivated” is selected automatically. The output file of job two doesn’t contain any audio.
Is this a bug and maybe fixed in version 4.x?
(The fast solution is to use separate batch files but that’s not really practicable.)
[…] written about job chaining before – http://www.larryjordan.biz/compressor-34-job-chaining/ – but I’ve never really found a good use for it, until […]