
![]() Just as the compression engine under Compressor supports Final Cut Pro X, Compressor, and Motion, so, also, the compression engine that is Adobe Media Encoder CS6 supports the applications in Adobe Production Premium.
Just as the compression engine under Compressor supports Final Cut Pro X, Compressor, and Motion, so, also, the compression engine that is Adobe Media Encoder CS6 supports the applications in Adobe Production Premium.
In this article, I want to introduce you to the Adobe Media Encoder (AME) CS6.
NOTE: A quick definition before we start. In general, to “encode” means to compress. Purists will argue. We will ignore them. I will use these two terms interchangeably in this article.
THE INTERFACE

There are four panels in AME. Like other Adobe applications, you can reorganize and resize these, but, unlike other Adobe applications, you aren’t going to need to. The default workspace is just fine.
The four tabs are:
COMPRESSING A FILE

To compress a file, either drag it into the Queue panel, or select File > Add Source (or type Command+I).
NOTE: AME runs the same on Windows and Macs. To convert keyboard shortcuts, substitute Cntrl for Command and Alt for Option.

Imported source files appear stacked in the order in which they were imported in the Queue panel. They are assigned the last compression preset you applied to a file, along with a default destination.

You can change the default destination in Adobe Media Encoder > Preferences > General. Like almost all my media files, I store compressed files somewhere other than my boot disk. Specifically, I’ve created a folder called “Compressed Files,” which is the location all my compression software stores files. That makes any recently-compressed file easy to find. I like “easy.”

Assuming your default compression settings are correct, click the green Start Queue button (or press the Return key) to begin compression.
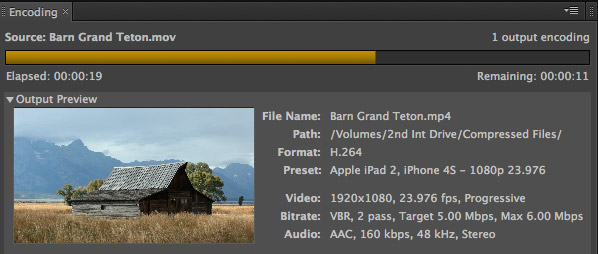
As soon as encoding starts, the Encoding panel displays the status of the encode. Just as with Compressor, encoding happens in the background, you can go to other applications and do other work while compression is going on. Assuming that was all you had to do, you can quit the application and get on with your life.
SELECTING A PRESET
However, when you get started with Compressor, we often want to select different presets, or create entirely new ones. Adobe has grouped presets in the Preset Browser by category, and within categories, by subcategory.
Here’s the key rule to compression: NEVER worry about the format of the source footage. Always select presets based on what you want to turn the file INTO; not on the source format, codec, frame rate or image size.
To apply a setting to a clip, drag it from the Preset Browser onto a clip in the Queue panel.
CREATING A PRESET
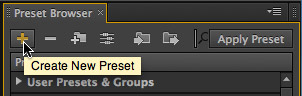
To create a new preset, click the New Preset (Plus) icon in the top left corner of the Preset Browser.

That opens the Preset Settings window. Books have been written on how to set compression presets – check out some excellent books on compression by Andy Beach, Jan Ozer, and Brian Gary – so I won’t go into detail here.
In this screen shot, for instance, I’m creating a custom preset for video to be uploaded to my website.
When you want to start creating your own settings, my suggestion is to start with an existing preset, and modify it. Most of the data rates for these presets are set too high – so that’s a good place to experiment in modifying, and then creating, your own presets. Many of the other settings are just fine and don’t need to be adjusted. Since this is a copy of a factory setting, feel free to experiment – the worst that can happen is your compressed file looks awful. In which case, trash the compressed file, then go back and tweak the preset some more.
Once you create a preset you like, you can use it for years. (I have two presets that I use every week that I created back in 2010.)

All the presets you create or modify are displayed at the top of the Preset Browser in the User Presets & Groups section.
SETTING A WATCH FOLDER
A Watch Folder is where all the time you spend working with Adobe Media Encoder really pays off. Watch folders allow you to automate the compression process.
A Watch Folder is a special folder in the Finder that AME keeps an eye on. When a file is added to that folder, AME immediately starts compressing it using the compression settings applied to that folder and stores the finished compressed file in the location you specify – either in Preferences or as part of the Watch Folder settings itself.
There’s no limit to the number of Watch Folders you can create – the only rule is that AME needs to remain running as long as you want AME to automatically compress media.

To create a Watch Folder, click the New Watch Folder icon (the Plus icon) and select, or create, the folder you want AME to watch. This folder can be on a local hard disk or network volume. However, it must be available to the computer running AME at all times.
Apply the video format and settings you want applied to all files added to that folder. You can apply multiple settings to the same folder, which allows you to create multiple versions of the same master file. These versions can have the same, or different destinations.
This last step is crucial. Make sure that Auto-Encode Watch Folders is checked and click the Start Queue green arrow. Remember to leave AME running for as long as you want Watch Folders watched.
THINGS I WISH ADOBE MEDIA ENCODER DID
While Adobe Media Encoder allows me to create a wider variety of formats that does Compressor, and it runs on Windows, there are several limitations that prevent me from making it my main compression system.
(If I am wrong about any of these, please let me know so I can correct this article.)
Adobe Media Encoder does not allow:
What Adobe Media Encoder does, it does well. I just wish it had more of the flexibility and filters of Compressor.

10 Responses to Adobe Media Encoder CS6: Overview
Or imagine being able to include asc cdl’s,luts or looks as a “filter” in AME. Now that would make me a happy camper!
Hi, I’m sorry to ask such a basic question, but I’ve been through many Encoder tutorials and not found this very basic piece of information – how do I play a video in the Encoder, to mark precise In and Out points?
I’m switching from Final Cut to Premiere and I can’t figure out this very basic, and obviously necessary, feature. In Compressor, it’s very easy to watch and listen to videos in order to choose edit points. How does this work in Media Encoder? Thank you.
Wow…! Great question.
You can set Ins and Outs in Premiere and After Effects, but it doesn’t look like you can set them in Adobe Media Encoder. I’ve been looking and can’t find any way to do this.
Larry
Hi Larry and Daniel,
You can, in fact, set in and out points of a source within Adobe Media Encoder.
Open the Export Settings window, and at bottom the left-hand side of the dialog is a timeline bar. Here you can scrub the video and change the Source Range value. If the source is a Premiere Pro or After Effects sequence, you can set the range as the Work Area. For any source you can set custom in and out points for any source by positioning the playhead at the desired frame and pressing the Set In Point or Set Out Point buttons (the little triangles to the left of the zoom control).
What this dialog lacks is the ability to simply play back the video, or any more sophisticated playback controls (play/pause, step forward/step back, specify in/out via timecode, etc.). Those are improvements we’d like to make in a future release of AME. For more accurate control, the workflows that others have recommended here of trimming in Premiere Pro or Prelude should work nicely.
Please don’t hesitate to send us suggestions for how to improve AME, via: http://www.adobe.com/go/wish
Thanks for the cool article, Larry!
-=Tim Kurkoski
-=Adobe After Effects Quality Engineering Team
Thanks for your response, Larry. That’s very surprising to me. The first step in any video project (in my experience) usually involves trimming long video and audio clips from master files stored on multiple hard drives, down to shorter, more relevant, clips which get stored in a project-specific folder. I would ordinarily use Compressor to do this in one step. Apparently, Premiere users do this by loading the master clips into the Premiere timeline and then exporting out to the Encoder. But it would be so much more efficient to simply do this in Media Encoder as one step.
But, thank you for your informative article. I appreciate your expertise.
So you can go into preferences and set your output folder. And then add your 200 clips to the Queue. Then you need to go back into your preferences and change the output folder again the next time around.
What about:
1/ either AME asks what you wish the destination folder to be as you add the files
2/ select multiple files you want to change the output folder of
———-
Can we have a mini info box that tells us:
1/ how many files in the queue / how many conversion to do
2/ estimated source/target File Size for one or for all
3/ Space left in output folder HDDs
4/ Percentage / time of total completion
@Daniel,
In my experience AME isn’t the best choice for beginning a project. If you want to get your projects off to a quick start, try using Adobe’s new Prelude CS6 product. You can import as many clips as you like into Prelude, mark and trim and comment on them to your heart’s content, and even construct a rough cut before you output to Premier Pro.
I have discovered your informative videos on YouTube and now exploring your website. Thank you for providing this tip regarding a compression setting for videos. Exactly what I needed. Looking forward to learning more.
HI sir is this option available in mac fcp?
The equivalent to Adobe Media Encoder from Apple is Compressor. They have VERY similar functions.
Larry