

Double-system sound is where you record the video on one device (a video camera, for example), while the audio is recorded on a separate device (such as a digital audio recorder). Many DSLR and video cameras don’t have high-quality audio recording built into them. This process resolves that issue.
NOTE: I need to point out that using the camera mic for recording anything except the sound of the environment will lead to heartbreak in editing. Camera mics are not designed for dialog – they are too far away from the person speaking.
However, with double-system sound, you now have two files: one for video and one for audio. How do you sync them? Premiere gives us two ways to create synced clips: Merge and Synchronize. Merge is used for clips in the Project panel, while Sync is used for clips in the timeline. They both operate similarly. Let me show you how these work.
NOTE: Here’s an article that describes how to sync double-system clips in Final Cut Pro X.

Import the audio and video source clips. Make sure to label them so that you know which audio clip goes with which video clip. I’ve put them both in a bin to keep things organized. Also, I created a separate bin for synced media. Neither of these bins are required, but they do help quickly identify synced clips from source media.
NOTE: You will need to manually move synced clips into the Synced Clip bin.
SYNC THE EASY WAY – USING THE PROJECT PANEL
In the Project Panel, select the clips you want to sync and choose Clip > Merge Clips.
There are five different ways we can merge clips, but, by far, the easiest is to choose Audio. (I’ll discuss the other options in a minute.)
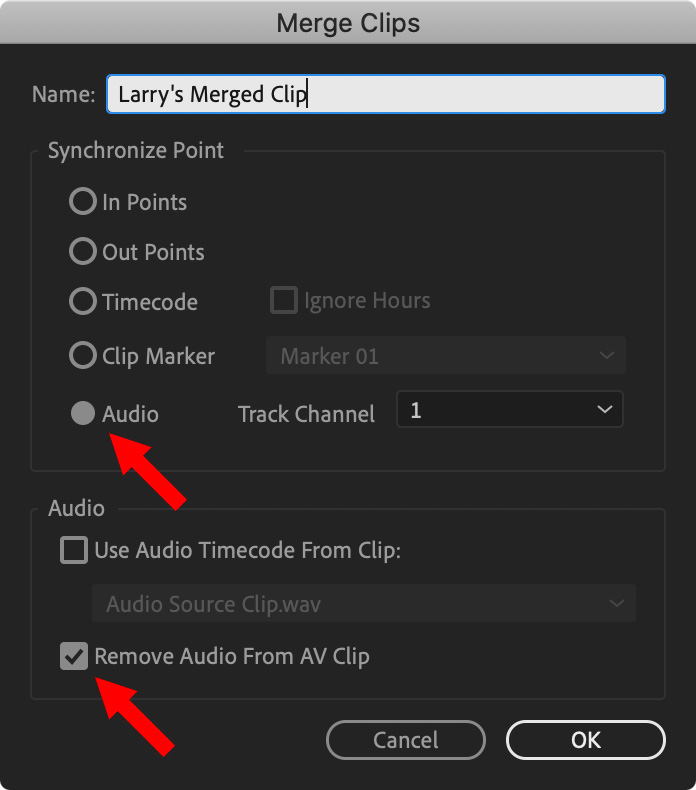
Give the soon-to-be-merged clip a name, click the Audio radio button, check Remove Audio from AV Clip and click OK.
In a few seconds, Premiere creates a new clip (but not new media) in the Project panel, which links these two clips based upon matching the audio files in both.

When we edit this merged clip into the timeline, we see the video and the new audio, but not the original audio associated with the source video clip. Why? Because we checked the “Remove Audio” radio button.
If we did not check this option, we would see and hear all the audio from all the merged clips. Most of the time, we want to ignore camera audio in favor of the external clip. While we could disable audio playback for the tracks we don’t want to hear, it is easier not to build the audio into the merged clip in the first place.
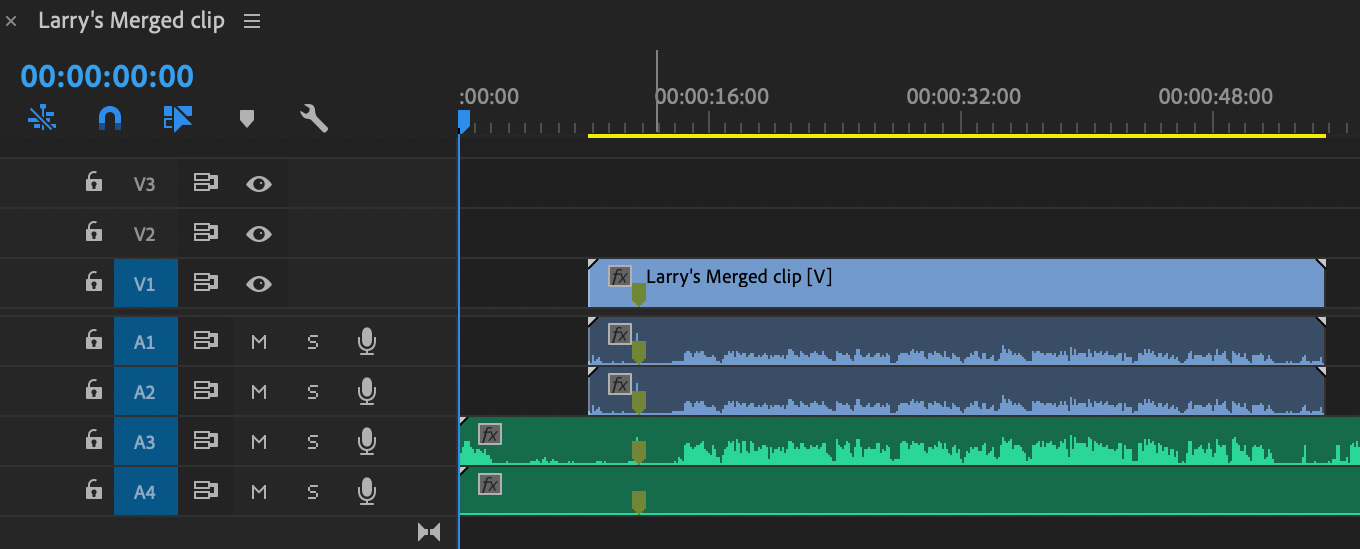
A merged clip is not a “real” clip. Instead it looks real but is simply two clips linked so that their audio is in sync.
SECRET TIP: However, a good reason not to remove audio that you can verify clips are synced by playing all audio tracks at once. If you hear echo, one or more clips is out of sync. Hollow sounds, though, are normal due to audio phase cancellation.
SYNC THE EASY WAY – USING THE TIMELINE

The second way to sync is to work with clips in the sequence itself. Here I have two clips that are obviously not in sync; however they both have the same audio. To get them into sync, select both clips and choose Clip > Synchronize. (This option does not exist for clips in the Project panel.)
NOTE: For this example, ignore the markers. These clips will sync by matching their audio. I’ll talk about markers in three paragraphs.
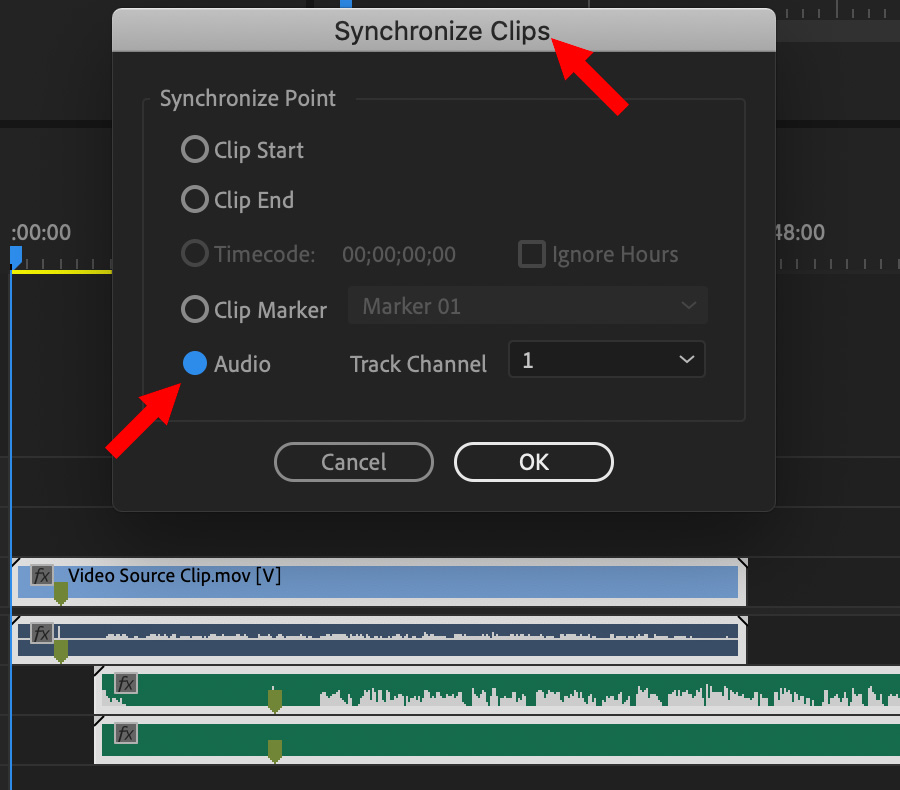
The options, as you can see, are exactly the same. Select the Audio option, click OK and a few seconds later, the clips move into sync.
Both these first two options work great – PROVIDED you have reasonably good and matching audio on all your sources. But, what if you don’t? That takes us to the advanced options.
ADVANCED SYNC
Whether you choose to merge or sync clips depends upon whether you are working in the Project panel (Merge) or timeline (Sync). Either way, the process is the same.
Many cameras, at both the low and high-end, don’t record audio or don’t record good audio. This means that we won’t have audio on the video clip to use for sync. Instead, we need to fall back on two older methods: matching timecode or clapper slates.
Matching timecode is the fastest and most accurate way to sync two or more clips. However, it requires gear on set to generate timecode to all recording gear, cameras and audio recording devices that support external timecode, and audio hardware that records Broadcast WAV (BWAV) files. (No other audio codec supports timecode.) While virtually every high-end production uses this technique, it isn’t cheap and requires setup at the beginning of each shooting day. However, it vastly speeds sync later in editing.
The second option, setting markers, is as fast as matching timecode but it requires recording a clapper slate at the start of each take. EACH take.
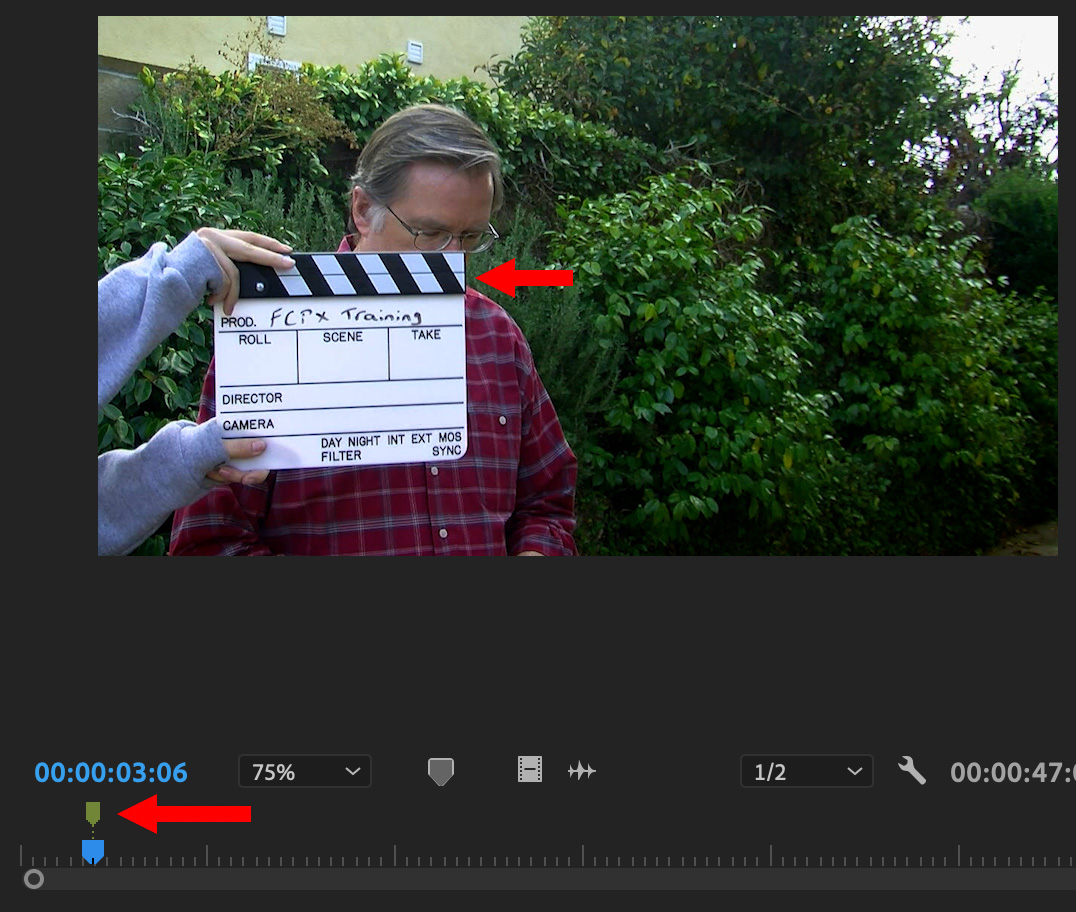
At the beginning of each take, record a clap from the slate on all devices at the same time. Then, as you get ready to sync a clip, put a marker (illustrated in the screen shot) where the clap occurs.
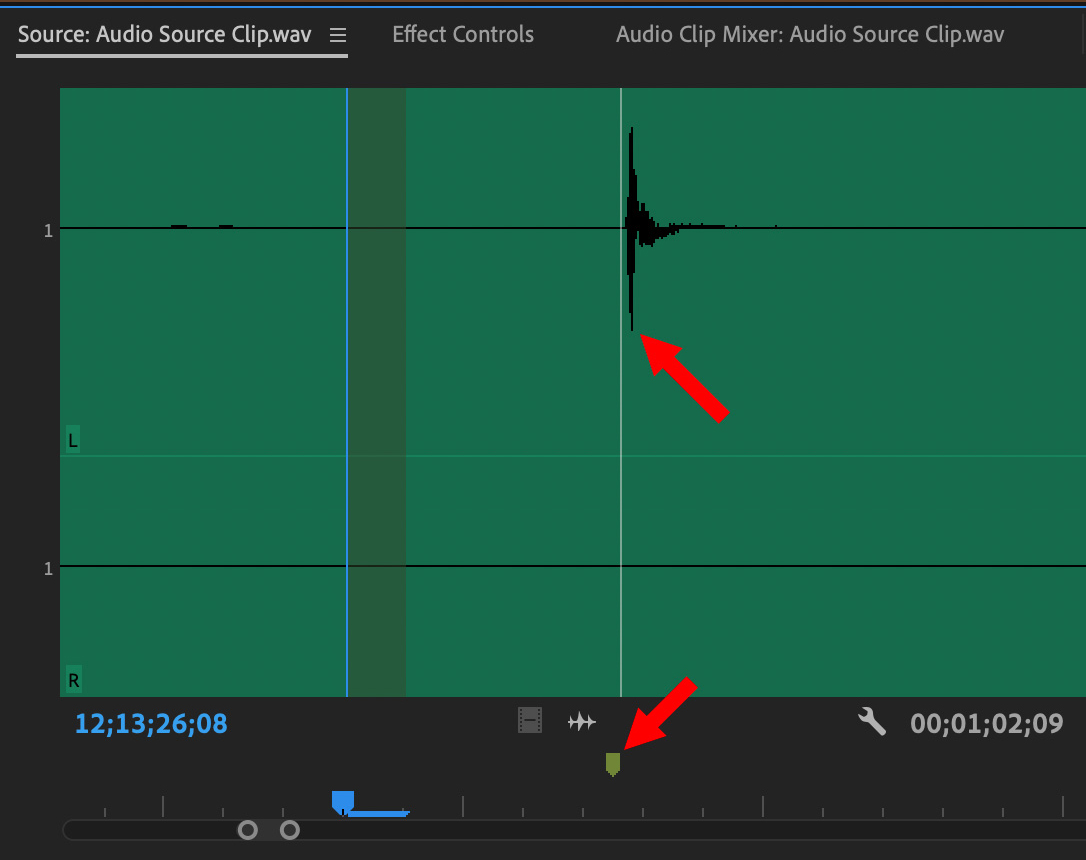
To mark the audio, open the audio clip in the Source monitor and zoom in until you can find and see the shape of the clap. Put a marker where the clap starts.
With markers in both audio and video clips, select both clips and choose Clip > Merge (for clips in the Project panel) or Clip > Synchronize (for clips located in the sequence).
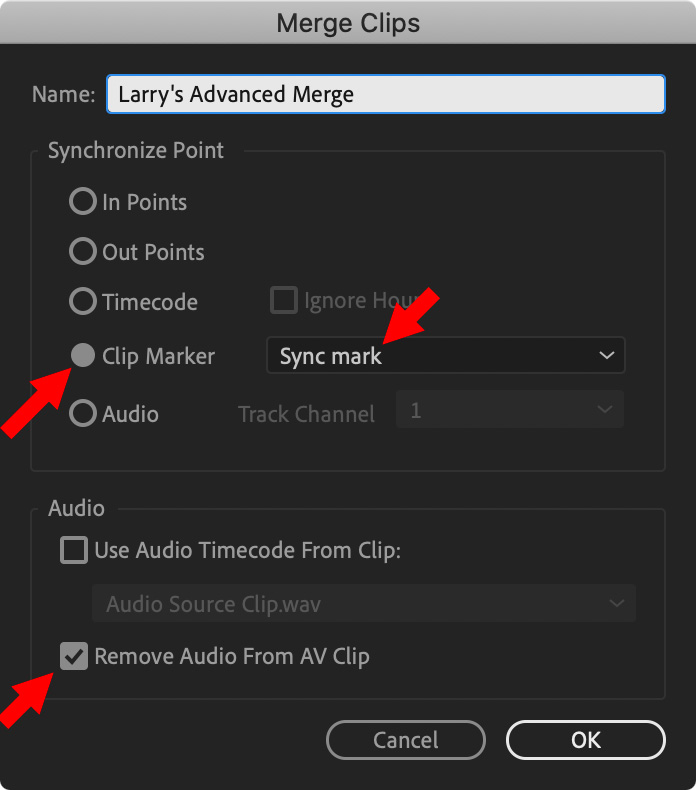
In the Merge/Synchronize dialog select Clip Marker. If you have more than one marker in the clip, specify which marker you want to use for syncing.
NOTE: Marker names must be spelled identically, including case, for Premiere to use them for sync.

In this screen shot, I edited the synced clip into the sequence so that you can see that the markers align. The markers snapped together and the clips are synced.
NOTE: You can also synchronize via In or Out points. The problem with using these is finding references in both audio and video clips that you can use to precisely determine sync. In general, use the In or Out when you don’t have any other options, then manually move the clips into sync.
FIXING SYNC
If the audio is still a little bit off after syncing, display the clips in the sequence, select the audio clip and type Cmd – left/right arrow to move the selected clip one frame left/right. (Type Shift – Cmd – left/right arrow to move in increments of 5 frames.
NOTE: Windows users, use Cntl rather than Cmd.
EXTRA CREDIT
In order for multicam syncing to work, all clips must run continuously; no stopping and starting. However, sometimes that’s not possible. An excellent utility that can simplify multicam syncing is PluralEyes from Red Giant Software.
Learn more here: www.redgiant.com/products/shooter-pluraleyes/
4 Responses to Adobe Premiere Pro CC: Sync Double-system Sound
IS there a way to delete a merged clip once it has been created, without deleting to source (master) clip?
Edwin:
Do a test, but the answer should be yes. You can delete the merged clip from the timeline at any time.
You can also delete the clip from the Bin that contains it without deleting the source clips, which should be listed separately in the bin.
Larry
Great tip on using the Sync parameter in Adobe Premiere Pro CC to double-system sound! I’ve been struggling with this issue for a while, and your explanation really helped clarify things. Thanks for sharing!
Thanks for your note. I’m glad I could help.
Larry