
![]() A Watch Folder is an automated way to compress (or transcode, actually) any media file using Adobe Media Encoder (AME), using settings that you apply to the Watch Folder itself.
A Watch Folder is an automated way to compress (or transcode, actually) any media file using Adobe Media Encoder (AME), using settings that you apply to the Watch Folder itself.
What AME does is wait for a media file to get added to a Watch Folder, then processes it; automatically. There is no limit to the number of files that can be added to a Watch Folder at the same time.
NOTE: In order to use Watch Folders, AME needs to be running, though it can be running in the background. Watch Folders are automatic. Once created, there’s nothing you need to do to compress a file.
A SIMPLE COMPRESSION AUTOMATION

At it simplest, create a folder somewhere on your system. Because I have three different computers that do compression, I often create watch folders on shared storage. However, for this example, I’ll store the folder on my desktop.

In AME, click the Watch Folder panel then drag the folder you just created in the Finder into the panel.
NOTE: You can create multiple Watch Folders, which we’ll do in the second part of this tutorial.

Finally, apply whatever compression settings you want to apply to all files dropped into that Watch Folder. In this example, I’m simply compressing a source file to send to YouTube.
NOTE: You can apply multiple compression settings to the same Watch Folder, to create different versions of the same source file.

Click the Queue tab and make sure Auto-Encode Watch Folders is checked. Once a file is transferred into the Watch Folder (and the transfer is complete) AME will compress it.
NOTE: There’s a 15-30 second delay after the file transfer is complete before compression starts. Don’t panic, the Watch Folder is still working.
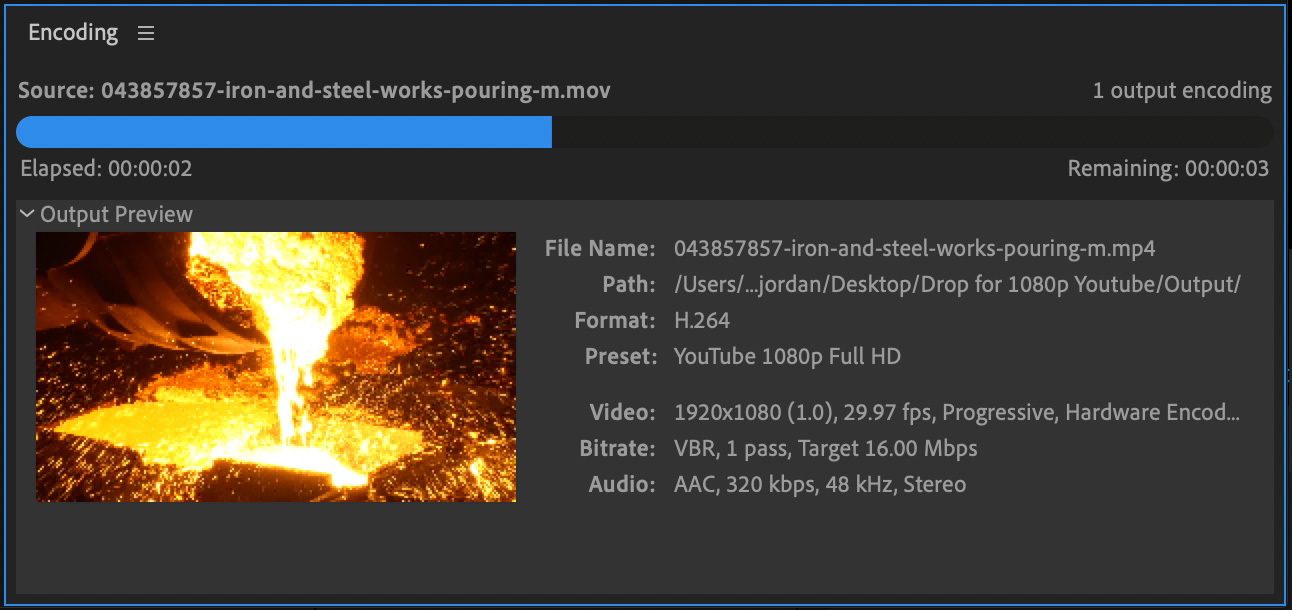
You can watch the transcode, if you are so minded, in the Encoding panel.

When the job starts, two new folders show up inside the Watch Folder:
Once compression is complete, you can drag the finished files wherever you need them. I used this process constantly during the Digital Production Buzz coverage of NAB. When an interview finished editing, it was dropped into a Watch Folder which immediately compressed it and sent it to the Buzz website for posting.
NOTE: To save storage space and time, you can drag an alias for the source file into a Watch Folder by pressing Option + Cmd as you drag the source file.
To stop using Watch Folders, either quit AME or delete the contents of the Watch Folder panel.
A MORE COMPLEX COMPRESSION TASK
Let’s take a second look at the contents of the Watch Folder. AME always creates both an Output folder and a Source folder. So let’s take advantage of this for something more complex.
Let’s pretend we are editing highlights of an event that needs to be sent to both broadcast and YouTube. Plus, these highlights need to have a watermark added to them – something that can be done in Premiere, but takes time that we don’t have.
How can we use Watch Folders to accomplish this? By doing the compression in two steps:
NOTE: Here’s an article that explains parallel encoding.

For this example, I created a Watch Folder (“Automated Watch Folder”) on my desktop. Inside it, I created four more folders:
NOTE: You can name the “Automated Watch Folder” anything that makes sense for your project.

Drag the Automated Watch Folder into the Watch Folder panel. Then drag the Output folder, inside it, into the Watch Folder panel, as well.
Because I don’t want to lose any quality when I apply the watermark to the intermediate version, I select Preset Browser: Broadcast > ProRes 422 for material shot by a camera, or ProRes 4444 for material generated on a computer.
NOTE: In this example, I’m using QuickTime ProRes for the intermediate file.
So, here’s the workflow:
Since the watermark was applied in the first step, we don’t need to waste time adding it to subsequent encodes.

Here’s stage 1.

And here’s stage 2. The two clips don’t compress at the same speed, but they DO compress at the same time. There was about a 15 second wait after Stage 1 completed before Stage 2 started, which is perfectly acceptable.
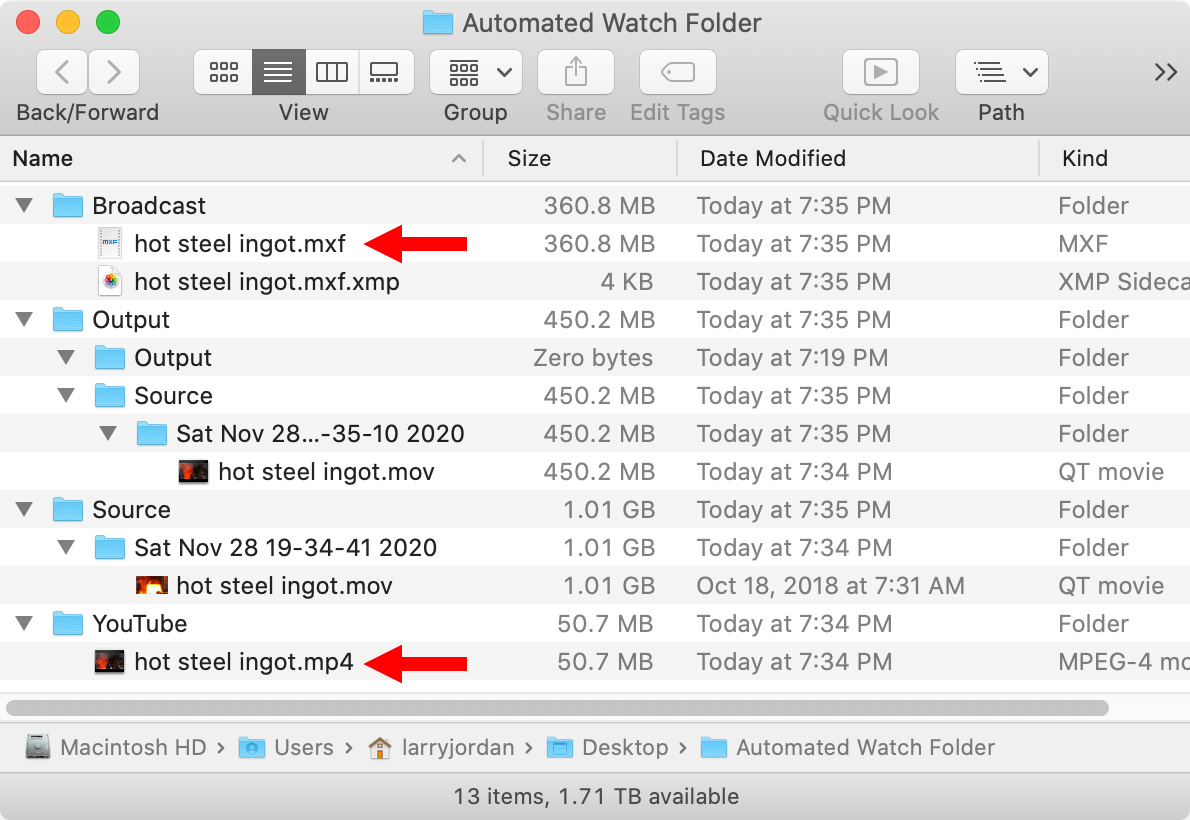
And here’s what the Watch Folder looks like when everything is finished. The red arrows indicate the two finished files, both with watermarks.
SUMMARY
Setting this up took less than five minutes and it worked perfectly on the first try. The time that nested Watch Folders can save on complex compression tasks is pretty amazing because there is no limit to the number of levels you can create.

5 Responses to Adobe Media Encoder: Use Nesting to Add Power and Flexibility to Watch Folders
Thanks, Larry. This is an excellent explanation of how to use watch folders.
Good stuff here, Larry. The new tip for me is the Option + Commando instruction to drag an alias to the watch folder. Thank you.
In return, I’ll offer up a tip of my one. Whether I use AME’s presets or create my own, I like to add compression info to the file name. There’s a handy box for that in Media Encoder’s setting:
AME > Preferences > General > Output > “Append Preset Name to FIle”
By checking that box, the output will be filename_presetname.
So, for example. I take AME’s default YouTube 1080p Full HD preset, duplicate it, then rename it to YT (for “YouTube”) and files come out xxxxxxxxxx_YT.mp4
Sometimes I’ll name my presets as resolution and bit rate with delivers me outputs that look like this:
_720-H264-2Mbps
_1080-H264-5Mbps
_1080-H264-10Mbps
Cheers,
Brian
Good tip, Brian!
Thanks,
Larry
The difference between using the Watch Folders and just loading up the ME queue with different transcode presets for the same export is that the different presets for the same file transcode simultaneously in the Watch Folder whereas the transcodes take place by one in the regular queue?
Lori:
If you are a single editor, there’s no big advantage to using Watch Folders, though they can make you more efficient. Both AME and Watch Folders encode multiple versions of the same file at the same time.
For a single editor, Watch Folders allow you to export a master file, drop it into a Watch Folder and have it automatically create whatever derivatives you need, without you needing to remember to assign specific presets. Nice, but not life-changing.
However, with multiple editors, you can install AME on a standalone computer optimized for compression, then have multiple editors – even remote editors – drop files into the Watch Folder, have them compressed into multiple formats, then automatically uploaded to social media or company websites automatically. Not only is this far more efficient, and a better use of computer resources, but allows for standardization of compress file specs and more efficient use of an editor’s time.
I used this process during all my NAB show coverage for the Digital Production Buzz. We were churning out dozens of compressed file per hour across three editors, using a dedicated iMac for AME and compression.
Larry