
![]() [Updated 3/14/16 with revised information on outputting a mono file.]
[Updated 3/14/16 with revised information on outputting a mono file.]
One of the new features in Adobe Media Encoder CC is the ability to normalize loudness levels to meet broadcast audio requirements in the US and Europe.
If you’ve read Adobe’s Help files on this feature, you were probably just as confused when you finished as when you started. So, allow me to share some additional information.
NOTE: I don’t presume to be an audio engineer. If you can provide more background, please share it in the comments.
WHEN SHOULD YOU CARE?
If your audio is going to the web, you don’t really need to care about this. On the other hand, it won’t hurt.
If your audio is going to broadcast or cable, you care a lot. HOWEVER, if your audio has been professionally mixed, the audio engineer probably made sure the final mix met these specs. Check with them before applying these settings.
If, on the other hand, your audio was not professionally mixed and you want to be safe, then apply these settings.
DEFINITIONS
In other words, normalization is a single setting applied to an entire clip, while limiting changes the audio levels throughout the duration of the clip.
TECHNICAL BACKGROUND
Loudness requirements grew out of recent industry conversations and legislation in Europe and the US seeking to balance levels between programs and commercials.
Adobe Media Encoder supports three standards:
The ITU (International Television Union) BS.1770-3 spec is global and one of the most important broadcast standards as many other standards are based on it. The ITU standard concerns Broadcast Loudness and True-peak Level measurement, and the loudness part is based on an Leq measurement employing K-weighting, which is a specific frequency weighting developed by the Communications Research Centre (a federal research institute in Ottawa, Canada).
The ATSC (Advanced Television Systems Committee) A/85 spec was approved in 2009, and last updated in 2013. It “provides guidance to broadcasters and creators of audio for high-definition (HD) or standard-definition (SD) television content. It recommends production, distribution, and transmission practices needed to provide the highest quality audio soundtracks to the digital television audience.” (ATSC website)
This standard applies to all US broadcasts. Here’s a link to the technical spec itself:
http://atsc.org/wp-content/uploads/2015/03/Techniques-for-establishing-and-maintaining-audio-loudness.pdf
The EBU (European Broadcast Union) has defined the R128 standard based on ITU BS.1770. However, the group also added new tools such as a relative gate that ensures even more consistent loudness across genres and types of program material. Some of these tools have been implemented in the updated version of ITU’s recommendation: ITU BS.1770-3.
Here’s a link to more information that does not require an engineering degree to understand: http://www.tcelectronic.com/loudness/broadcast-standards/
The short answer is:
GET STARTED

While we can enable Loudness Normalization after a compression setting has been applied to a clip, we have more configuration options if we add or enable normalization to a preset before it is applied to a clip.
To create a new Preset, click the Plus icon at the top of the Preset Browser.

To enable normalization in an existing setting, select the Preset, then click the Preset Settings icon at the top of the Preset Browser panel. (Either of these options takes you to the same group of settings.)

Enable Loudness Normalization in the Effects tab by checking the Loudness Normalization checkbox.

Select the standard you want to apply. Remember:
The settings for both the ATSC and EBU options are fixed. The ITC settings can be modified by the user, however my recommendation is to leave them alone unless you have been instructed to change them by someone who knows what they are doing.

If you want to apply limiting to your peaks, check Configure True Peak Limiter.
I prefer a longer Release Time, to minimize the background noise “pumping” that is often heard when limiting cuts in and out too quickly; so I changed the Release Time setting to 200 ms.

If you want to create a Loudness Report that documents the changes made to your file, check Write Loudness Report. Then, click the Browse button to give it a location so you can find it later.
In this example, I’ve enabled the report and am storing it to the Desktop.
SIDEBAR – TRUE PEAK LIMITER

The True Peak Limiter prevents the signal between two samples from surpassing the 0 dB level (indicated here by the dashed red line). While standard limiters might just validate that each sample value itself is below 0 dB, samples are just positions on a waveform and it’s possible for the pressure curve between 2 legal samples to extend into the illegal region. In the screenshot above, the samples are both just below 0dB, but the signal surpasses this and would clip. The True Peak Limiter ensures that the signal itself never surpasses 0 dB.
NOTE: Adding the True Peak limiter protects against excessive peak levels. It doesn’t create a measurable difference in the final average loudness levels.
[UPDATE] OUTPUTTING A MONO FILE

By default, AME outputs stereo audio. In order to output a mono signal, we need to go into the Audio tab and click the Mono audio button.
AME does not automatically default to matching the channel layout of the source file.
CONFIGURING STREAMS

Loudness Normalization supports Mono, Stereo and 5.1 Surround clips. (It can support more, but this requires custom channel configuration. Click the Plus icon in the lower right to enable more channels.)
In general, you should set Normalization to match the output configuration you set using the Audio tab.
THE RESULTS

Here’s a mono narration source file measured using Adobe Audition and displaying its Amplitude Statistics. The Peak is at -1.82 dB, and Loudness, at the bottom, is -19.14 LUFS.

Here’s the same file after normalization. Peak levels dropped from -1.8 to -6.68 dB. Also, the Loudness, at the bottom, now matches the spec at -24 LUFS, from it’s original level at -19 dB.
In other words, the original clip was much louder than the normalized version.

And here’s the Written Report, the red box indicates the loudness changes that were made. The original loudness (Source) was – 19.144 dB, now it is -24 dB (LUFS).
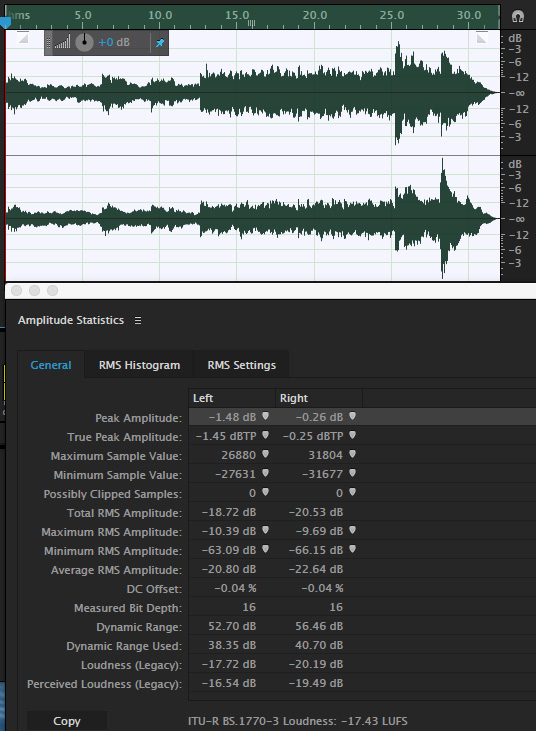
Here’s an original stereo music file, again measured in Audition. The Peak varies between channels, but is around -1 dB, while loudness is -17.43 LUFS.

Here’s the file after Normalization in a Stereo configuration. Audio differences between channels have been preserved, with peaks lowered closer to -7 dB, and Loudness sitting right at -24 LUFS.

And here is the Written Report. The Source file’s loudness was -17.4 LUFS, which was lowered to -24 LUFS.
SUMMARY
Loudness Normalization is a fast way to make sure your audio avoids excessive levels and meets required broadcast specs. While its operation with mono clips is confusing, most of us are generating stereo files which should work fine.
Be sure to choose the right setting for your region of the world. And, as always, be sure to listen to your audio after compression to be sure it still sounds good.

10 Responses to Adobe Media Encoder: Loudness Normalization [u]
These settings must apply to CC2015, as I do not find them in CC2014? We are still on CC2014 in our shop, as have not upgraded to CC2015 yet, as we have multiple editors, and waiting to make sure all the bugs are worked out before we do so.
Patrick:
You are correct – this first appeared in the Nov. 2015 update to Premiere and Adobe Media Encoder. Both have this function.
Larry
I am using the AME CC 2015.3 and the loudness normalisation tab effects is disable.
Do you have any idea what’s happening?
Thanks
Romulo:
This feature in AME is only available when you are exporting from Premiere. (AME handles all Premiere export duties.)
Larry
Thanks for this. Does Premiere’s Loudness Normalization INCREASE volume when necessary to bring it to the target -24? Or doe it only limit volume that is too loud. Thanks.
Kenny:
Correct. Normalization works in both directions.
Larry
How does something like this compare to a service like https://auphonic.com/landing
Currently for our broadcasts, I run our 57 min. long audio through the site to generate a new audio track to bring in. But this would allow me to bypass that step altogether it sounds like.
Ryan:
It would be better to think of Auphonic as a replacement for Adobe Audition. Adobe Media Encoder is primarily a media compression program with a few helpful filters attached.
Larry
I’m using Premiere 2021 and am not getting the option to set channel configuration at the bottom of the Loudness Normalization section in Export Settings. Consequently my 5.1 channels are getting messed up when I Normalize Loudness. Has the location of these settings changed?
James:
Good question. I never use these settings, so I don’t know the answer.
Perhaps another reader does – or you can contact Adobe Support.
Larry