
![]() Most of the time, we work with media in Adobe Premiere Pro CC with no problems. But, every so often, we want or need to extract a shorter range from within a longer video clip.
Most of the time, we work with media in Adobe Premiere Pro CC with no problems. But, every so often, we want or need to extract a shorter range from within a longer video clip.
This can be useful when you need to share media between editors and want to minimize storage space, or when you recorded an hour but only need to work with about a minute. Or, well, just because…
Adobe Media Encoder makes this easy. Here’s how.
GET STARTED
Open Adobe Media Encoder.

Choose File > Add Source (Shortcut: Cmd + I ) and import the source media file from which you want to extract something shorter.
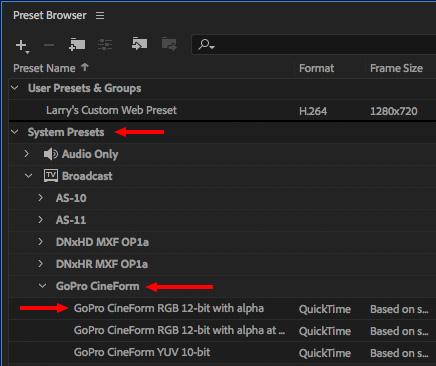
On the left, open System Presets, then open the GoPro Cineform folder. Drag the GoPro Cineform RGB 12-bit with alpha setting on top of the clip name in the Queue panel.
NOTE: GoPro Cineform runs on both Windows and Mac systems and is fully supported within Adobe software. If you are Mac-only, another good option is Apple ProRes 422. Keep in mind that you may need to install additional software to use GoPro Cineform. Here’s a link that explains more.

If there are other compression codecs assigned to that clip, select them, then press the Delete key to remove them.

Click Yes, in this dialog, to confirm you want to delete the unneeded compression settings.
SELECT A RANGE

To select a range within a clip, double-click the blue text “GoPro Cineform” located underneath the imported clip name in the Queue panel.
NOTE: Double-clicking any blue Preset text opens the Export Settings window.

(Click image to view full size.)
This opens the Export Settings window.

On the left, under the image, drag the blue playhead to the frame you want to use as the In and type I. (This sets the new In.)

Then, reposition the playhead to the frame you want to set as the new Out and type O. (This sets the new Out.)

NOTE: The In cannot be located to the left of the Out.

At the top right, under Export Settings:
TWO EXPORT OPTIONS
Now that you have imported the clip and set the range you want to export, you now have two options:
Option 1: Transcode

To transcode, verify all your settings are as we described. Click the OK button at the bottom right of the Export Settings window.

Then, click the green arrow at the top right corner of the Queue panel to start the extraction process.

AME gets right to work creating the new version.
NOTE: The status window displays what’s going on and indicates that it is creating a new version using GoPro Cineform.
Done
Option 2: Rewrap
Rewrapping allows us to create a second, shorter, clip using the same settings as the source clip.

Based on the instructions above, once you verify at the top right of the Export Settings window whether you want to export audio, video or both, change the Preset popup menu from GoPro Cineform to Match Source (Rewrap).
Then, as before, verify all your settings are as you want. Click the OK button at the bottom right of the Export Settings window.
Then, click the green arrow at the top right corner of the Queue panel to start the extraction process.

Extracting a rewrapped clip is generally MUCH faster and, as you can see, although we applied the GoPro codec, the actual export was ProRes 422 HQ, because this was the codec used by the source file.
Done
SUMMARY
Most of the time, I let Premiere worry about all of this. But, for those occasions where you need to extract media, AME makes it fast and easy.

4 Responses to Adobe Media Encoder: Extract a Short Range from Longer Video Clip
If someone does find a way to set an out before an in, let us know pronto!
Smile…
Well, one COULD argue that it would then play the clip in reverse… but that would take all the fun out of it.
Larry
Hi Larry,
When I want to export a clip or portion of the timeline, I simply set in and out points, highlight the clip and export media. The portion of the clip I selected comes up in media Encoder and I proceed as if exported the entire timeline. Did I miss something in this article? thanx Larry.
xxo glo
Glo:
You didn’t miss anything, but if all you need is an excerpt, you don’t need to start Premiere. You can do all that work directly in AME.
Larry