
Roy Breiling asked a good question recently:
Maybe you might consider having a step-by-step guide in FCP to teach the most efficient way of making videos to save hard drive space. I recently made a 17 minute family video of mostly pictures and a few videos, and it was over 68 GB! It took almost two days to get it up to the cloud.
Smile… Yeah, this was why they invented video compression. Let’s examine why.
NOTE: I’m using Final Cut Pro as part of my example, but the process and numbers are the same, regardless of whether you use FCP, Premiere, or Resolve. Media Encoder settings would be similar to Compressor. And, with Resolve, I use Compressor to compress all Resolve projects.
First, let me define a key term: Codec (short for Compressor/Decompressor): This is a group of mathematical settings that determines how light is converted into a digital file. There are dozens, probably hundreds, of different codecs, each optimized for a specific purpose. Because of this optimization, different codecs are used at different stages of any project:
THE CODEC TRIANGLE

When determining how to edit a video project, we are bounded by the limits of the Codec Triangle. A project can have a small file size, high image quality or be easy to edit. However, we can only pick two. Yes, we want all three, but, sadly, only two are available in any given codec:
WHAT DETERMINES COMPRESSED FILE SIZE
The size of any compressed file – regardless of codec – is defined by six criteria, NONE of which are dependent upon the source file. Any source file setting can be changed during compression.
Here’s a quick look at each:
SO, WHY DOES THIS MATTER?
For acquisition, we use whatever format the camera manufacturer picked for that camera. They selected a codec that creates the highest possible video quality given whatever limitations the hardware in that camera requires.
However, most less-expensive camera record in some version of H.264. This is only an 8-bit codec (256 shades), so editing in H.264 will, among other things, limit what you can do in color grading and, frequently, make any gradients look stair-stepped. H.264 is also significantly slower to edit on older computers.
For this reason, it generally makes sense to convert H.264 or HEVC recordings to ProRes 422, which is a 10-bit codec (1,024 shades), or, for log and other extremely high-quality files, to ProRes 4444, which is a 12-bit codec (4,096 shades).
Once editing is complete, it’s time to move our project to the third tier of codecs for distribution. For most of us, that means convert our video into H.264.
NOTE: We can use HEVC, but, as you’ll see, there isn’s a big file size difference and while H.264 plays everywhere, HEVC still has playback limitations.
But, you may ask, isn’t H.264 lower quality than ProRes? Yup, it is. On the other hand, files are MUCH!!! smaller, image quality is close to really good, and once color grading is complete you don’t necessarily need to stay in a 10-bit color space.
Harumpf, you reply. I want my 10-bit color!! In which case, use Apple Compressor to convert your finished edited file into HEVC 10-bit. It isn’t as small as H.264, but with the hardware compression built into all M-series Macs, compression will be faster than real time.
NOTE: Based on my tests, converting into H.264 will be about 5X faster than real time, while HEVC 10-bit will be around 3X faster. Your mileage will vary based upon the overall speed of your computer.
OK, WHAT DOES THIS MEAN IN REAL-LIFE?
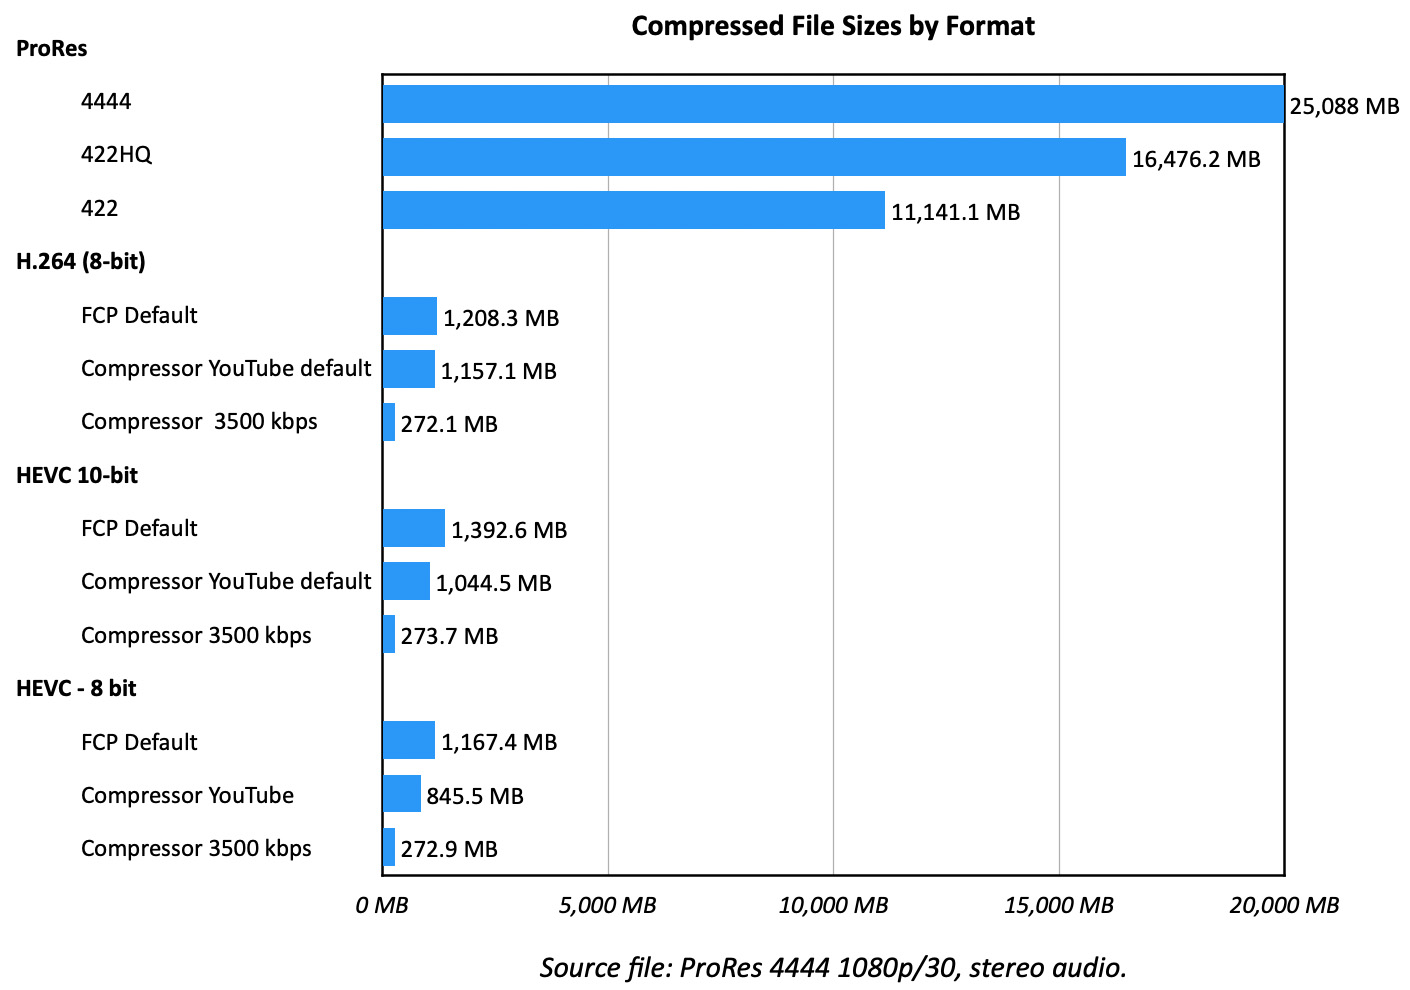
Just before writing this, I compressed a ten-minute ProRes 4444 edited file into several different codecs using Apple Final Cut Pro 11.2 and Compressor 4.11. Take a look at the chart above.
The ProRes 4444 source file was 25 GB. ProRes 422 HQ and ProRes 422 dropped the file size to 16.5 and 11.1 GB, respectably. Not bad, but still really big, especially if you need upload it; but, for editing, these are perfect.
Inside Final Cut (just like Premiere and Resolve) there are default export options for H.264 and HEVC compression. The default bit rate is around 16,000 kbps. (A limitation of exporting from Final Cut is that we can’t change the bit rate.)
As this chart shows, changing the codec shrinks that file about 96%! However, we can do better – and should, in most cases.
While Final Cut makes exporting one-step simple, we don’t have enough control over the process. That’s where Apple Compressor comes in. This is a $50 utility that is worth every penny. I use it every week.
Using the default Compressor settings for social media (15,000 kpbs) makes the file 100 MB smaller than FCP’s default.
But, when we start to apply custom bit rate settings, in this case 3500 kpbs for a 1080p file, file size drops to only 270 MB! This is 1% the file size of the original source!! An amazing reduction without any appreciable visual artifacts.
OTHER COMPRESSION THOUGHTS
All compression in Compressor and Final Cut occurred faster than real-time, the actual speed will depend upon your hardware.
10-bit HEVC creates files about 20% larger than 8-bit, which is about what I would expect.
If you see artifacts (floating, blurry rectangles) in your compressed images when using custom bit rates, simply increase the bit rate by 400 – 500 kbps until the artifacts disappear. Custom bit rates will always yield smaller files that the defaults, and be most visible on moving objects.
Also, if you are sending files to any social media platform, they will ALWAYS recompress it into all the different formats they need to support. So, you want to compress any social media post with extra data so that when it is recompressed artifacts won’t appear. For this reason, use the social media compression defaults for social media posts and custom settings for files you are uploading to your own website for download.
SUMMARY
Compression is a fact of life. Given the high quality of digital files, use the right codec for the job. It is OK to convert files as you move your project from acquisition to editing to distribution. Different codecs are used for different tasks.
In “the olde days,” when the Internet was really slow and hard disks didn’t hold a lot, it was critical for us to compress files as small as possible. Those days are gone. We don’t have to be that obsessive any more.
Btu we still need to compress our video. And, now, you know why.
