 When I figured this technique out, I couldn’t stop giggling. It is now a highlight in my Photoshop classes and my students are adding cast shadows to everything.
Watch!

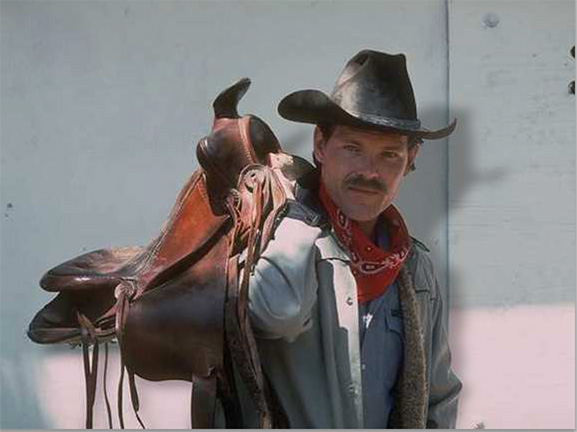
Here’s our source image. He’s lit from the upper left. While this isn’t a bad photo, this would look much better if he actually cast a shadow on the wall behind to give us a sense of the distance from him to the wall. But, a shadow just doesn’t exist… yet.
Time for us to improve things.
ISOLATE THE SUBJECT

First, convert the background image to a layer by clicking the lock icon. (This isn’t totally necessary, but layers are much easier to work with than the background.)

Next, duplicate the image twice by right-clicking the background layer and choosing “Duplicate Layer.” Or, type the keyboard shortcut: Cmd + J.
In this screen shot, I also renamed the layers. Again, not strictly necessary, but renaming helps me keep things organized in my mind.
NOTE: To rename a layer, click the name once and wait a second.

Select the top layer (“Subject”), then choose Select > Subject. Photoshop uses its own magic and selects what it thinks is the subject of the frame.
NOTE: You can also use any manner of other Photoshop selection tools, but I found using Subject to be both fast and reliable.

Choose Select > Inverse (shortcut: Shift + Cmd + I) to select everything EXCEPT the subject. (Note that the “marching ants” are now around the edges of the image. Then, press Delete.
This removes the background from the subject. Don’t remove the selection, yet.

Oh, yeah. Well, you won’t see anything disappear because the other two copies are still selected. Sorry about that. Click the “eyes” for the two lower layers and you’ll see the isolated subject.

NOW you see the isolated subject. Whew.
Turn the eye off for the Subject and on for the Shadow and select the Shadow layer.
If you haven’t removed the selection, press Delete, again, to remove the background from the Shadow layer as well. If you accidentally removed the selection, follow the same process as above to select the subject, then invert the selection.
Now you have two layers with just the subject isolated.
With the Shadow layer selected, invert the selection again to select the cowboy’s image on that layer (shortcut: Shift + Cmd + I).

Next, replace the Shadow layer image with black to create the shadow. Choose Edit > Fill and fill the selection area with black. (There are also keyboard shortcuts that do this, but they take too long to explain here.)
Finally, choose Select > Deselect to remove the selection (shortcut: Cmd + D)
This finishes the isolation phase. The top layer is the isolated subject, the middle layer is the isolated form of the shadow and the bottom layer is the background.
CREATE THE SHADOW

With the Shadow layer selected, but NO selection in the image, choose Filter > Blur > Gaussian Blur and blur the shadow. The more you blur the shadow, the farther it will appear from the subject. There’s no one perfect number – pick something that looks good to you.

Now, the magic starts! Again, with the Shadow layer selected, choose Edit > Transform > Distort.

POOF! A shadow appears. You’ll see this even more clearly if you enable the Subject layer, then distort the Shadow layer. Distort the shadow in a way that mimics the direction of the lighting and how far you want the subject to appear from the background.

Turn on all three layers, and adjust the opacity of the Shadow until it feels right. I generally use 25-30% opacity.
Done. Cool!
EXTRA CREDIT
The blur of a shadow increases as the shadow gets farther from the object casting the shadow. There is a very powerful effect that helps you emulate this: Tilt-Shift Blur.
Select the Shadow layer and apply Filter > Blur Gallery > Tilt-Shift Blur.

Put the white dot in a circle down where you want the shadow to be sharpest.
Click the small white dot above it to rotate the blur to match the angle of the shadow.
Drag the dotted line to where you want the maximum blur.

In Blur Tools at the top right, increase the Blur amount to get the dispersion you want. This will vary by image.
Press Enter to accept your changes.

Ta-DAH! Done.