 Adobe Premiere Pro CS6 changed a lot of things, but it didn’t change how Premiere moves images around. So, in this article, I want to explain how to use the tools in the Effect Controls panel to resize and move images.
(If you are an old hand at Premiere, most of this will be pretty basic. But, if you are new, there are some tricks here you’ll find useful.)
NOTE: I’ve created an in-depth video training series covering Adobe Premiere Pro CS6. It presents some very cool stuff. Learn more here.

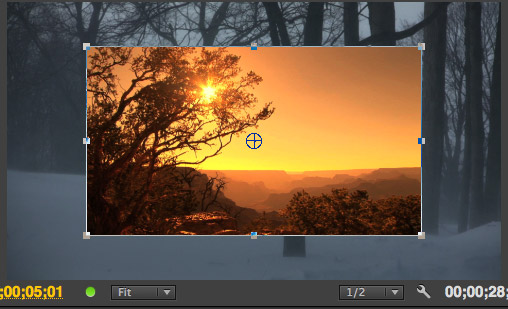
Here’s where we are heading. A picture-in-picture with a 3D perspective effect added to it.
GET STARTED

In order to see multiple images at the same time, they need to be stacked in the Timeline and the foreground clip ALWAYS goes on top. (In this example, I’m illustrating what trees dream about during winter; specifically, summer.)
NOTE: When creating effects in Premiere, always put your playhead in the clips you are changing. This allows you to watch what you are doing in the Program monitor, while making adjustments in the Effect Controls panel.
By default, Premiere displays a video clip at 100% size with 100% opacity; in other words, the top clip totally blocks whatever clips are below it. For B-roll this is perfect. For effects, this means that we always apply settings and effects to the top clip, before adjusting anything below it.

To adjust the size, position, or opacity of a clip – as well as any applied filters – select the clip in the Timeline first, then select the Effect Controls panel. (If this panel is not displayed next to the Source monitor panel, select it from the Windows menu at the top of the screen.)

Twirl down the Motion triangle to reveal Position and Scale controls, among others. Then, do one of four things:
But, wait, you say, that’s only three?! And you are correct. There’s a secret button that can make your life a lot easier.
NOTE: If you want to accelerate your dragging speed, hold the Shift key while dragging to change a number. Or, conversely, hold the Command key to drag in slow motion. The Shift key gets you there in a hurry, the Command key provides much greater precision.

Click the small, four-sided icon next to the word Motion at the top of the Effect Controls panel. This selects the clip in the Program monitor.

Once the clip is selected you can:
So, to change the position of a clip either drag it when it is selected in the Program monitor, or select the clip in the Timeline and change the Position values in the Effect Controls panel.
NOTE: Like Photoshop, Premiere sets the 0,0 point at the top left corner of the frame. For a print picture, this makes sense. But for video, it makes calculating where to position images a lot harder.
What the Position numbers show is the position of the center of the selected image, compared to the underlying pixel grid of the frame. So, if you set the Position of a selected clip to 0,0, the center of the selected clip will be at the top left corner of the frame. (The left number represents horizontal position and the right number represents vertical position.)
Because these centering numbers change as the frame size changes, here are some example “centers-of-frame” for three popular image sizes (the left number represents the horizontal position):

To reset all the Motion parameters back to their default settings, click the small “hooky-arrow” to the right of the word “Motion.” This is the reset button and it is used throughout Premiere as a settings reset.
TURN ON SAFE MARGINS

Safe Margins – also called Action Safe and Title Safe – are displayed via the Wrench icon in the lower right corner of the Program monitor and Source monitor.
Click the wrench and, from the bottom of the list, select Safe Margins.
NOTE: You can adjust the region represented by these two borders by selecting Project > Project Settings > General. However, the default values are considered industry standards. Most of the time, I suggest leaving these settings alone.

Here, for example, our picture-in-picture is in the upper left corner. You could add a transition or keyframes to transition into the frame in a wide variety of ways.
ADDING A 3D LOOK
However, in this case, I want to apply a simple 3D effect to put some perspective into the image.

Go to the Effects tab, in the same group of tabs as Media Browser – or select Window > Effects.
Twirl down Video Effects > Perspective and apply the Basic 3D effect to the clip.
NOTE: New with the CS6 release, you can now apply an effect to a selected clip by double-clicking the effect name in the Effects panel. Or, you can take the traditional approach and drag the filter and drop it on top of the clip to which you want to apply it.

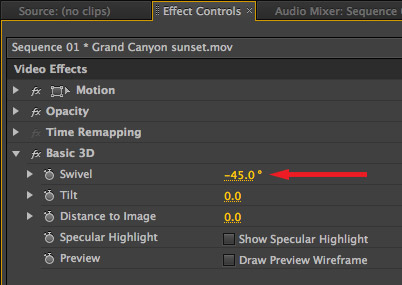
In the Effect Controls, change the Swivel value to -45.

This creates a very nice perspective effect (I’ve turned off Safe Margins to make this easier to see), but, it also chopped off the top left corner of the foreground image. (This is caused by scaling the sunset image larger than the frame that contains it.)

To fix this, adjust the Distance to Image so that the image moves back and redisplays the missing corner. At which point, I readjusted Scale and Position until the image looks the way I want. (The screen shot shows the settings I used. I changed: Position, Scale, Swivel, and Distance to Image.)

Here’s the final result. As with all effects in Premiere, we can add animation using keyframes or other effects, but I’ll save that for another article.
6 Responses to Premiere Pro CS6: Moving Images and Effect Controls
Thank you very much!
helo,
my name is Uchenna, Please am having problem locating this following ‘EFFECTS’ in Adobe CS6 premier pro:
they are ROLL EFFECT
RIPPLE EFFECT
GPU EFFECT
thanks
Thanks Larry
you helped me out there 🙂
(I would change your title to suit the advice tho 🙂 I nearly didn’t find you and you are the ONLY published solution I found regarding this)
thank again
RocketBoy:
Good advice. I changed the title.
Larry
Thank you so much! this is exactly what I was looking for and more.
Ron V
thank you very much for all this!