 I use Photoshop to prep almost all my still images before editing them into a video; whether I’m using Final Cut Pro X or Premiere Pro CC (or FCP 7, for that matter).
While there is an almost infinite number of ways to enhance or repair an image in Photoshop, for this article I want to illustrate several simple steps that I use to prepare a digital photo.
TUTORIALS ON IMAGE REPAIR
If you have an image that you want to repair:
IMAGE WORKFLOW
My general workflow is:
Just as a note. Photoshop has amazing color adjustment tools, but what it doesn’t have is video scopes. I’m sorry, but the histogram is not sufficient for materials going into a video project. So, I’ll adjust exposure in Photoshop, and fix obvious color problems, but save detailed color adjustments for the NLE where I can use the scopes to make sure my adjustments are consistent and accurate.
Also, I always clean up the image before resizing. Scaling the image, up or down, is the last thing I do before exporting the final image.
SET LEVELS

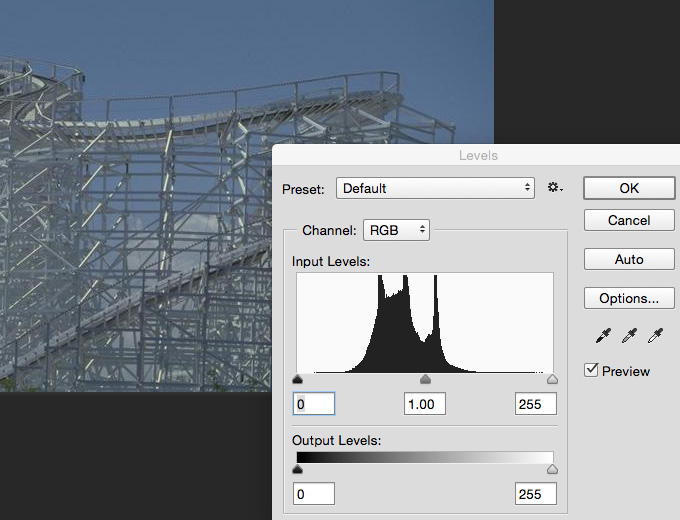
Let’s pretend that I’m doing a still image montage of wooden roller coasters. Here’s the wide shot that I want to start with.

My first step, always, is to choose Image > Adjustments > Levels (Shortcut: Cmd + L). This allows me to adjust the gray scale values of an image.
Here, for example, the histogram shows that all the pixel values are concentrated in the mid-tones, there are no dark or light pixels. Seeing as the photograph was taken in bright sunlight, with lots of obvious highlights and shadows, this tells me that Levels need to be adjusted.

First, I drag the black level slider to the right until it just touches the trailing edge of the histogram. This resets the value of all dark pixels toward black.
NOTE: I don’t move the slider inside the bulk of pixels, just up to the trailing edge.

Next, I drag the white slider, on the right, until it just touches the leading edge of the histogram. This resets all the lighter pixels to white.
NOTE: Again, I don’t move the slider inside the bulk of pixels, just up to the leading edge.
If necessary, I’ll adjust the mid-tone slider to enhance the image a bit, but in this case, adjusting the slider doesn’t improve anything, so I’ll leave it alone. Adjusting mid-tones is totally personal preference, which can also be done inside the video editing software.

Compare the difference of the first picture to this one, which only had Levels adjusted.
Digital photos almost always have highlights that are too bright, black levels that are too high and mid-tones that are washed out. Even if all you do is tweak the Levels, you can quickly improve almost every still image.
SIMPLE COLOR CORRECTION

Here’s a close-up of the roller coaster track. Again, it has a washed out feeling, so I’ll first tweak Levels.

Here’s the image after I reset Levels. Where, specifically, to move the sliders is personal preference, provided you don’t go past the edge of the pixels in the middle. Dragging inside the pixel block removes either shadow or highlight detail and makes the image look either crushed (black levels set too high) or blown out (highlights set too low).

However, there’s also a blue cast to the image. Here, Curves can help. Curves, in the hands of an expert, can do magic. However, since I want to do most of my color correction in the NLE, I use Curves for only the simplest of tasks.
Choose Image > Adjustments > Curves (Shortcut: Cmd + M).

Click the middle eye-dropper at the bottom. This allows you to click something that’s supposed to be gray and the Curves dialog will automatically adjust the mid-tone color curves so that the selected object becomes gray.

I clicked on the railing. Notice how the image instantly looks much less blue. You can see the adjustment Curves made in the screen.
Click OK to accept the changes.

Here’s the image after simple Levels and Curves adjustments.
SIZE THE IMAGE

Next, I need to size the image using the Crop tool. (Shortcut: C) In the top menu bar, select W x H and enter the image size you want to create.

For full-screen images that you don’t intend do moves on, choose:
For images that you intend to do moves on, multiply both dimensions by 3:
You can create images larger than this, but keep in mind that Final Cut prefers images that are smaller than 10,000 pixels on a side. Premiere allows images up to 16,000 pixels on a side.
I also try to keep my images in a 16:9 aspect ratio.

Adjust the crop rectangle to reveal the image you want, then press the Enter key.

Here’s our finished image.
SAVE THE IMAGE

For images you plan to use in video editing, save them as either a PNG or TIFF. Both are excellent quality. If you need to preserve layers, save it as a Photoshop (PSD) document.

For PNG images, set Compression to None and Interlace to None.

For TIFF images, set Image Compression to None and Byte Order to Macintosh.
SUMMARY
Virtually every still image can be improved in Photoshop before importing it into your video editing system. These improvements don’t need to take a long time. But, as you’ve seen here, they can make a major difference in the quality of your work.