 Given the speed of today’s computers, it isn’t as important to optimize Premiere’s preference settings as it used to be.
However, that doesn’t mean we can’t improve on the default settings. Here’s how.
OPTIMIZE PREMIERE PREFERENCE SETTINGS

Given the vast number of settings we can change, it is reassuring to know that most of them are just fine. Additionally, if you don’t like a setting, you can change it at any time.
Given that, here’s how I’ve optimized my preferences.
NOTE: If I don’t mention a section, it’s because I don’t make any changes to it.
GENERAL

If you are working on the same project for multiple days, change General > At Startup to Open Most Recent.
AUDIO

If you do a lot of timeline audio recording – say for temp narration tracks – enable Mute input during timeline recording. This prevents unexpected feedback during recording.
Enable Render audio when rendering video. Audio files render very quickly, so it makes sense to do everything at once.
AUDIO HARDWARE

This varies for each system depending upon the gear you have connected to it. I use external audio gear. So I change the default Input, Output and Clock to point to the external audio gear.
A sample rate of 48000 is perfect; virtually every camera or audio device records audio at a 48K sample rate.
NOTE: A caution. If you use screen recording software, such as Telestream Screenflow, it will reset both the input and output settings just as you start recording. This has ruined more screen recordings than I can mention. I always re-check this before doing any screen recording or live streams.
AUTO SAVE

Consider enabling Premiere to save your current project every time it does an auto save. That way, you are automatically protected even if you don’t remember to save your project as often as you should.
MEDIA

When Default Media Scaling is set to None (the default), images will import at 100% size. This is fine if the frame size of your media matches the frame size of the sequence. However, I find it easier to change this setting to Set to frame size.
This scales the media to match (or fill) the frame AND shows the amount of scaling in Effect Controls. Scale to frame size changes the size of the image, but does not display how much it was changed. I avoid using this setting.
I also disable Automatically refresh growing files. A growing file is a file that is recording while you are editing it. (Think sports highlights of an on-going game.) However, this setting means that Premiere is constantly checking your hard disk to see if anything has changed in the files you are editing. For fast SSD systems, this isn’t a big deal. For spinning media, it is. If you aren’t editing files that are changing as you edit them, turn this option off.
NOTE: Premiere automatically takes advantage of whatever hardware acceleration is built into your CPU – either Intel or Apple silicon.
MEDIA CACHE

I am constantly working on different projects, which means that my cache files are constantly growing. To prevent them from overrunning my storage, I enable Automatically delete cache files older than ## days. Then, I set the timer 30 days.

NOTE: This warning appears when you change the cache file settings.
If you are working on the same projects for multiple days or weeks, either leave cache settings at their default or enable the third option which deletes older cache files when they start to occupy a lot of space.
PLAYBACK

If you aren’t displaying media on a dedicated display – rather than a computer monitor – turn off Enable Mercury Transmit.

However, I specifically added a second monitor to display video. So I left Mercury Transmit enabled and selected which monitor would be used to display video fullscreen.
TIMELINE

A 30-frame video dissolve is too long. I set this to 0.67 seconds so it’s the same at all frame rates.
Then, I change many of the settings at the bottom (red box).
TRIM

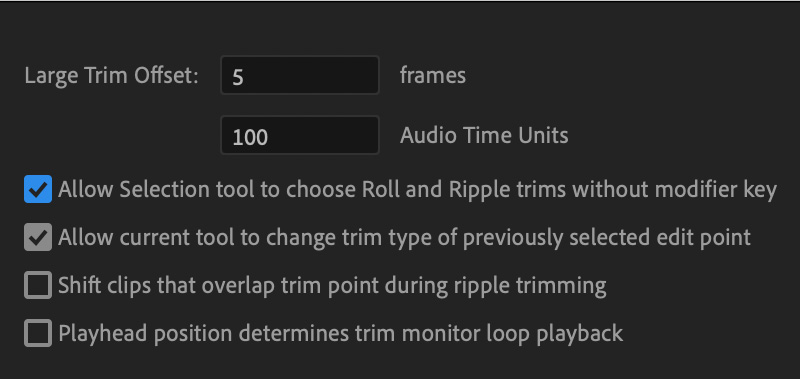
I enable Allow selection tool… This makes the cursor act “smart,” by selecting a trim tool based upon where it is placed at the edit point. This is easier to see than explain.
TRANSCRIPTION

If I was editing dialog all the time, I would enable Automatically transcribe clips. However, most of my editing is video-only, so I leave this off, which is the default setting.
If you are doing lots of transcriptions, set these settings as needed to match your typical transcript.
SUMMARY
One of the great strengths of Premiere is how much it can be customized. But all that choice also becomes overwhelming. Hopefully these tips help explain the settings you might want to consider modifying for yourself.
Feel free to share your personal preferences in the comments.
5 Responses to Optimize Premiere Pro Preferences for Single Editor Editing
Larry,
You make our lives better by generously sharing your knowledge, which saves many of us frustration and pain. I learned long ago when Larry speaks it pays to pay attention. Thanks for helping us edit well.
David:
Thank you for sharing such a lovely note. I’m very happy to help – I enjoy teaching.
Larry
Thank you Larry for this much needed info on Preference Settings.
Gloria
Thank you, Larry. This is a very helpful article and I appreciate your time putting it together.
[…] by Larry Jordan […]