
IMPORTANT: Before you start, please read this tutorial on The Critical Importance of Project Settings in DaVinci Resolve. It will save you pain.
The problem with learning new video editing software is similar to that of cooking in someone else’s kitchen. You know they have everything you need, you just don’t know where they put it.
I’ve made sporadic attempts to learn DaVinci Resolve over the years. Yes, I know; it is excellent software. Yes, it is upgraded frequently and, yes, those upgrades are significant. And, yes, Resolve has more integrated editing features than either Adobe Premiere Pro or Apple Final Cut Pro.
I really should learn it. Sigh… But, well, the older I get, the harder it is to learn something new. I call it my “Four Stages of Learning.”
Currently, I’m wading through Stage 3. But, I’ve discovered that Resolve is easier to learn than I thought – mostly because it builds on what I already know.
The process of video editing is infinitely complex, but, in brief, it consists of five main steps:
Resolve supports all of these processes in one application. It does a lot. So much that Resolve’s User Manual runs 4,140 pages! That’s enough to scare anyone!
The good news is that DaVinci Resolve provides a simplified approach to getting started that allows you to dip your toe into the very deep pool of Resolve features without fear of drowning.
Let’s create a simple edit and use it to explore Resolve.
GET STARTED
If you haven’t already, download the free version of DaVinci Resolve and install it. The current version – for this tutorial – is 18.6.4.
During installation, Resolve asks you to create a library/database. You only need to do this once. My recommendation is that you create a Resolve folder on your fastest drive, then point to that folder. Resolve uses this location to store media, projects and work files.
Resolve takes about the same amount of time to launch as Premiere – which is slower than Final Cut. The first window (above) is the Project panel. To create a new project, double-click the Untitled Project icon. To open an existing project, double-click its icon in this panel.
By default, Resolve opens into the Cut page. This is a streamlined screen for simple editing. It allows you to get started without bogging down in the entire interface. If you are new – or in a hurry – this is a great place to start.
Type Cmd + I (menu: File > Import > Media) to select media to import into the project. This is the same process as Premiere or Final Cut.
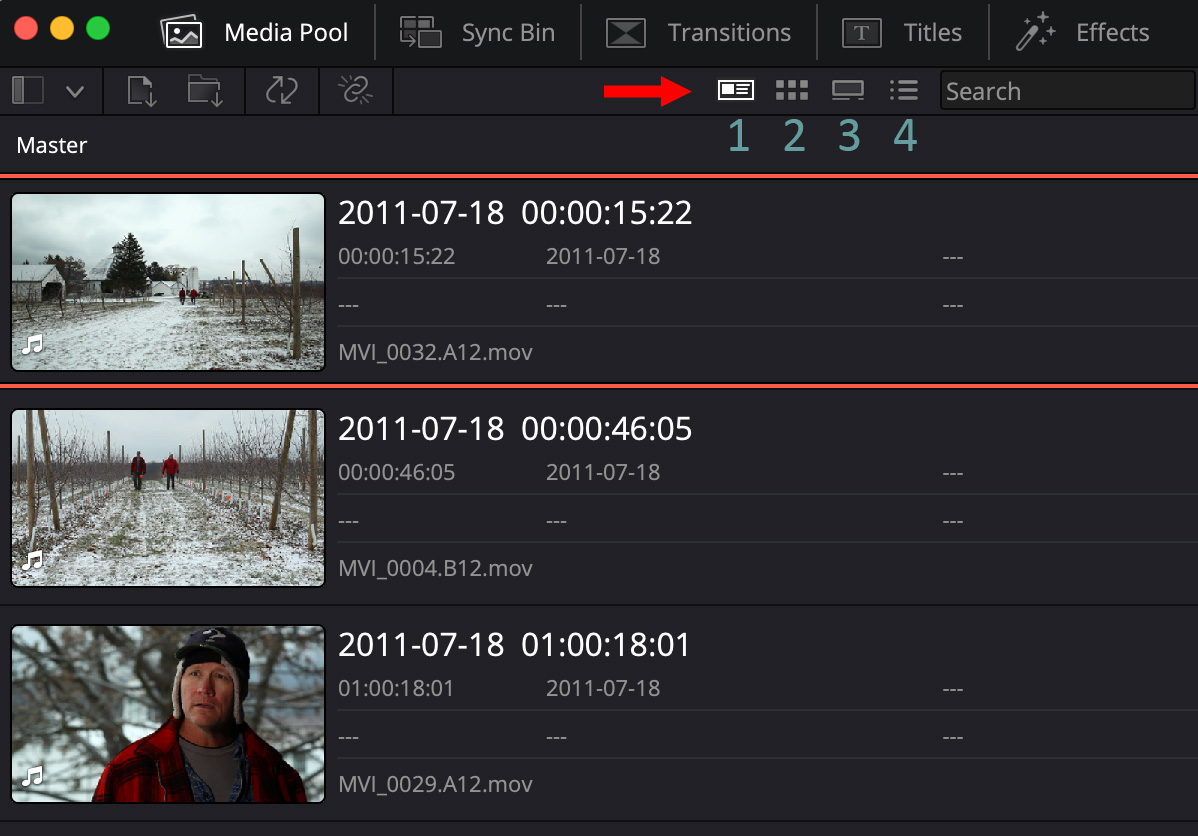 Images courtesy of John Putch “Route 30, Too!” (www.route30trilogy.com)
Imported media is displayed in the Media Pool window in the top left of the interface. This is the same location as Premiere or FCP. The screen shot above shows the metadata view. Click an icon to change the display:
Unlike Final Cut, the Viewer does not automatically toggle between displaying clips in the timeline and the browser. Unlike Premier, there is no Source monitor. To view a clip in the Media Pool, scrub the image in any view except List. If the Viewer does not show the media, type Q.
Here are other key editing shortcuts:
You can also select a clip in the Media Pool, display it in the Viewer, then scrub in the Viewer to set an In or Out.
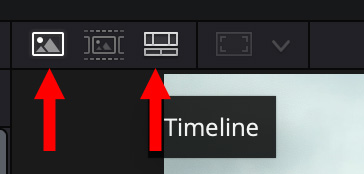
NOTE: To toggle between viewing the Source clip and the Timeline, type Q – or click one of the icons indicated by a read arrow (above).
EDITING

Edit Icons
To edit a clip into the timeline, either:
NOTE: While an Append edit is exactly the same as in Final Cut Pro Premiere does not have an equivalent. An Append edit places the selected clip at the end of all current media in the timeline on the lowest layer.
To insert a clip between two clips in the timeline, put the playhead at or near an edit point, then:
Other shortcuts:
NOTE: Unlike Premiere, you don’t need to target a track before editing a clip into a higher layer. Also, unlike Premiere, the Cut Page timeline acts like the magnetic timeline in Final Cut Pro. If you don’t like the magnetic timeline, use the Edit page for editing.
TRIMMING
Just like trimming in Premiere or Final Cut, grab an edge and drag it to trim an edit.
Keyboard shortcuts:
MOVING THE PLAYHEAD
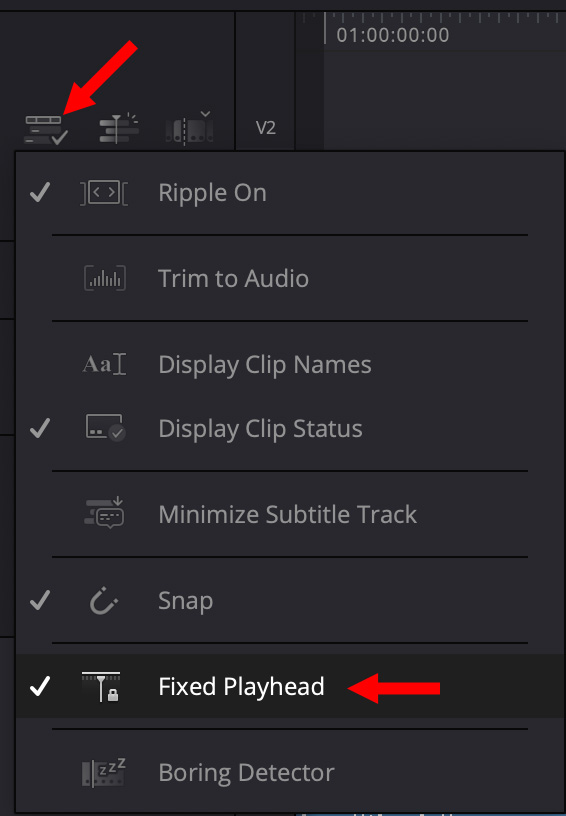
There are two playheads in Resolve:
The top playhead moves, the bottom one does not. This difference drives me nuts! I’m always grabbing the wrong one. So, to move the playhead:
– OR –
SET AUDIO LEVELS
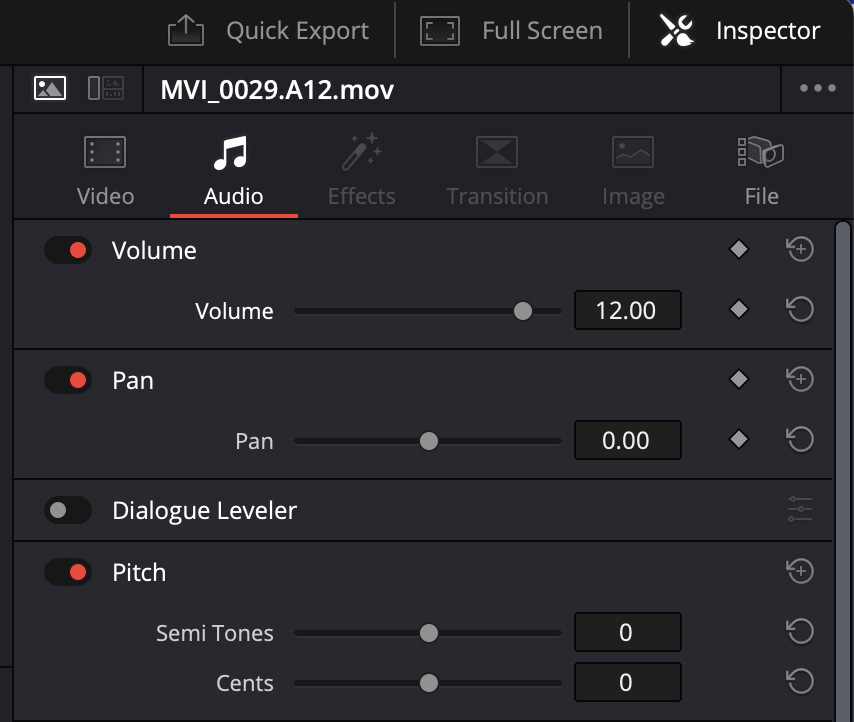
Audio needs its own tutorial, but, if you are in a hurry, select the clip(s) you want to adjust, then, in the Audio Inspector at the top right, drag the Volume slider till you get the level you want.
NOTE: Resolve includes Fairlight – a full-blown, high-quality audio mixer. Truthfully, for any edit where I care about the audio, I wouldn’t change audio settings during the edit, but click into the Fairlight page and start enhancing there. But this is a Get Started tutorial, not a book.
EXPORT
Normally, once the edit is roughed in, it’s time to add effects and clean up the audio mix. But, for now, we are simply looking at an overall workflow for a simple edit.
Click the Deliver page to shift into Export mode (screen shot above).
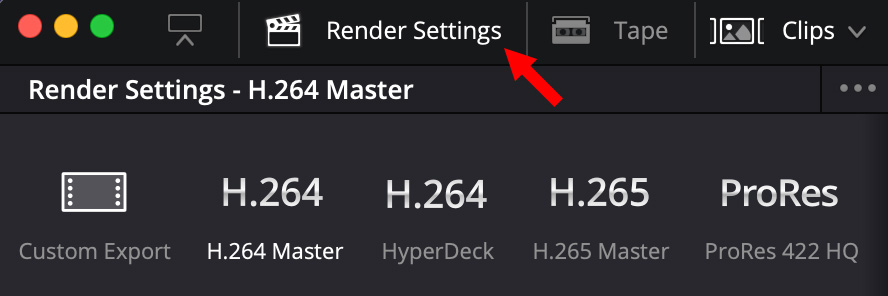
Select the output format in the top-left – H.264 is a good choice for social media. ProRes 422 HQ is a good choice for the master file.
Actual compression settings are similar to Adobe Media Encoder or Compressor – there’s nothing new to learn.
Should you need to make tweaks, you can review the entire project in the Deliver page; however, you need to switch back to the Cut (or Edit) page to make changes.

What IS new, though, is that we don’t just “export” – we add the movie to a Render Queue. The advantage is that you can queue a number of exports, then process them all at the same time.
When you click Add to Render Queue you can specify the output file name and location, the same as any other NLE.
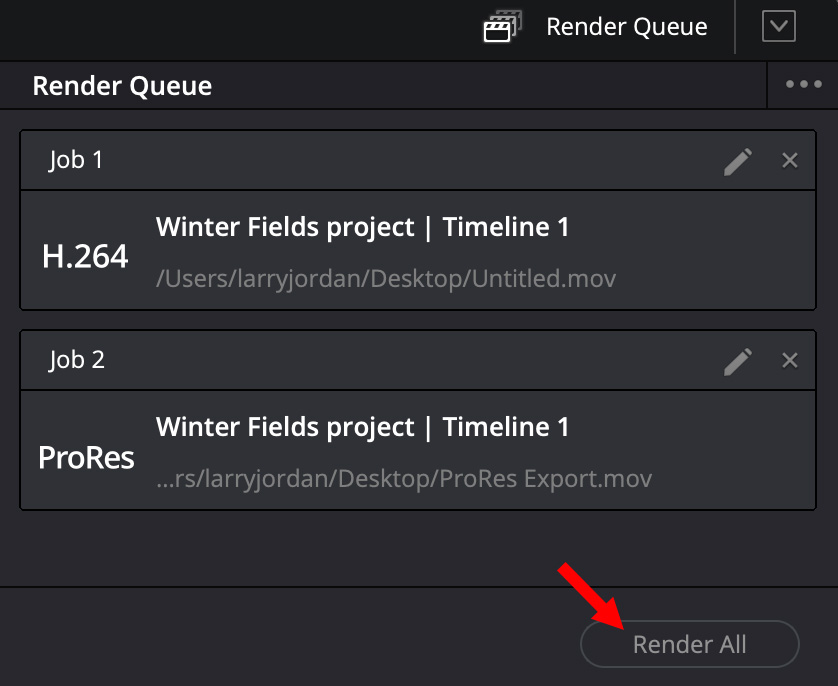
For instance, here, I’m exporting two versions: H.264 and ProRes 422 HQ. Click the Render All button to start the export process.
SHUTTING DOWN
Resolve does not auto-save, unlike Final Cut Pro. So, when it comes time to quit, go to File > Save As and save your work (shortcut: Cmd + S).
The next time you open Resolve, you’ll see your project in the Project panel.
SUMMARY
Yes, Resolve is complex. Yes, Resolve has its unique quirks. However, at heart, it’s just like any NLE – and very similar to both Premiere and Final Cut. In fact, Resolve borrows many of Final Cut’s keyboard shortcuts and behaviors; both from FCP 7 and FCP X.
The lesson here, at least for me, is that when it comes to learning new software, many times we are our own worst enemy. The software is far easier to learn than our fears make it and provides a different feature set which we can leverage to accomplish tasks that might be harder in the software we are currently using.
14 Responses to Get Started Editing with DaVinci Resolve
Comment on Multicam
I almost agree with you on multicam. I have got it to work but through a long about way.
Problems for me:
1 – Take clips from two cameras, with identical audio. Try syncing on audio and most time it fails.
2- I use multiple cameras. Each supports multiple audio tracks. I use all of these tracks in my final product, but DaVinci only thinks that track one will be used. So, I have to find ways to sync them, and Resolve doesn’t even load the other tracks.
3. It doesn’t understand that sometimes you might stop both cameras during a single event. It wants that to be a separate timeline.
4. And there are other issues.
My current process is as follows.
1 – Take clips and load them onto a FCP7 timeline. I might have three video tracks and 12 audios tracks.
2 – Use Plural Eyes (a discontinued product that does not work with Resolve after ver. 14) to sync all the tracks.
3. Open Plural Eyes sync’d timelines and cut all tracks at a common point, loke where a clap occurred.
4. Delete all material before this cut so that all of the clips have a common start point at 1:00:00:00.
4. Export each audio track and each video track as a separate file.
5. Open Resolve and drag each file to the media pool.
6. Select the two or more video tracks and tell it to create a multiclip from the selected files.
7. Open multiclip timeline and click appropriate user interface buttons to properly play multiclip, video only. https://youtu.be/ZzPZe36RdkU?t=668 (This is the video I use to remind me how it works. I have a start time since I work the edit page vs. the cut page in resolve.)
8. Drag all audio tracks below video multiclip track and edit like it was FCP7. Resolve on my Mac Studio Ultra is fast, so I don’t need proxies. Also, I do like the toolset Resolve gives, which includes fusion and the best color correction/finishing tools.
At this point it works fine with one problem, the cut all tracks shortcut at time cursor sometimes doesn’t work.
Ed Grogan
Ed:
I like your workflow – weird thought it is… Except, like many editors, I don’t have access to FCP 7 anymore. The multicam issue is tricky. I’ve had feedback from several editors so far today and, while we found two necessary steps that aren’t in the manual, I still don’t have multicam working.
I am not giving up – I am assured (and believe) that multicam works – its just not yet working for me.
Larry
This is SO WELCOM – Thank you I will devour this!!!!!
This is SO WELCOM – Thank you I will devour this!!!!!
I’m retired now but have lived through the transition from film to digital editing. I’ve forgotten how to operator more editing systems than I know. On the question of learning new software, my advice is to learn it when someone is paying you to learn it. If you’re already comfortable with an editing program and have no financial need to learn another one, the most likely result of your effort will be time lost learning something you’re likely to forget. If down the road you are required by some employer to use that program you learned all those months ago, you’re likely to find you have to take a refresher course anyway and a lot of what you do remember will have changed. In my career, the only program I ever decided to learn on spec — it was called Ediflex — was one of the only programs I never used on a job. It no longer exists (although one of its features survives inside Media Composer) and all the experience gave me was a cautionary tale. (Now if someone knows a good teacher for Adobe Animate, that would interest me. I’d love to make cartoons for my grandchildren.)
Stephen:
Thanks for your comments. I think there are different issues at play. It is important, I think, for editors to know at least two editing programs. First, job security. If a client requires you to use specific software it helps to know how it works before confronting a deadline. Second, learning different software helps illustrate that there’s a commonality between all of them.
Software is the manifestation of a philosophy. It’s the concrete example of how the programmer “thinks” editing should be done. As each of us thinks differently, so also programmers think about editing differently. And I’ve learned that discovering these differences helps me to better understand the software I’m using.
That being said, there’s also the intellectual curiosity of learning something new simply for the sake of learning something new. Why? Simply because it is there.
Larry
I certainly endorse the value in learning something new. My advice concerns when to learn it. If you have no requirement to put what you’re learning to use fairly soon after you’ve completed the lesson, there’s a good chance your newly acquired skill will fade from memory. Use it or lose it is a valuable cliche. You’re learning Resolve because you’ve made it your job to teach software. That’s a perfect reason to make the effort. I’ve never learned Final Cut X (despite my having edited projects on FCP 7) because I’ve never been asked to use it on a project. Were someone to do that tomorrow, I’d tell him I’m a whiz with it, then I’d log into one of your courses and make myself an honest man.
Stephen:
Smile… An honest man is a worthwhile addition to any workforce.
Larry
I honestly don’t understand your issues with multicam in Davinci Resolve. Maybe I don’t understand what is that you are trying to do and why. But I cut multicams every week on Resolve without any issues.
Can you clarify what and why are you trying to accomplish?
David:
Yup, it should be easy. But, for some reason, it is not.
* I can create a multicam clip.
* I can edit the multicam clip into the timeline.
* I can display the angles in the multicam clip in the Preview monitor.
* I can play the multicam clip in the timeline.
* But I can NOT play the multicam clip in the timeline with angles displayed in the Preview monitor.
I have:
* Created a new multicam clip
* Created a new timeline
* Created a new project
* Reinstalled Resolve
Nothing, currently, allows me to play a multicam clip while also watching the angles.
Sigh..
Larry
Larry , I also don’t know what your problem with Resolve multicam is but I have had wonderful experiences cutting multicam in Resolve. As an example I have an older 2017 iMAC (top of the line maxed out but still 2017). I was able to easily cut 6 camera multicam from UHD originals and do extensive color correction while working without a hitch and running a secondary Thunderbolt monitor and a Flanders monitor for color at the same time . I did use proxies but they were not very low quality – Good enough so I could evaluate my color from them though I did frequently and easily bounce back to the originals to double check. I always found the proxies good enough for my corrections though. The timeline usually ran well.
Leonard:
Thanks for your comment. I’m looking forward to figuring out why multicam doesn’t work for me. As soon as I do, I’ll write up a tutorial on my experiences.
Larry
I am also retired. Having worked on Avid, Final Cut 7, & Premiere before getting Davinci I found that the easiest way to adapt was to use the same keyboard shortcuts & follow as closely the same methodology. The major advantage to Davinci is cost & the flow from edit to color to effects et. al. I worked in news, magazines, & documentaries. I rarely had to delve deeply into effects. Kept it simple.
Edward:
Thanks for you comment.
Larry