 One of the benefits of using graphics files with Final Cut Pro 7 was that when you updated the graphics file using Photoshop, or another image editing program, as long as you saved the file using the same name it would instantly update inside FCP 7 without having to reimport it.
Because of the more robust method Final Cut Pro X uses to link media files with the program, we seem to have lost this benefit. Except, I discovered a way to make it work.
WHAT DOESN’T SEEM TO WORK
What doesn’t seem to work is modifying imported Photoshop documents (PSD files). Final Cut doesn’t seem to update them with the new changes. However, there’s a simple workaround that seems to solve this problem.
For example, yesterday I took a day off from my training in the UK to see Windsor Castle. (As the sign on the front says: “The home of the British Sovereign for 900 years.”) Like all tourists, I took photos.

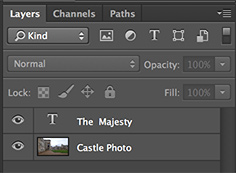
Let’s pretend that I want to use this image as the opening graphic for a short video on the Castle. Notice that I added some text at the top of the image in Photoshop.

The image is on the background layer, while the text is on Layer 1.

If I save this as a PSD file, import it into FCP X, both layers are retained. However, if I make any changes to the original image in Photoshop, the new image is not updated in Final Cut. (I’m still not sure why.)
However, it IS possible to create and import images that we can modify. Here’s how.
HOW TO IMPORT IMAGES
First, you must import the image in a way that makes change possible.

During import, select “Leave Files in Place.” If you copy the files, FCP makes a copy of the image which means that any changes you make to the original file will not affect the copy.
Then, don’t check “Create optimized media” or “Create proxy media” because those, too, make copies of the original file.
At this point your image is imported and ready to edit. Now, let’s make a change to the original image and get it to update inside Final Cut Pro X.
REOPEN AND MODIFY THE IMAGE

In the Final Cut Browser, right-click the image you want to modify and choose “Reveal in Finder.” This is a fast way to find the source image you need to modify.

If double-clicking the image in the Finder doesn’t open it in Photoshop, right-click the image and select Open with > Photoshop.
NOTE: I’m using Photoshop CC; however this technique works with any version of Photoshop or any graphics program, actually.
MAKING CHANGES

Modify the TIFF image in Photoshop – for example, here, I added more text. Be sure to save it using the same name and as a TIFF image.
NOTE: While it is not necessary to save the TIFF image with layers, if you plan to make more changes, retaining layers can make changes easier.

As soon as you re-save the modified image in Photoshop and switch back to Final Cut, the image is instantly updated to the new version….

…both in the Browser and for all clips of the image edited into the Timeline.
Cool.
4 Responses to FCP X: How To Update a Graphics File
The file does not have to be external to the FCP library. As long as the layer structure is not alter the file will be updated in FCP.
Tom:
In this example, I did, in fact, add a layer and it still updated correctly.
And the problem with working with media stored inside a library is that you need to open the library to access the file.
Larry
The Reveal in Finder function neatly takes you inside the bundle to the Original Media folder. There is however a problem with hard links. If the file is used in another library on the same drive the update will change the master and disappear the file in the library copy.
Hi Larry,
This is most interesting, thank you.
Do you know if a similar method will work when updating Smartsound music files in FCP X? In FCP 7 you used to be able to change the length, variation or mood by simply overwriting the original file and it would instantly update the music clip in the timeline.
In FCP X the best way I found to update a Smartsound file (or any other audio file) is to drag the changed file from its ‘external to the Library’ folder (external because Sonicfire Pro won’t save Smartsound music file to the Original Media directory inside a FCP X Library container file) and drop it directly onto the old music clip in the time line using the Replace option. To complete the media management process I then have to delete the corresponding old music clip from the Browser, which is all a bit messy and time consuming.
Perhaps you could write an article on this, if there is a better way please?
Most gratefully,
Andy