 This article was suggested by a comment Bill Code made in an email about his problems in exporting multi-channel audio from FCP X. Bill writes:
I often need to export two audio tracks (NATSOT and voice-over). It took me a while to figure out this needs to be done by assigning Roles. The problem is it seems to make using compressor presets impossible. I now have to export a file and then put it into compressor afterwards. Has anyone (Larry?) figured this one out?
Bill, you are correct. All the compression presets assume you are exporting stereo audio from FCP X; they ignore Roles. You are also correct in that we need to create a custom preset in Compressor to compress multi-channel audio.
While there is no way we can export Roles and compress the file at the same time, there is a fairly easy work-around, which I discuss here.
A couple of definitions before we start:
THE SETUP
Apple added Roles to Final Cut Pro X with the 10.0.3 release. What Roles allow you to do is to group files by “tags;” for example, all the dialog clips, or all the music clips. Roles allow you to find, hide, or export files by tag, not just clip or track.
There are five default Roles:
There are LOTS of things you can do with Roles – and this article explains Roles in more detail. (So does this video.) You can add as many custom Roles and subroles as you like.

I created a simple project with one video track and three audio tracks. Here, I tagged all the dialog clips with the Dialog Role (Modify > Assign Roles > Dialog, or keyboard shortcut: Control+Option+D).
This allows us the option to consolidate the audio assigned to this Role into a separate output during export.

Next, I assigned all the effects clips to the Effects Role (Modify > Assign Roles > Effects, or keyboard shortcut: Control+Option+E).
Each clip can be assigned to one and only one Role. A video clip with sync audio has a single Role assigned to the video clip, and a second Role assigned to the audio clip.

Then, I assigned all the music clips to the Music Role (Modify > Assign Roles > Music, or keyboard shortcut: Control+Option+M). Assigning Roles does not affect levels, mixes, or effects. Roles are simply used for clip organization and output.
For the sake of this example, let’s pretend our mix is complete and ready to export. At this point, we have two options:
At this point, I have not found a way to compress both the video portion of a file and the audio portion, while still retaining separate audio tracks for the stems.
EXPORT HIGH-QUALITY MASTER FILE WITH STEMS
To export a high-quality Master File with individual stems does not require Compressor. In fact, FCP X makes it easy.


EXAMINE THE RESULTS
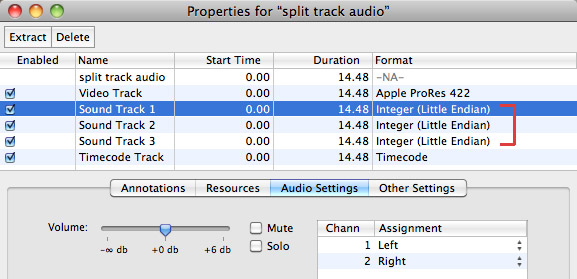
At this point, the export is complete; FCP will render and export the file in the background. However, just to show you what happened, let me open the file in QuickTime Player 7 so we can see the tracks. (This is not necessary at all, I’m just doing this for illustration.)

After opening the file in QuickTime Player 7, select Window > Show Movie Properties (or type Command+J). Notice the three separate Sound Tracks. These correspond to the Dialog, Music and Effects Roles. You can enable, disable, or extract whatever stems you need from this file.
Cool.
THE CHALLENGE
But…
When you export files this way, everything is uncompressed — really great quality with REALLY large files. What if you want to reduce the file size?
Well, we can, but it requires a custom Compressor preset and the understanding that you can’t compress audio if you want to retain the stems. So, we are going to create a custom QuickTime compression setting in Compressor that compresses the video and doesn’t touch the audio.
Then, we’ll create a droplet that allows us to quickly convert a Master File into something smaller to send to a client.
Here’s how.
NOTE: If Compressor is new to you, I’ve created in-depth video training that will help you make the most of it. Learn more here.
CREATE A CUSTOM COMPRESSION SETTING

Open Compressor and, in the Settings tab, click the Plus sign to create a new compression setting.
Select QuickTime Movie. (This is important, because QuickTime is the only option I know of that supports video with multiple audio tracks.)

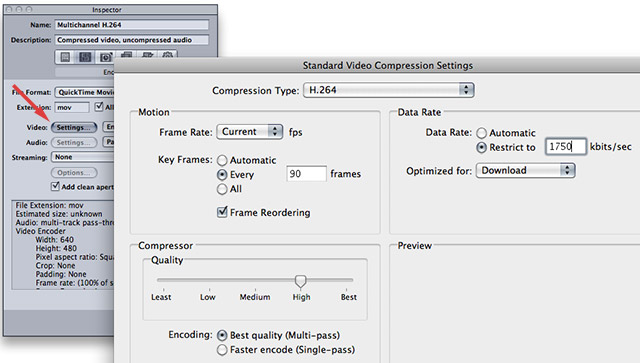
In the Inspector, set the Audio Settings to Pass-through. This means that Compressor will copy the audio as is, from the source file to the compressed file. This is the step that retains all the original audio stems from your output. Pass-through is another way of saying “untouched.”

Click the Video Settings button to access video compression settings. This can be set to whatever you need. Here are my typical compression settings for 720p video. Then, configure the rest of the settings as necessary.
When you are done click Save.
CREATE A DROPLET
At this point, you have two options:
1. Compress the file directly in Compressor. This works fine, but requires you to open Compressor and import the file whenever you need to compress a file.
2. Create a droplet to automate compression. This is what I would do in most instances, as I always like something that is fast and easy.

Creating a droplet is simple.


Then, to compress a multichannel Master File, simply drag it on top of the droplet in the Finder.
Poof! Done.
SUMMARY
While it would be helpful if Final Cut allowed us to export Roles into a Compressor setting, this technique provides a fast and high-quality work-around.
For my work, I always export a Master File using Roles, view it to make sure everything exported OK, then drop the file on a droplet to do the compression as a second step.
I’ve learned it is far faster to fix a problem file before you spend time compressing it, then after you’ve delivered it to the client. Also, in my unofficial tests, compressing using Compressor is faster than compressing using Final Cut Pro; especially when you are running multiple instances of Compressor.
Whenever I can combine speed, with quality and flexibility, I’m a happy camper.
Visit our website to see Final Cut Pro Training & more!
52 Responses to FCP X: Export Multi-channel Audio
← Older Comments-
 Julia says:
December 18, 2019 at 5:57 am
-
 Larry says:
December 18, 2019 at 8:47 am
-
 Margie says:
May 21, 2022 at 9:00 am
-
 Larry says:
May 21, 2022 at 10:10 am
-
 Lee Morgan says:
June 23, 2022 at 10:39 am
-
 Larry says:
June 23, 2022 at 11:34 am
← Older CommentsThank you for all the good information about roles it’s been very helpful. However, I need some clarification about sync’d audio. As I understand it now, when you export sync’d audio FCP X will only export 2 channels of audio with the video. The only fix I can think of is to un-sync the audio from the video. Is there another option?
Julia:
Yes, and it involves Roles. Here’s an article that explains how.
https://larryjordan.com/articles/fcp-x-export-multichannel-audio-using-roles/
Larry
How do I create my multi audio languages in Final Cut Pro so that Quick time recognizes the languages instead of showing unknown language.
Margie:
I’m not sure what you are asking. You want to create a QuickTime movie that contains multiple audio tracks, one for each language, then allow QuickTime Player to play the audio track you want?
Give me more details.
Thanks,
Larry
Hey,
Just came across this and I feel it’s almost the solution I’m looking for. I’m not expert at editing nor sound design though so figured I’d just ask.
I have a short narrative film that has been a third in my side for almost a year now!
I have the edit in place and rough audio (dialogue and effects) I’m at the stage where it’s time to send it off to the sound designer to sort out all the audio etc.
Ideally he’s looking for an OMF or AAF file to then be able to work with it in Pro Tools. I just cannot find a solution to this, to get him a file that will work for him to do the sound design.
I understand it’s apparently not possible to get these files out of final cut.
I’ve tried various XML exports but they don’t work.
I’ve tried importing my FCP XML into Da Vinci resolve, as apparently that was a solution, but the AAF I get out of resolve doesn’t work. Nor does running that Resolve/FCP XML through Premiere Pro.
Most recently bought a pricey app – X2Pro, which apparently can convert FCP XML’s into AAF’s. It kept failing when it reached some MP3 effects files at first. I removed those completely and it finally worked but the AAF produced just dumps the various audio out into one big uneditable file apparently.
There are three radio mic tracks (one for each actor) and a general boom plus the odd effects files here and there. No roles or anything were assigned at any point in the edit, which I’m just learning about.
Been stumped on this since we shot it last July!
Any help or thoughts very welcome!
Best,
Lee
Lee:
You are almost there.
1. Export your project as an XML file (Select the project, then choose File > Export > XML.)
2. Be sure to select the highest version of XML
3. Import the XML file into X2Pro. This was specifically designed to move projects from FCP into ProTools by creating an AAF file containing all audio clips.
4. Ignore any video errors. It should import all audio as separate clips, ready for mixing.
5. Export as a stereo pair.
6. Import the stereo pair into FCP. Assign it a custom Role.
7. When the final project is ready to output, disable all audio roles except the final mix, then export your project.
Larry
P.S. If this process gives you problems, contact the folks that made X2Pro and they will explain how to fix them.