

[Updated Aug. 18, 2025, to include a critically important set of dialogs for Premier and general corrections throughout.]
On my goodness! What a mess!!
For something that’s supposed to be fast and accurate, adding captions to video could not be more cumbersome – regardless of which NLE you use.
If all you need is to add captions to video, Final Cut, Premiere, and Resolve create them with blinding speed. The perfect check-off item.
BUT..! If you want to add captions to video that are accurate, properly timed, with correct line breaks – you are heading down a rabbit hole that will suck up hours of time.
Sigh…
As someone who actually relies on captions for most of my television viewing, it used to amaze me at how inaccurate and poorly timed captions were. Not any more. Given what I’ve learned this week, it amazes me that captions exist at all.
THE BACKGROUND
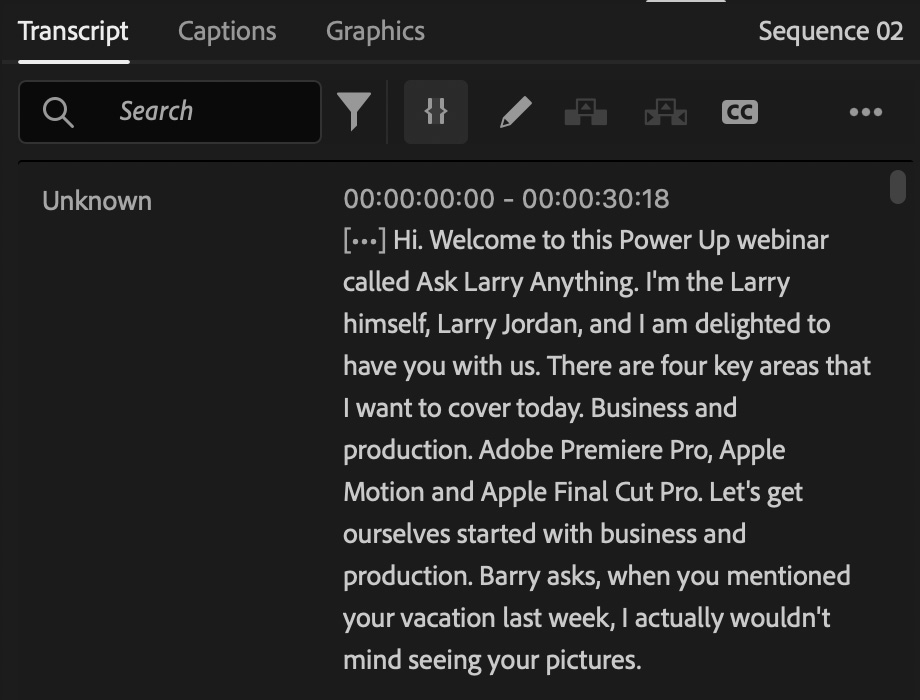
Last week, my social media team asked me to create several short video commentaries to post to the web. These needed to be vertical, display burned in captions, and run about two minutes.
NOTE: If you need to create separate SRT files, most of these comments still apply. I needed to create burned-in subtitles, which added to the challenge.
It took an hour or two to write four videos, then, another hour to record them. Whew! I thought. The hard part is over.
Foolish me.
It took longer to add captions to these four 2-minute videos than it did to write and record the series as a whole. The problem? Accuracy, editing, formatting and the caption interface.
COMPARISON OVERVIEW
Here’s a quick overview.
* When Adobe first introduced automatic transcripts, project audio was uploaded to an Adobe web server. Last week, Adobe told me they changed to local processing sometime in 2022.
THE DETAILS
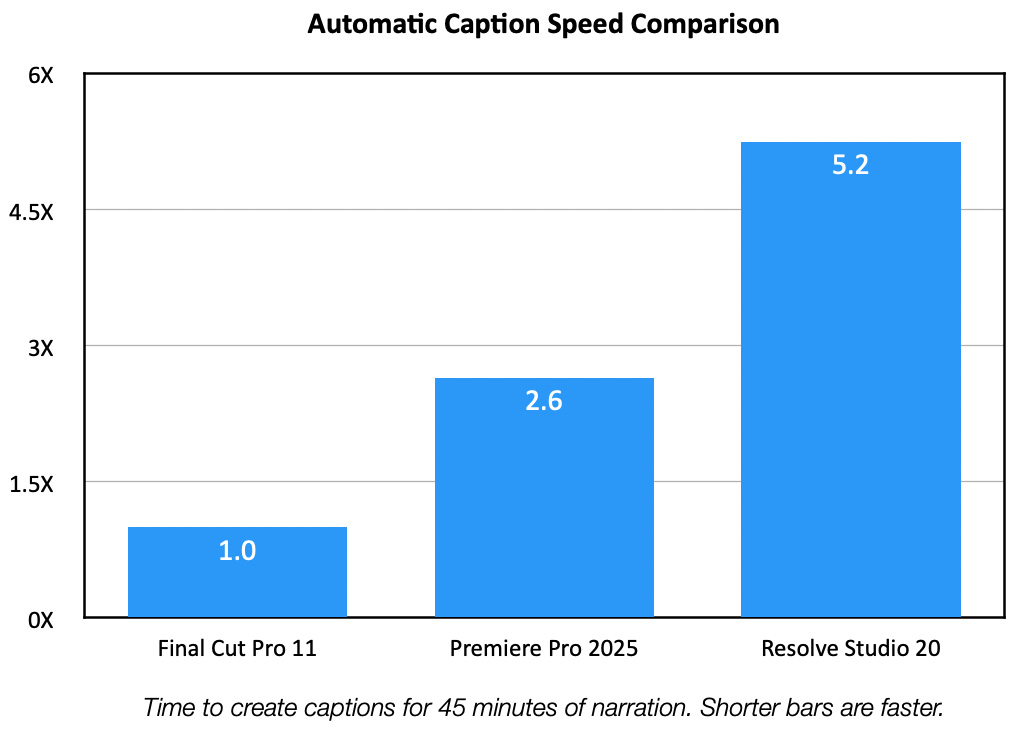
This chart compares how long it took each software to transcribe and create captions for three narrated programs of 24, 30 and 44 minutes. The narration was clean with no sound effects or background music. Final Cut was fastest, hands down.
Specifically, Premiere was 2.6X slower, and Resolve was 5.2X slower, compared to FCP in creating a transcript and captions.
NOTE: Both Premiere and Resolve require a two-step process to create captions which are easy to read and edit. Creating the transcript takes the most time. Actual caption creation took 1-4 seconds using a corrected transcript.
However, speed is only valuable if the results are accurate and the process is easy to use. THOSE open up an entirely different can of worms. Let’s take a look at each software.
FINAL CUT PRO 11
By default, FCP creates iTT captions which can be converted into SRT & CEA-608 (SCC) captions.
Click to see larger image.
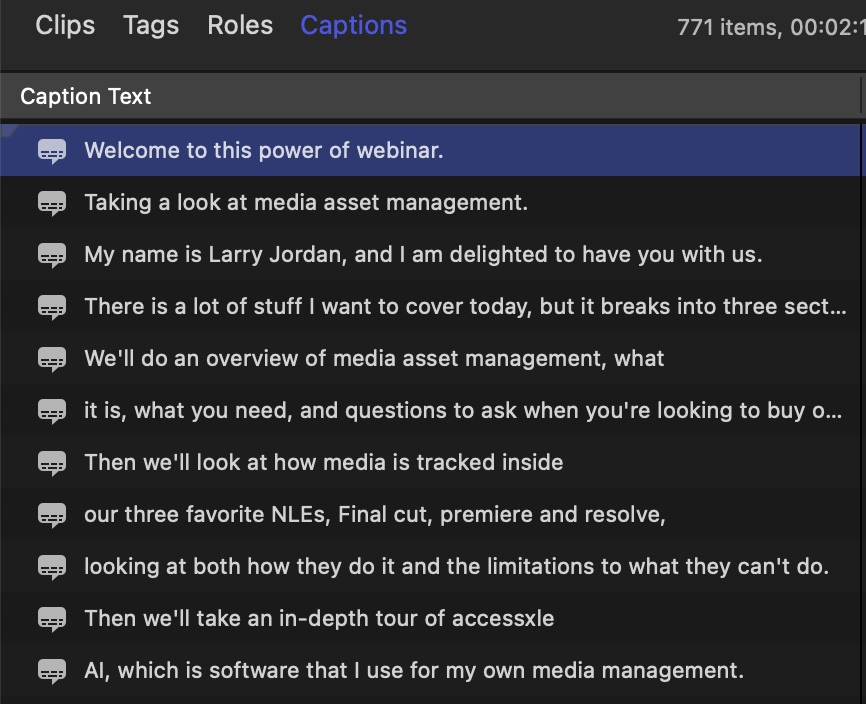
This is the caption interface in the Timeline Index in Final Cut. Unlike both Premiere and Resolve, there’s no easy way to see an overview of all your text. To view captions that are too long to display in the Index, you need to select each individual caption, then view it in the Caption Inspector.
At a minimum, the Timeline Index should expand to show all the caption text, but it doesn’t.
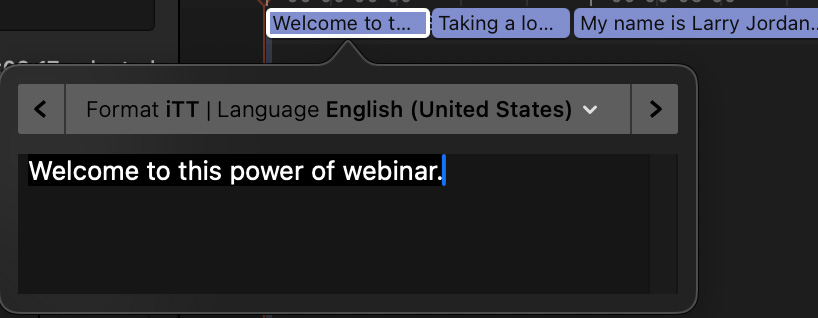
Captions are easy to edit by double-clicking each caption in the timeline, but there is no easy way to spot mistakes (like “power of” for “PowerUp”) that may be scattered throughout the text. Nor is there search-and-replace to correct a recurring mistake.
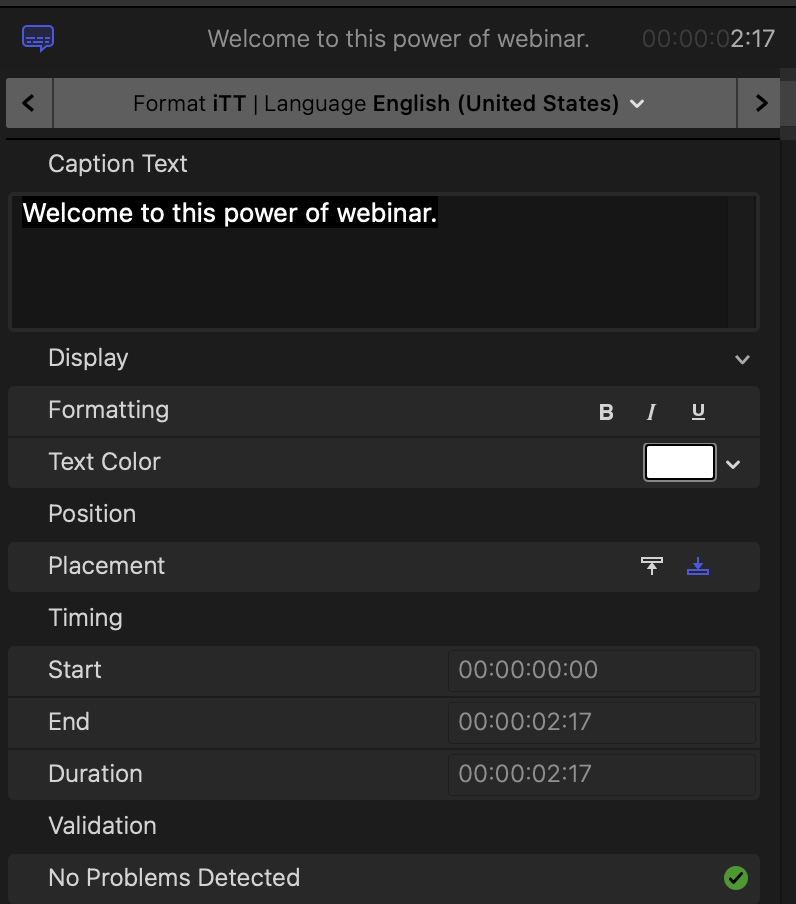
Here’s the caption editing interface in the Caption Inspector. Easy to edit a single caption, impossible to review the entire transcript.
Also, unlike Premiere or Resolve, there is no way to export a transcript of your captions suitable for printing and sharing with a client. (Though you can export an iTT or SRT caption file, which can be read by any text editor, but it contains timecode references and caption numbers.) There’s really no excuse for not supporting transcript exports as simple text for an editor or client to review.
Captions in Final Cut strike me as something cobbled together quickly, without any thought to how it would be used in the real-world. It goes half-way, then stops. If you need captions, it’s fine. If you need ACCURATE captions, it isn’t.
DAVINCI RESOLVE STUDIO 20
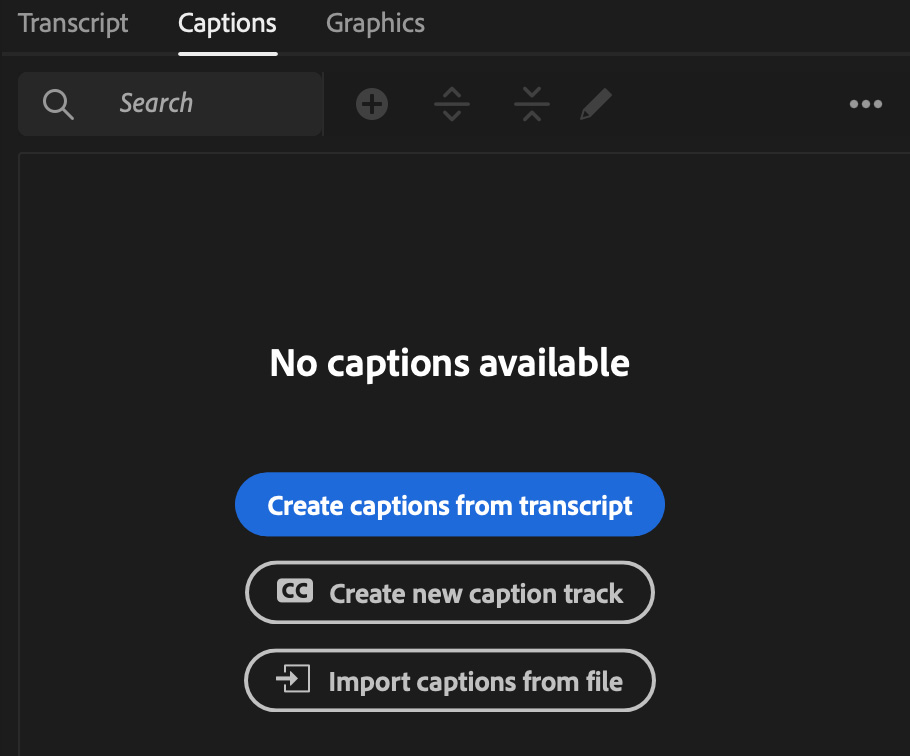
Speech-to-text requires the Studio version of Resolve. By default, Resolve creates SRT captions which can be converted into VTT, DFXP, and TTML captions.
CAUTION: Resolve 20 creates non-standard SRT files. Read this tutorial to learn why and how to fix it.
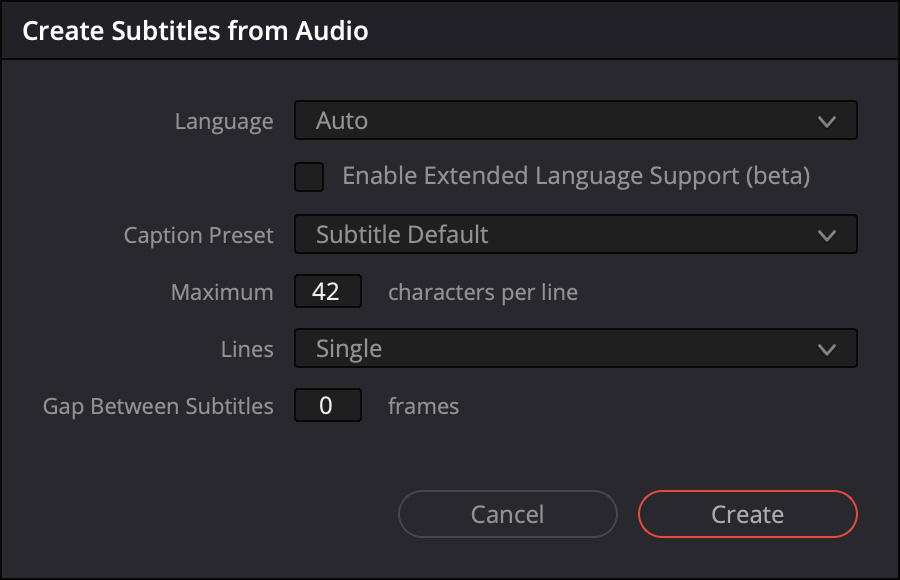
When you choose to create captions, Resolve displays this dialog. I tend to leave this at the defaults, especially if you are burning in captions to video. Mostly, because you will never use Resolve for creating captions if you value your free time.
UPDATE: The Lines menu is easy to overlook. It determines whether captions will display as a single or multiple lines. Also, the Maximum characters value is too short for horizontal video – I prefer 55 – and too long for vertical video – I would try between 25-30.
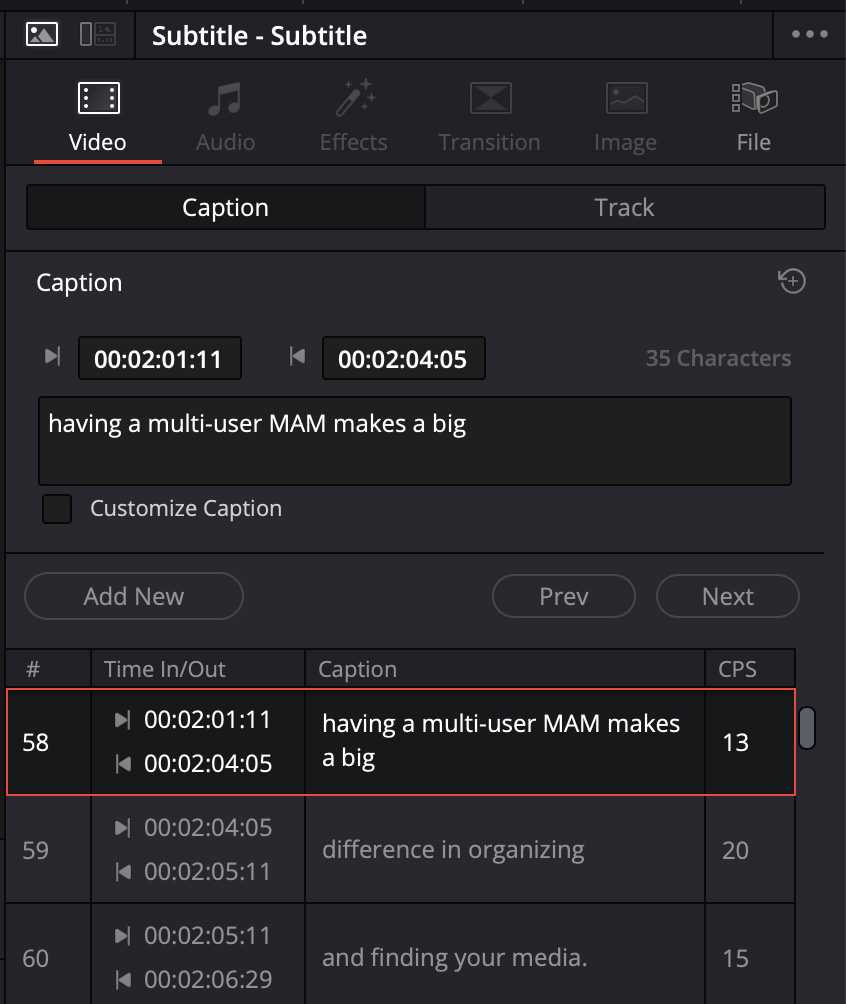
This is the caption interface in Resolve. While you can read each caption completely, unlike Final Cut, you can only edit each caption individually. This interface does not support search-and-replace.
While you can edit captions directly, the “easiest” way to edit captions is to first create a transcript, edit the transcript, then create captions from the edited transcript. However, it takes twice as long for Resolve to create a transcript than it does to simply to create captions directly. I have no idea why – it’s the same text.
There’s no free lunch.
NOTE: For my 44 minute narrated text file, creating captions-only took 3:08. Creating a transcript of the same material took 5:41! Then, after the transcript was created, it took less than a second to convert that transcript into captions.
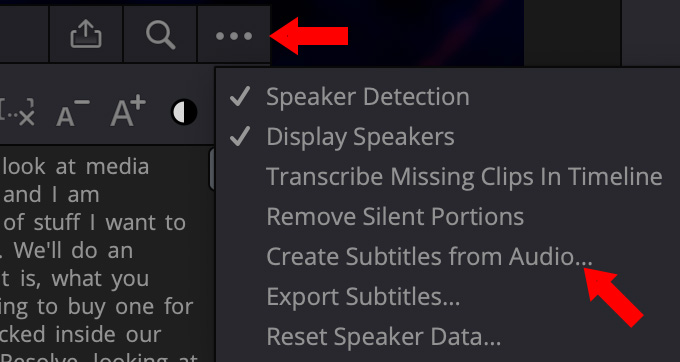
To create captions from an edited transcript, click the Three Dots at the top of the Transcript panel (top red arrow) and choose Create Subtitles from Audio.
Click to see larger image.
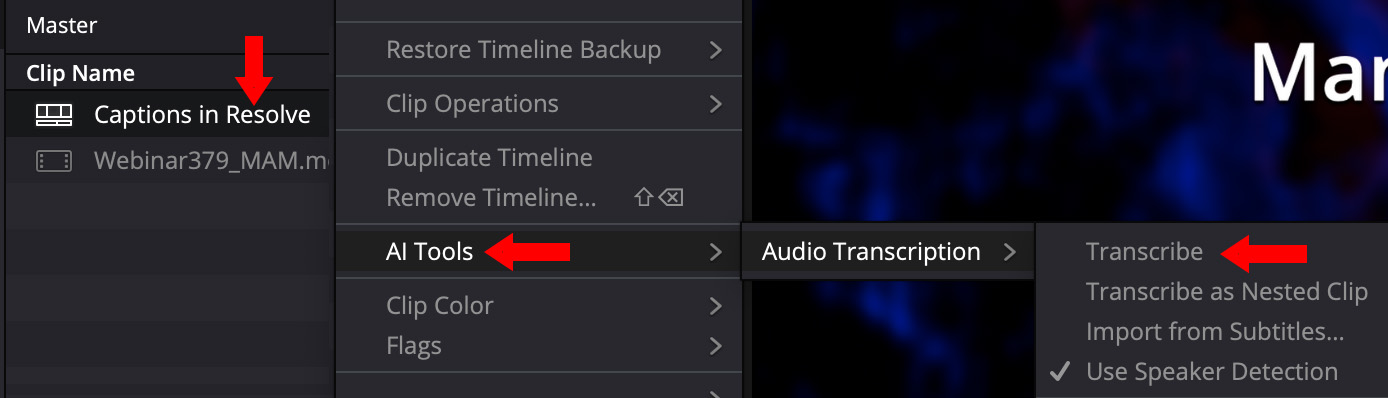
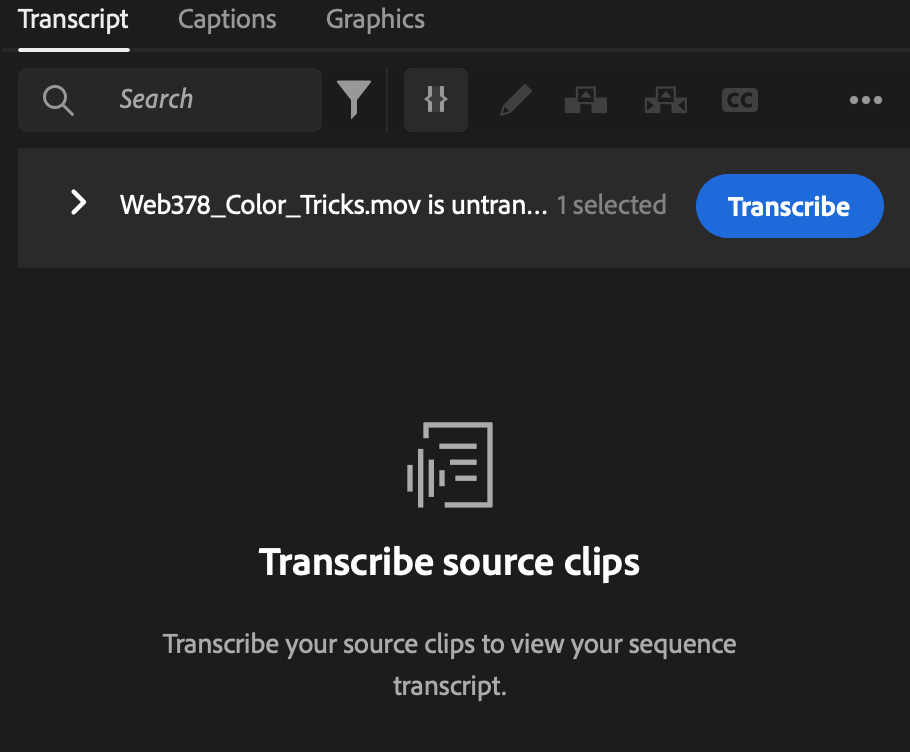
To transcribe an edited timeline, right-click the timeline in the Media Pool and choose AI Tools > Audio Transcription > Transcribe. If the clips in the timeline were already transcribed, Resolve will pull from those transcripts.
Click to see larger image.
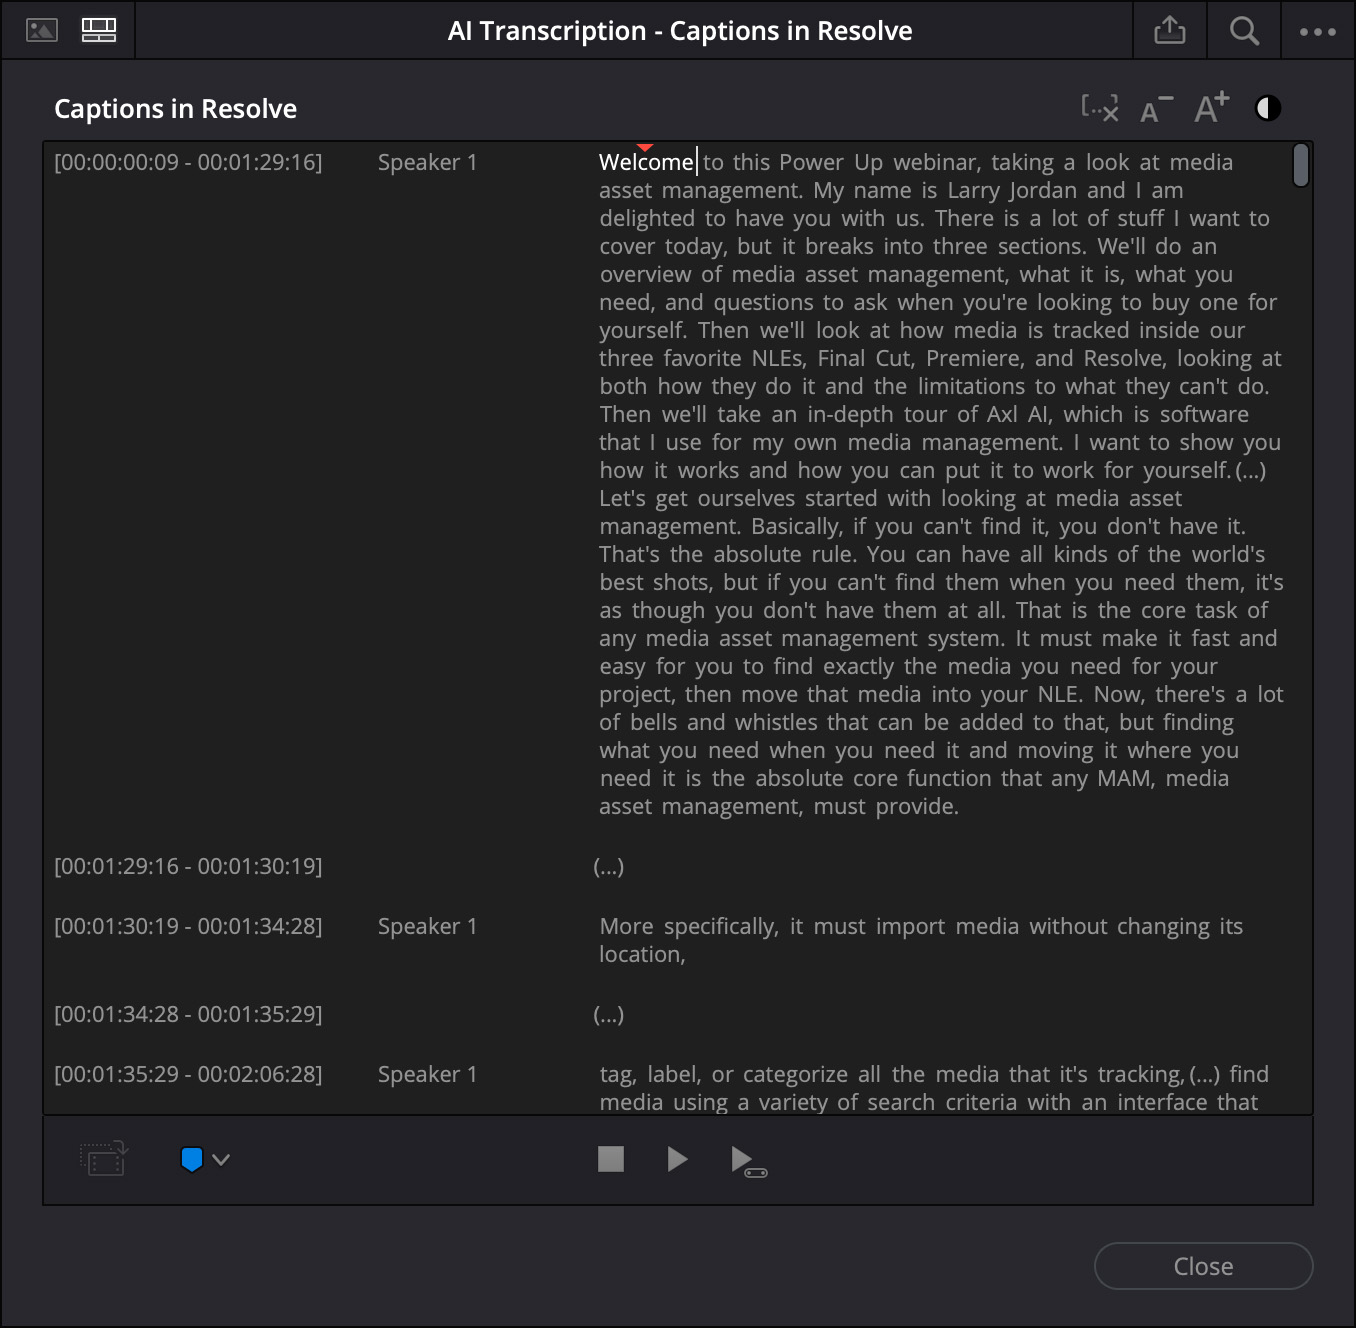
Unlike the caption interface, captions are displayed as paragraphs, which can be easily reviewed.
NOTE: Accuracy in Resolve is better than Final Cut. For example: “Power Up” is correct, as is the capitalization of Final Cut, Premiere and Resolve. Not perfect, but much better.

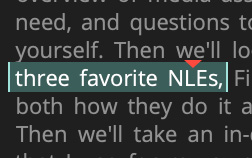
Click to see larger image.
Search is located at the top of the Text panel. However, while you can search in a timeline transcript, you can only make changes in the clip transcript. (Notice that the Replace option (red arrow) is grayed out, with an inactive checkbox.)
To open a clip transcript, right-click that clip in the Media Pool, then choose: AI Tools > Audio Transcription > Transcribe.
NOTE: To access an existing transcript in either a clip or timeline, use these exact same menu choices. There’s no keyboard shortcut to a transcript that I’ve found.

Click to see larger image.
Once you are in a clip transcript, enter the text to search for, then check the Replace check box (red arrow) to replace it. Search and replace is very fast and works exactly as you expect.
HOWEVER, to EDIT a transcript – say to add punctuation, correct a spelling, or change a word – is MUCH harder.
Select the text you want to change, the red chevron shows the position of the playhead in the timeline.
Right-click the selected text to break the paragraph at this location, I think, because tooltips are not displayed. But you CAN’T simply type to make a change. Nope.
Because this screen shot is from a timeline transcript. To make changes you need to access the clip transcript.
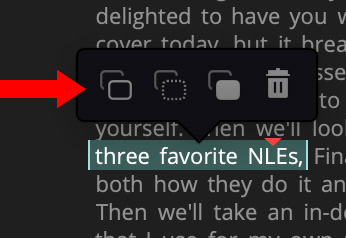
Once you are in the clip transcript, select the word, or words, you want to change and click the Pen tool (far left icon).
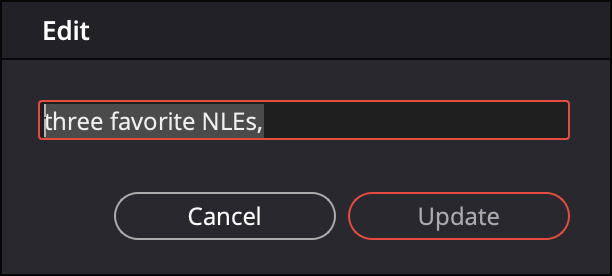
This opens a floating window where you can change the text. Then, click Update when done.
To say this is confusing, awkward, and time-consuming is an understatement. Worse, this is absolutely the slowest NLE for actual transcription. I started creating transcripts for one of my two-minute movies and gave up. Too many hoops.
Life is too short. The improved accuracy is nice, but the workflow is atrocious.
NOTE: I should add that Resolve fully supports exporting transcripts for review, but not editing. This is true for all NLEs that export transcripts. Because each word is linked to specific timecode, exporting transcripts without an explicit timecode reference for each word breaks that link. This means they can’t be reimported and attached to a timeline.
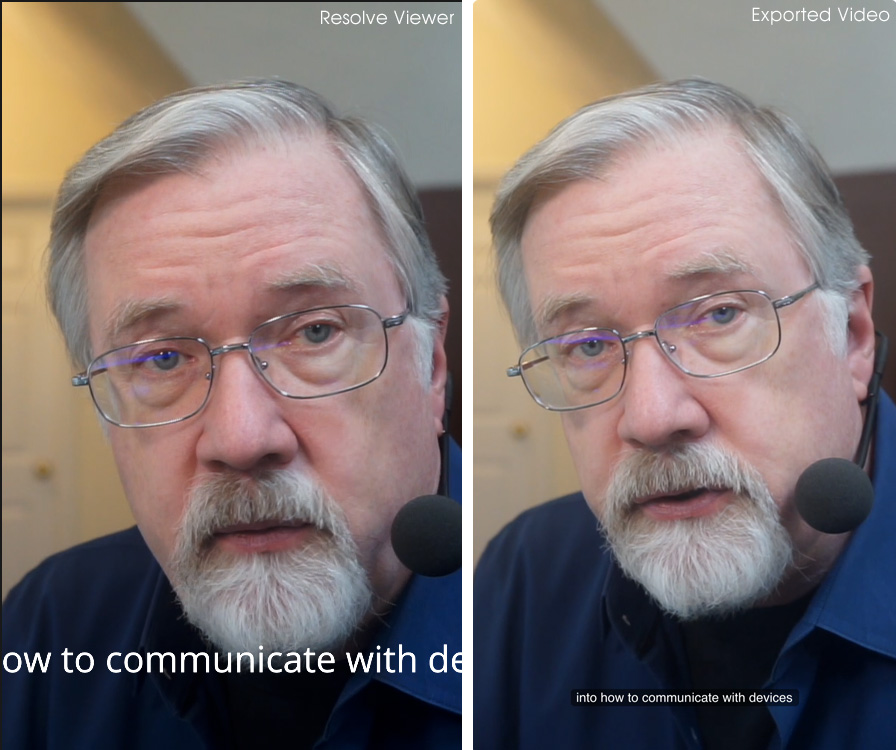
Another problem I had with Resolve was that the subtitles I saw on screen did not match the subtitles that were output, as the screen shot above illustrates. This made it really hard to decide where to put line breaks.
I just gave up.
ADOBE PREMIERE PRO 2025
I was delighted to learn, as I was researching this article, that Premiere now processes all transcripts locally, no more files uploaded to the web are required.
By default, Premiere creates SRT captions. But it also supports CEA-608, CEA-708, Australian, EBU and Teletext transcripts.
NOTE: You can set a preference for Premiere to transcribe clips as soon as they are imported, or as soon as they are added to the timeline, to save yourself time. That feature is unique to Premiere.
UPDATE – TWO VERY IMPORTANT DIALOGS
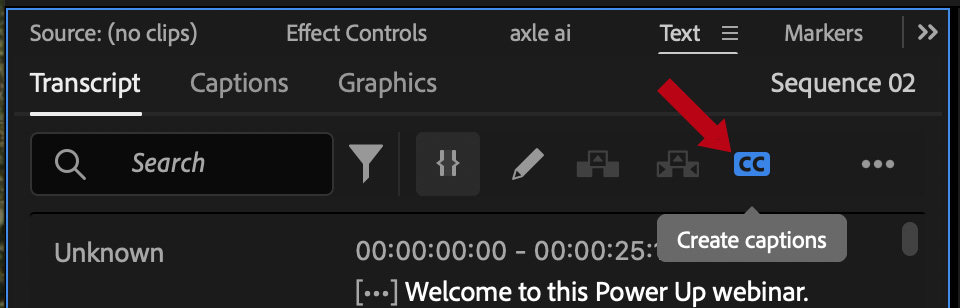
A faster way to create captions is to click the CC button (red arrow) in the transcript itself.
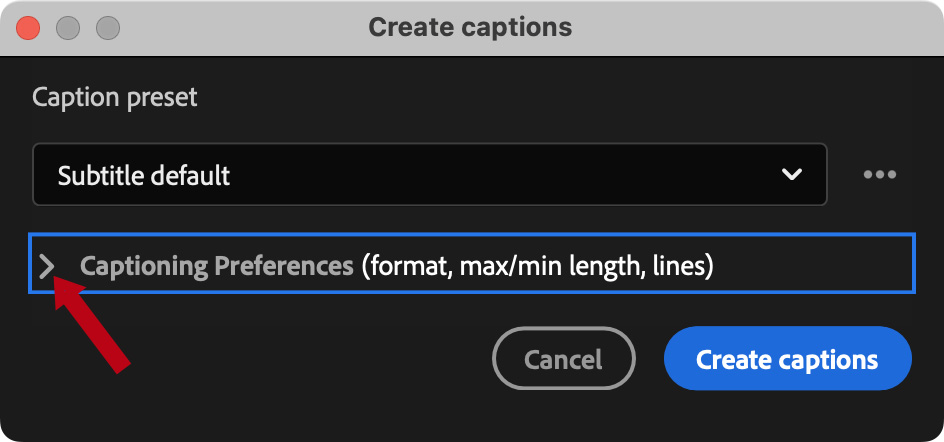
This dialog appears, which I immediately blew past when I first wrote this tutorial. But as I spent hours yesterday working on webinar transcripts in Premiere, I finally decided to look at it. There are two critically important settings hidden under that chevron (red arrow). Click it.
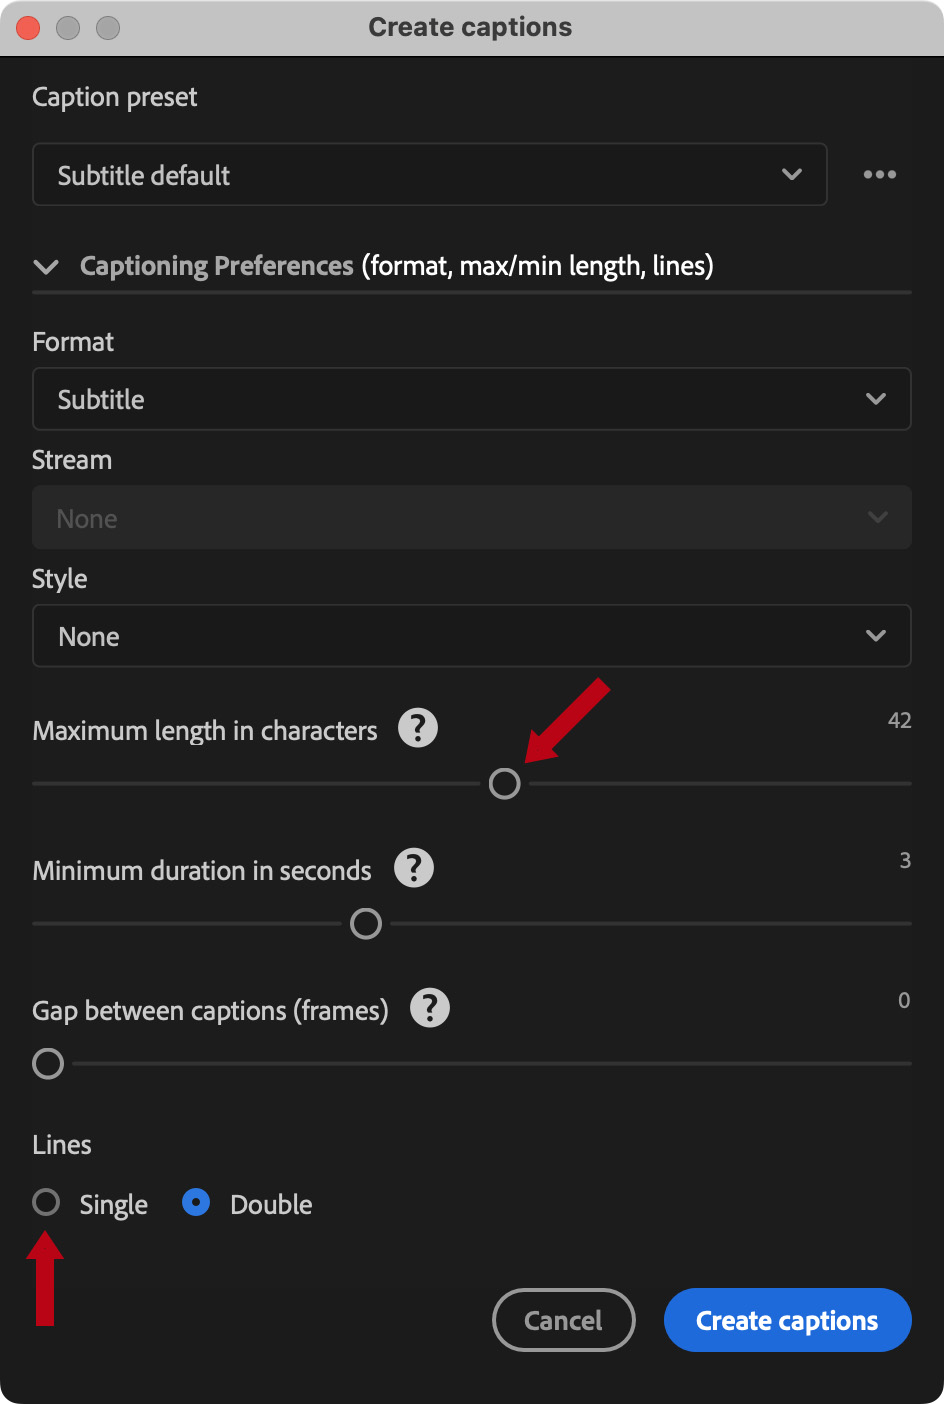
In this dialog you can determine how many characters wide each transcript is. For my HD horizontal video, I increased Maximum length to 55 (top red arrow).
You can also limit the number of lines each transcript will contain. While the default in Resolve is 1, the default in Premiere is 2. Discovering the Lines setting – and changing it to Single – saved me hours of time in correcting inaccurate line breaks. Also, single line transcripts block less of the visual material displayed in the video. YAY!
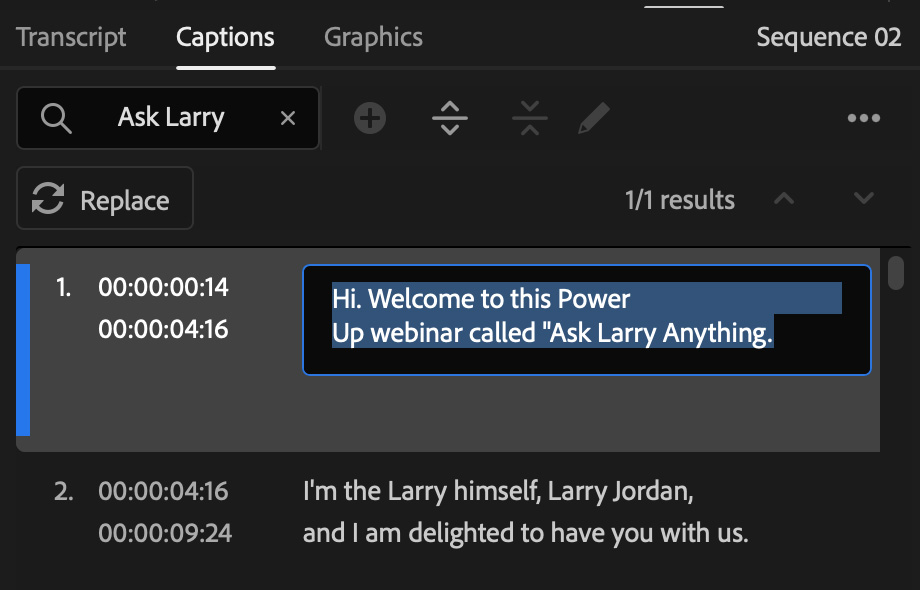
WORKING WITH PREMIERE TRANSCRIPTS
Click to see larger image.
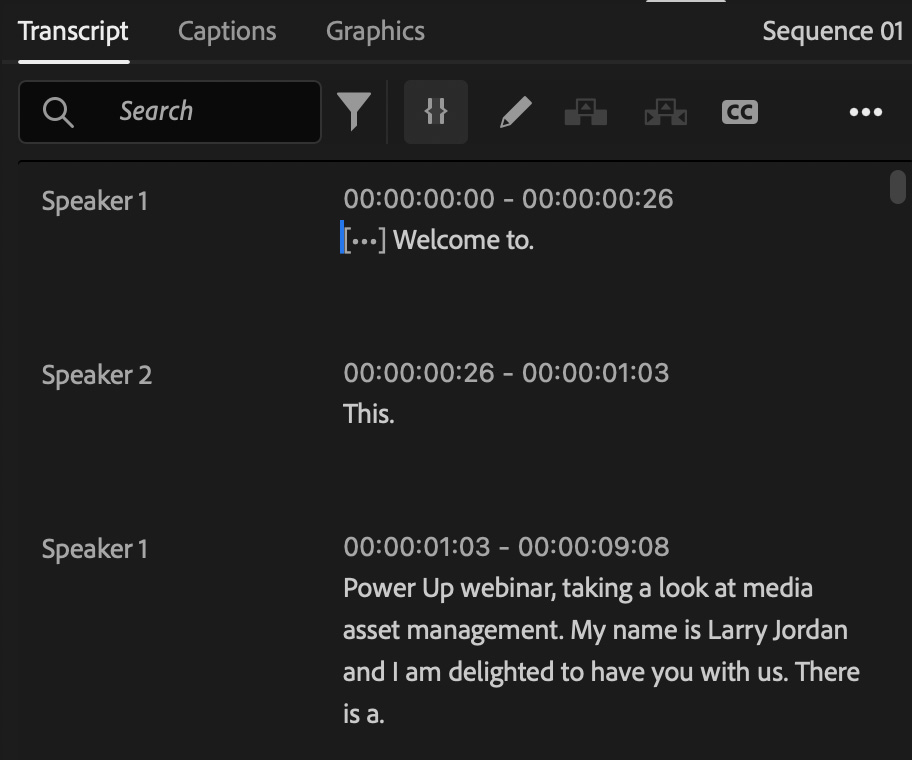
Premiere defaults to identifying speakers and, because I wasn’t paying attention to my preference settings when I clicked this, my single voice narration got divided into two speakers in very bizarre ways.
NOTE: This also made me realize there is no obvious way to either consolidate multiple speakers into one, or even delete a transcript and start again.
Because I couldn’t delete the transcript, I decided to create a new project, reimport the same program and try again. Nope. Even if you are in a new project, Premiere helpfully remembers the older, incorrect transcript and forces you to use it. Grr…
I created the transcript in Resolve, exported it as an uncorrected SRT file, imported the SRT files into Premiere and began editing. Sigh…
Click to see larger image.
To show how the Premiere interface worked, I loaded a different video to create a clean transcript, because removing all the false speaker breaks created by Premiere would take forever.
Here’s how Premiere displays transcript text. Accuracy was as good or better than Resolve. And the actual transcription process was twice as fast.
Click to see larger image.
To edit transcript text, simply click in the middle of a text block and make your changes – just like a word processor. YAY! Finally, something straight-forward and easy.
I really like this approach to editing a transcript. All the timecode stuff is hidden. I just need to make the text accurate. Whew.
NOTE: The key is to make these changes before creating captions. Otherwise you are doing this on a caption-by-caption basis. Worse, changing the transcript after captions are created does NOT change the caption. Changing a caption also does not reflect that change back to the transcript. So, make all changes before creating captions.
Click to see larger image.
Search-and-replace is located at the top of the transcript window. Changes can be made in either clip or timeline transcripts. And any changes made are reflected back to the source clip or timeline, whichever was not selected.
Select an individual caption to see it in the Program monitor, make changes in the Captions panel, or change its timing in the timeline.
I also reviewed each caption to make sure line breaks are correct and move words from one caption to another if that improves readability or understanding. This is not a fast process.
UPDATE: Setting captions to single line solved the line breaks problem, but moving words and changing where one caption transitions to the next is still a time-consuming, manual process. Captions always cut, they can never dissolve.
SUMMARY
If I want accurate captions, with reasonable line breaks, not more than two lines and located at the bottom of the frame, AND I want to get done before dawn, I need to:
It took me three hours to accurately caption these four 2-minute videos. After working with all three NLEs, I chose Premiere for its accuracy and ease of correction. Final Cut is simply inadequate and Resolve goes out of its way to make the process excessively cumbersome.
UPDATE: Premiere’s accuracy is surprisingly good. After I discovered the line length/number of lines dialog in Premiere, I spent an afternoon using it to add captions to webinars. Major corrections were capitalizations, accurately typing keyboard shortcuts, and acronyms. It would take about 30 minutes to correct the first ten minutes. Then, because I didn’t have enough time, I let the rest go as transcribed. Not perfect, but at least they were there.
If you need to regularly caption long-form programming AND you want accurate captions, expect to spend much more time doing so than you planned. And make sure the transcript is accurate before creating captions.

17 Responses to Compare Captioning in Final Cut Pro 11, Premiere Pro 2025, & Resolve 20
As always, great info. I haven’t worked with captions that much but my recollection is that creating (externally) and working with an SRT file (in FCP) was easy to adjust to the video, the SRT captions appearing on the timeline. Maybe that’s not how it works now?
Jim:
Nope – you are correct. Changing the position, trimming or deleting captions in FCP (or Premiere or Resolve) is exactly the same as a video or audio clip.
Larry
The right thing to do isn’t always the easiest, Larry. Captions are a great example. Because the OS running our Final Cut software doesn’t support the captioning process, I actually use YouTube to do the hard work for me. Its automatic captions out of the gate aren’t great, but have gotten better over the years. Most of the time, timing is spot-on, while punctuation and capitalization are sketchy, sometimes nonexistent. But the editing interface is easy to use and I can export a VTT and SRT file (I need both for the two platforms I publish to). Fewer tools is always a nice idea – I’d love FCP to be perfect – but having the right tools is the best timesaver of all.
Scott:
This is an interesting workaround. Thanks for letting us know.
Larry
Sheesh! Give me a word processor. I’ll set up a 50-character width page and type them manually!
Mike:
Smile… but without a timecode reference, all you have is a word processing document with text in it.
PUS, you’d still need to listen to the whole show to know what to type.
Yeah, it’s a mess.
Larry
Thank you for a great breakdown of all three NLEs, Larry!
I tend to use FCP exclusively for client work, and have found similar frustrations with captions. My workaround has been to use Captionator as a go-between. I get the project to where I want it, then I ‘export’ to Captionator, it does the processing of the SRT files which allows for using much more accurate language models, then bring that back into FCP. I copy the subtitles into the project and do final checks. While there are more steps, it does provide much more accurate captions and thus the overall amount of time is reduced. This also gives me the added benefit of being able to also create actual titles, rather than just SRTs. I know you were comparing the built-in tools, but just wanted to share my process in case it’s helpful for anyone out there while waiting on updates that will hopefully make the overall process easier and more accurate! The only issue is that when it comes to 3rd party solutions, they tend to be less reliable than build-in solutions.
Doug:
Thanks for telling us about Captionator. It is always good to learn about effective 3rd-party programs that we can use with our NLEs.
Larry
Mr. Larry.
PP: I export the transcript (short, 1-person interview), do a paper edit (shorten/rearrange trans), and import the revised transcript. I get to drop the transcript (top2bottom selects) into the new timeline to make a 1st timeline draft. So using it this way works for me. Now, multiple interviews, a little more involved. Just my workflow with transcriptions. Thanks for your insights, and be well, Andre/Los Angeles
Andre:
Interesting. I need to test this for myself – I haven’t tried this approach.
Thanks,
Larry
Hi Larry,
I’ve been using Premiere’s caption creator for a few years now, and I do like it a lot. I find it pretty straightforward to work with, not to say that it’s lightning fast or anything. Time-wise, it feels about right, and it does a great job transcribing. Of course, you still have to go in and make corrections. I have yet to try importing a transcript, but I think that’ll be next.
What I was recently surprised about was when I tried using the caption creator in Final Cut for the first time. I expected it to be as “easy” to work with but the bottom line was, I hated it. It’s probably my fault somehow, but I couldn’t manage it as effortlessly as I’ve learned to in Premiere. Also, my captions were so tiny and for the life of me, I couldn’t figure out how to scale them up. I ended up exporting my video and adding the captions in Premiere.
I need to watch one or your instructional videos, I guess, as well as explore Scott’s Youtube workaround. Thanks for the comparison results!
Hi Larry. Thanks for the detailed comparison. Prior to FCP being able to create captions I edited in FCP (my preferred editor) and then did captioning only in Premiere using the master. Time consuming, but it worked and I already owned Premiere. I then discovered the rather inexpensive third-party app “Transcriber” through FxFactory designed for FCP. It works very well. Had no problem translating Spanish and even Haitian very well.
Seth:
Thanks for your note. I had not heard of Transcriber and I’m glad to learn of it.
Larry
Hi Larry, thank you for the interesting comparison. I was kind of relieved that I’m not the only one losing a lot of time while revising captions. Recently I had good experience using Simon Says. The transcription (in German language) and also translation to English worked well. The timing was a lot more accurate than with the other solutions / NLEs I tried before. In their visual subtitle editor you can specify a maximum of characters per line and the number of lines that it creates. You have to pay per minute but in my case it was worth it. You can also share your projects so that other persons / the client can revise the subtitles.
Carsten:
Thanks for your comments. I’ve known about Simon Says for many years. They do good work. Thanks for mentioning them.
Larry
This is spot on, Larry, Actually got fed up of this, especially in DaVinci Resolve and made my own tool. The best thing is, it transcribes at sentence level with so much better accuracy. And instead of captions, I, let it export as markers, which also makes my timeline searchable. But I can very easily add captions as export with accurate sentence level timestamps as well.
https://cutsio.com
Rish:
Smile… it is very helpful to be technically talented!! (And Cutsio looks like a very helpful tool.!)
Larry