 As I was planning my webinar last week, looking at Particles and Replicators, I realized that there was so much to cover that I wouldn’t have time to discuss the Sequence Replicator. So, I’m writing about it here, instead.
DEFINITIONS
There are five settings that can be animated in the Sequence Replicator:

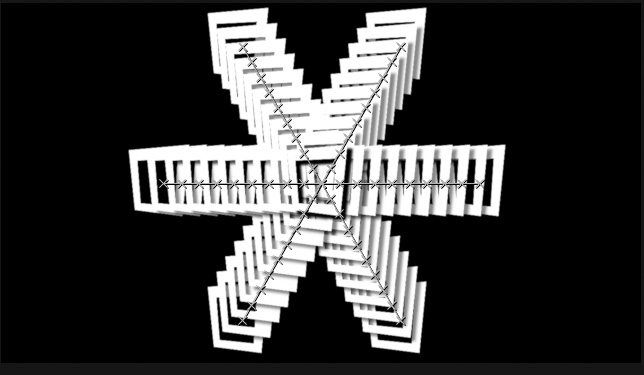
Here is where we are headed. Let’s see how to get there.
GET STARTED

Here is an image from the Motion Library – Big_Frame_Shadow – that I’ve placed into a new Motion project. By itself, it just sits there. (I scaled it a bit smaller, just because I could.)

Select the image in the Layers panel, then click the Replicate button in the top center of the interface; just above the Viewer.
The image is turned into a pattern – ugly, but a pattern – that still doesn’t move.
Let’s go to the Inspector and add a few choices to make this more visually interesting.
NOTE: You are WELCOME to make this look any way you want, what we are focusing on here is how the Sequence Replicator allows us to animate our image.

Select the Replicator in the Layers pane, then in Inspector > Replicator > Replicator Controls, change:

Still no animation, still ugly. But, um, now there’s more of it.

In Cell Controls, just below in the Inspector, change:

NOTE: Again, there is no magic to any of these settings. Once you see where we are going, feel free to change these.

Still no animation, but it looks prettier.
TIME TO ANIMATE

Select the Replicator in the Layers pane, then click the Behaviors icon in the top center of the interface and choose Replicator > Sequence Replicator.
At this point, start playing the playhead, because we are simply going to play and tweak and see what happens.
What the Sequence Replicator does is animate the elements in a replication. By default, it starts with what you created and animates from there.

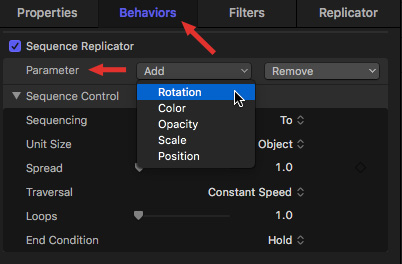
With the Replicator selected in the Layers pane, go to Inspector > Behaviors and click Add next to Parameter. This shows the five choices we can animate.
Click Rotation then set it to 90° and watch the playback. Finally! Things are moving.

Specifically, each element in the collection rotates 90° – one right after the other – over the course of the project. To have them all rotate at once, change the Unit Size setting in Sequence Control to All.
To change the direction of the animation, change Sequencing from To to From to Through. There’s no “right” answer – watch each and pick the one that looks most interesting to you.
Also, watch what happens as you change Traversal.
NOTE: Remember to keep the playhead moving, you are adjusting the animation, not a still image.

Click Parameter > Add > Color and pick a color; I chose cyan, because I liked the contrast.

Now we have animation and color variation. Much, much cooler.


Next, I added changes to Opacity and Scale. And we are done; for now.
In all cases, the Sequence Replicator starts with what you first created, then animates changes to rotation, color, opacity, scale and/or position.
SUMMARY
In this example, I used an image. You could just as easily use a corporate logo, or any other visual element. The Replicator builds patterns out of whatever you give it. And the Sequence Replicator makes them move.
This is a behavior designed to be played with. Enjoy playing!
2 Responses to Apple Motion 5.3: Sequence Replicator
Larry,
I could not find Big_Frame_Shadow in the Motion Library. Where might it be?
Thanks.
Philip:
Library > Content > Particle Images.
Larry