 We are all familiar with using Apple Compressor to compress media files stored on our local hard disk. But, it would be even better if we could automate the entire compression process.
We can – using Droplets.
BACKGROUND

Apple Compressor is a “front-end” to a Unix daemon, which is a piece of software that runs in the background with no user interface. Compressor collects all the compression settings then passes them on – when you click Start Batch – to compressord (the daemon) which does the actual compression. (You can see it running in the screen shot above, as illustrated in Activity Monitor.)
DEFINITION: In multitasking computer operating systems, a daemon is a computer program that runs as a background process, rather than being under the direct control of an interactive user. Traditionally, the process names of a daemon end with the letter d, for clarification that the process is in fact a daemon, and for differentiation between a daemon and a normal computer program. (Wikipedia)
Because the actual compression is done by this background process, Compressor can create Droplets, essentially a compression preset, but packaged as a stand-alone application, such that Compressor does not need to be running for us to use them.
We can store Droplets anywhere, but they are most useful when stored on the Desktop.
GET STARTED
I find it easiest to create a standard folder to hold all my compressed files. This isn’t required, but it means that I don’t spend a lot of time trying to figure out where my compressed files are located.
In my case, I store all my compressed files on a server, but this system works the same with an external hard disk, or even your internal boot drive.

Create a folder called “Compressed Files.” This will become the default location for the Droplet to store its compressed media.
SET UP COMPRESSOR

Open Compressor, and open the Settings panel. (If this is closed, click the small icon to the right of the three “stop lights” in the top left corner.)

Click the Location text button.

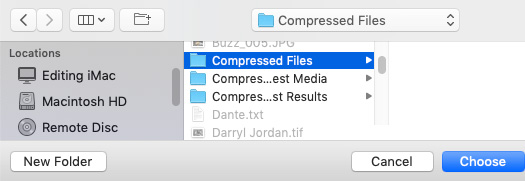
In the lower left corner, click the plus sign to create a new Location. Navigate to the Compressed Files folder and click Choose.

Here, I’ve created a Location that points to the Compressed Files folder we created earlier.
NOTE: Your locations and names can, and most likely will, be different. That is not a problem. There is no limit to the number of locations you create, where they are located or what they are called.

Switch back to the Settings tab and right-click, or Control-click, on the setting you want to convert to a droplet and choose Save as Droplet.
NOTE: You can use either a built-in setting or a custom setting that you created. It is beyond the scope of this article to explain how to customize compression settings, but ANY setting – built-in or custom – can be used as the source settings for a droplet.

In the dialog that appears, give your Droplet a name so that you know what it does.

Then, VERY important, pick the Compressed Files location where you want it to automatically store your compressed files and click Save.

The Droplet now appears on your desktop.
You can quit Compressor, its work is done.

Now, whenever you want to compress a file – in this case, for YouTube – simply drop the file, or any number of files, on top of the Droplet icon on the Desktop.
The Droplet window opens which allows you to:
When you have verified that everything looks right, click Start Batch.
NOTE: Here’s an article that talks about how to use Compressor to create and operate a network of computers for media compression.
SUMMARY
If you find yourself compressing the same type of files over and over, Droplets are a fast way to get your work done that are drag-and-drop easy to operate. Plus, they have the the added benefit of defaulting to the storage location of your choice.