Advanced Features of Warp Stabilizer in Adobe Premiere Pro

Guest post: Zac Carr is a Chicago-based content writer for Captive Demand, a full-service marketing agency offering demand generation, web development, SEO, CRO, and content creation solutions. My website neither accepts nor makes payment for guest posts.
As video professionals well-acquainted with the foundational aspects of Adobe Premiere Pro’s Warp Stabilizer, you understand the transformative effect it can have on shaky footage. However, true artistry and technical mastery lie in leveraging its advanced features. These tools go beyond basic stabilization, allowing you to fine-tune and perfect your footage.
Here we look into several key advanced features of the Warp Stabilizer tool and discussing why they are indispensable for achieving smooth motion and high-quality results, especially when working with handheld camera footage.

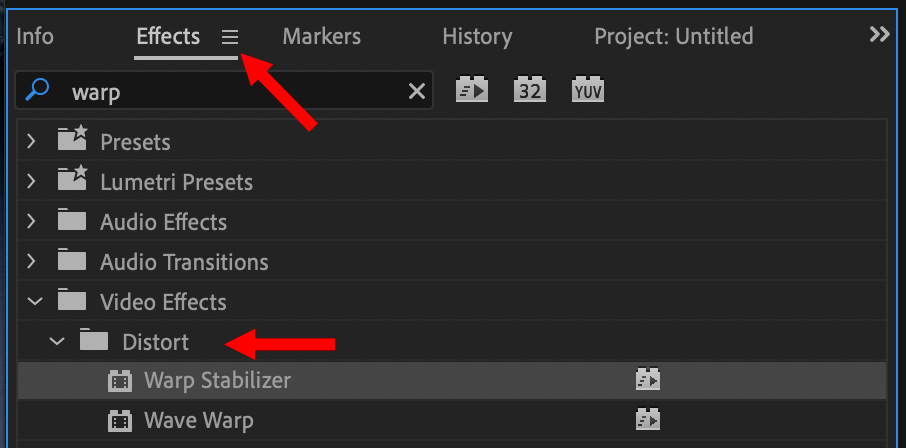
The Warp Stabilizer is located in Effects > Video Effects > Distort.

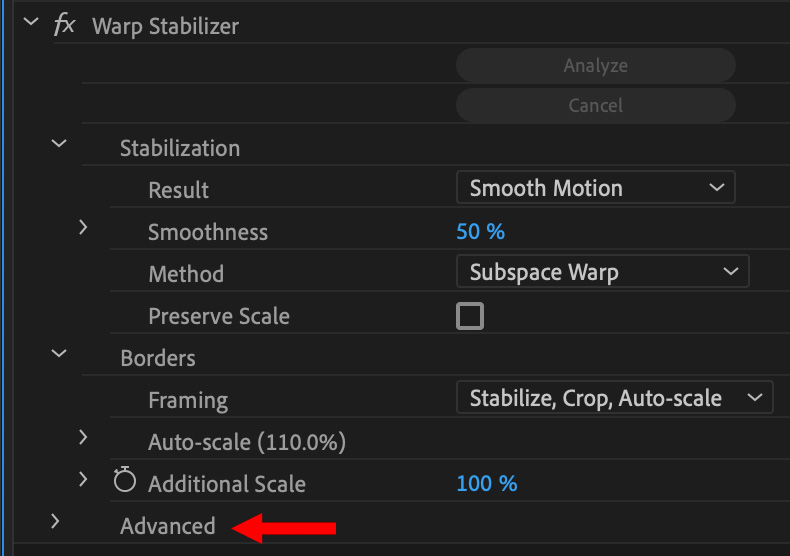
Twirl down Advanced (red arrow) to reveal additional Warp Stabilizer settings.

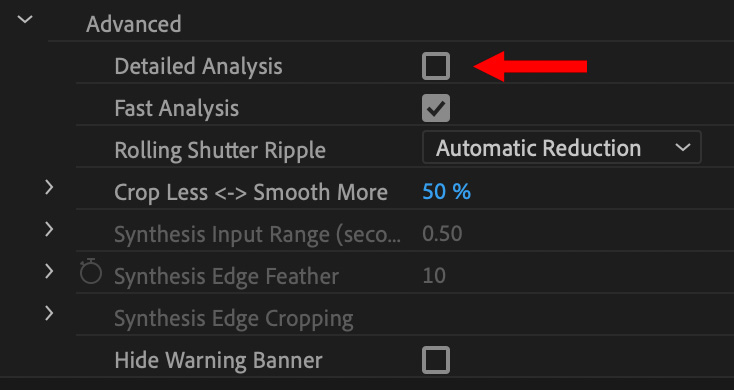
Detailed Analysis is the top checkbox (red arrow).
Detailed Analysis: A Deep Dive into Footage
The Detailed Analysis feature within the Warp Stabilizer effect is a powerhouse for those dealing with complex or severely shaky videos. Unlike the standard analysis, this mode conducts an intensive examination of each frame, providing a more nuanced and precise stabilization process.
Why It Matters
- Enhanced Tracking Accuracy: This feature is particularly beneficial when stabilizing footage with intricate details or significant movement.
- Complex Scene Handling: For scenes with multiple elements moving in different directions, Detailed Analysis can better distinguish and stabilize these varying motions.
- Quality Over Speed: While it does require a bit more processing time, the trade-off is a level of stabilization that standard analysis may not achieve.
- In some scenarios where haze vs fog significantly affects the visual clarity, using the Detailed Analysis feature might help. It performs a more thorough examination of the footage, potentially improving tracking and stabilization in challenging conditions.

Rolling Shutter Ripple: Tackling Distortion
The Rolling Shutter Ripple adjustment is a specialized tool within the stabilization process, designed to address distortions typical of CMOS sensor cameras, particularly those noticeable in handheld footage.
The Significance of This Tool
- Correction of Distortion: It effectively corrects the wobble or skew often seen in fast-moving or vibrating cameras.
- Method Flexibility: This feature works best with the Subspace Warp or Perspective methods, offering flexibility based on your project’s needs.
- Enhanced Reduction Option: For footage with larger ripples, the Enhanced Reduction setting can be a lifesaver, smoothing out these distortions more effectively.

The Crop Less <-> Smooth More Balancing Act
The ‘Crop Less <-> Smooth More’ slider is a critical tool for editors who need to fine-tune how much of the frame is sacrificed for the sake of stability. This feature plays a pivotal role in the post-stabilization phase.
The Importance of Balancing
- Customizable Stabilization: It provides control over the trade-off between keeping more of the original frame (less cropping) and achieving smoother footage.
- Creative Control: This slider allows you to make creative decisions about the look and feel of your stabilized footage.
- Versatility for Different Projects: Whether you’re working on a dynamic sports event or a documentary, this tool adapts to various stabilization needs.

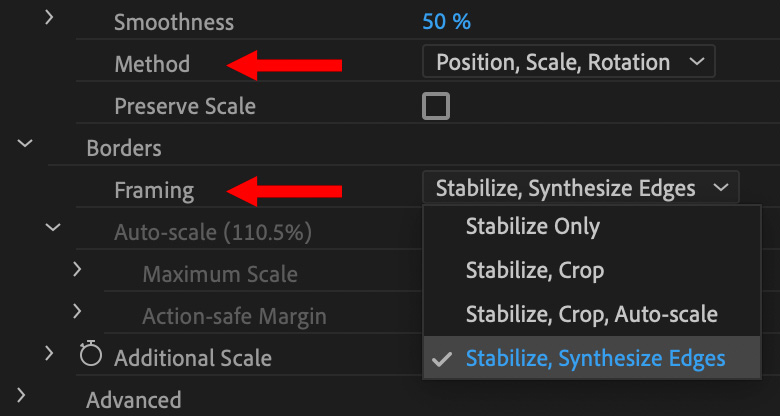
NOTE: To enable synthesis, set Borders > Framing to Stabilize, Synthesize Edges (botton red arrow). You may also get better results by changing the Method from Subspace Warp to a simpler setting, such as Position, Scale, Rotation (top red arrow).
Synthesis Tools: Crafting Perfection
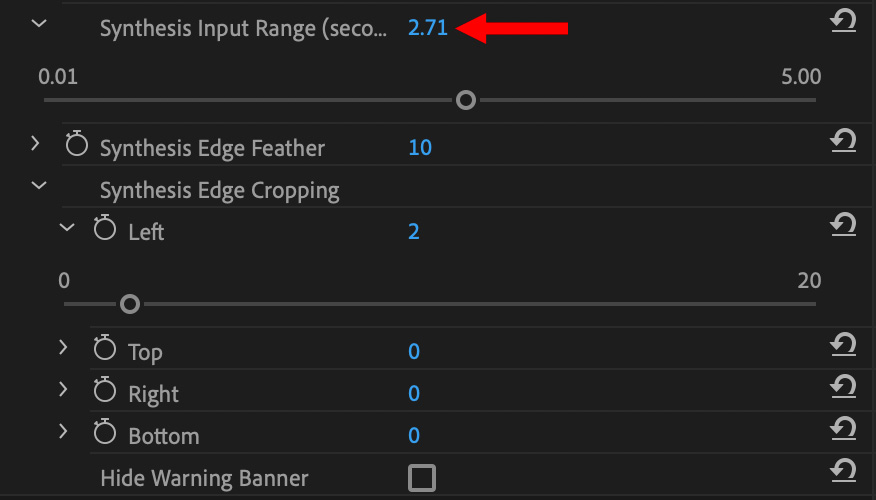
The Synthesis tools, encompassing Synthesis Input Range, Edge Feather, and Edge Cropping, are indispensable for dealing with edge artifacts and ensuring a seamless blend between stabilized and original footage.

Why These Tools Are Crucial
- Synthesis Input Range: This setting dictates how far the tool looks forward and backward in time to fill in missing pixels, important for scenes with rapid movement.
- Edge Feather: By adjusting the feathering, you can seamlessly blend synthesized edges with the original footage, crucial for maintaining a natural look.
- Edge Cropping: This feature allows you to crop out undesirable edges, often a byproduct of stabilization, ensuring a cleaner, more professional end result.
Implementing These Features into Your Workflow
Understanding how to integrate these advanced features into your editing workflow in Premiere Pro is just as important as knowing their functionalities. Here’s how you can make the most out of them.
Workflow Integration Tips
- Prioritize Detailed Analysis for Complex Footage: Reserve Detailed Analysis for shots where standard stabilization isn’t cutting it. This targeted approach saves time and resources.
- Use Rolling Shutter Ripple Judiciously: Apply this feature when dealing with footage from CMOS sensor cameras, especially for action-packed sequences.
- Dial in the Crop Less <-> Smooth More slider: Experiment with this slider to find the perfect balance for each project, ensuring that you don’t over-stabilize and lose vital parts of the frame.
- Fine-Tune with Synthesis Tools: Utilize these tools to refine the edges of your stabilized footage, making the difference between a good and a great final product.
Advanced Stabilization Strategies
Beyond individual features, advanced stabilization involves strategic thinking and a holistic approach. Consider these strategies when using the Warp Stabilizer tool.
Strategies for Maximum Effectiveness
- Combining Features for Complex Shots: Often, a single feature isn’t enough. Combine Detailed Analysis with Synthesis tools, or Rolling Shutter Ripple Correction with the Crop Less <-> Smooth More slider for comprehensive stabilization.
- Understanding Footage Characteristics: Different types of footage require different approaches. Fast-paced action might benefit more from Detailed Analysis, while subtle jitters in a static shot might be best addressed with the Synthesis tools.
Creative Uses of Warp Stabilizer
The Warp Stabilizer isn’t just for correcting shaky footage; it can be a creative tool as well. Embrace its potential to add some artistic flair to your projects.
Exploring Creative Possibilities
- Intentional Motion Effects: Use the tool to add a sense of motion or energy to static shots, creating a unique, dynamic feel.
- Narrative Enhancement: Stabilization can be used to emphasize certain narrative elements, like the calmness of a scene or the chaos of an action sequence.
Maximizing Efficiency with Warp Stabilizer
In professional video editing, time is often as valuable as the quality of the work itself, so understanding how to maximize efficiency while using these advanced tools is crucial.
Streamlining the Stabilization Process
- Selective Application: Apply Warp Stabilizer only to the clips that desperately need it. This approach reduces processing time and allows you to focus on the most problematic areas of your footage.
- Adjust Settings Preemptively: Anticipate the needs of your footage. If you know a clip has severe rolling shutter issues, adjust the relevant settings before the analysis begins. This foresight saves time with re-rendering or re-analyzing.
- Batch Processing: When working on multiple clips that require similar stabilization treatment, consider batch processing them with the same settings. This can be particularly effective when working on projects like interviews or documentaries, where the camera setup remains consistent across shots.
Balancing Quality and Time
- Assessing Need versus Return: For some projects, the highest level of stabilization may not be necessary. Assess the intended platform and audience of your project – sometimes, a slightly less stabilized but more authentic look is preferable, and it’s certainly more time-efficient.
- Hardware Optimization: Ensure your editing workstation is optimized for Adobe Premiere Pro. Using a powerful GPU can significantly decrease the time taken for the Warp Stabilizer to analyze and apply its effects.
Final Thoughts
Warp Stabilizer is not just a simple tool for fixing shaky footage; it’s an intricate suite of features that, when understood and used correctly, can elevate the quality of your video projects significantly. Each advanced feature offers unique solutions to common problems faced in post-production stabilization. By integrating these tools into your workflow and understanding their specific applications, you can confidently transform handheld footage into stunningly smooth and professional-looking videos. And by embracing advanced capabilities, your skills as an editor in creative storytelling will surely give you an edge over the average media creator.
EXTRA CREDIT
Here’s an Adobe Help page with more information.
Bookmark the
permalink.
2,000 Video Training Titles
- Apple Final Cut Pro
- Adobe Premiere Pro
- DaVinci Resolve
Edit smarter with Larry Jordan. Available in our store.
Subscribe to Larry's FREE weekly "Edit Smarter" newsletter and
save 10%
on your first store purchase.
Read the latest Media Industry News, curated by Larry Jordan
Media News


