 New with the Spring, 2017, update to Adobe Premiere Pro is the new Text tool and much easier ways to create titles.
NOTE: Here’s a webinar I recently presenting illustrating the new features in this update.
Just as with Photoshop, there’s now a text tool in Premiere. You’ll find it at the bottom of the Tools panel.
CREATE A TITLE

Select it, (um, it’s the letter T) then create a title by typing directly on the Program Monitor.

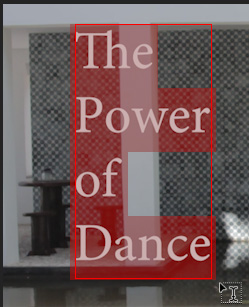
For instance, let’s create a new title graphic for our video. Notice that when we are creating text, it is bounded by a red box; the cursor is indicated by a red vertical line.
NOTE: This dance footage is courtesy of Amy Campion and Antics Performance (www.anticsperformance.com).

As soon as we start typing, a new graphic clip is created in the Timeline at the position of the playhead; though this clip does not appear in the Project panel.
MAKING CHANGES

This is important: it is NOT enough to select, or double-click, the clip in the Timeline to change it. Why? Because a single title clip can contain multiple text blocks. Instead, you need select the Text tool, then select the text you want to change in the Program Monitor; THEN change it using Effect Controls.
Also, you don’t need to select the text clip in the Timeline first.

NOTE: It is very, VERY easy to create extra, unwanted text blocks inside a title clip simply by clicking anywhere inside the Program Monitor. Worse, these text blocks are almost impossible to spot on screen.
To delete an unwanted text block, select its name – “Text” – in Effect Controls and press the large Delete key. Blocks that are empty just say “Text”, blocks that have text in them display the actual text next to the word “Text”.

Here, for instance, using the settings in Effect Controls, we’ve changed the font, added a drop shadow, and matched the color of her jeans.
NOTE: While the Title panel still exists and has more formatting options than this new Text tool, the Effect Controls panel contains the most popular text formatting settings. However, for really complex titles you can still use the Title panel or Photoshop.

To move a text block within a title clip, select the Move tool (shortcut: V), then click inside the text block you want to move in the Program Monitor and drag the text to its new position.
You don’t need to select the text clip in the Timeline first, but the playhead needs to be inside the text clip in the Timeline if you want to see it in the Program Monitor.
NOTE: When you are entering text, the text block is red. When you are moving text, the text block is blue.

Here’s our finished title, with a red rectangle created using the Pen tool, then Opacity set to 25% in Effect Controls and and placed under “Power” to emphasize the word.
NOTE: Here’s an article that shows how to use the Essential Graphics panel to create a motion graphic template of this title for use elsewhere.
Cool.
4 Responses to Adobe Premiere Pro: The New Text Title Tool
hi.please i’m having an issue with that red box surrounding the text. i can see it in my premiere pro when i select the type tool. help me please . thanks you.
Kisuke:
Remember, a single text clip can have multiple boxes. Re-read the article as I describe how to select specific text, of a specific box.
Red means that a box exists. Blue indicates you can edit it.
Larry
Hi, im using premiere pro right now and when using the text button there is no red box surrounding it but when i used it on another pc it did, is there any way i can recover that
Khalid:
I don’t know for sure, but it sounds like you are using an older version of Premiere on the system that doesn’t show the red box.
If both versions are the same, it’s time to contact Adobe Support.
Larry