 Auto-ducking first appeared as part of the Essential Sound Panel that was released in Adobe Audition two years ago. The sound panel then moved into Premiere last spring, but auto-ducking wasn’t in it, yet.
This year, in the April, 2018, update, Adobe Premiere Pro CC added auto-ducking. Here’s how it works.

Scene courtesy of John Putch “Route 30, Too!” (www.route30trilogy.com)
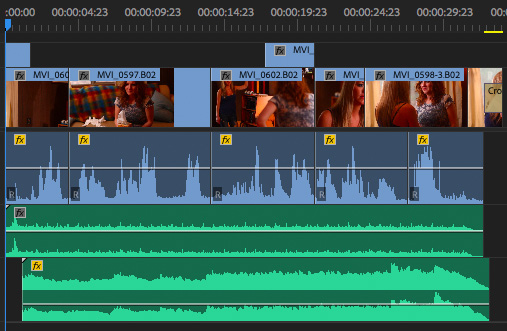
Here’s a typical sequence that we can use to illustrate this feature. This dramatic scene has a dialog track, a ticking clock SFX track and music track. The dialog track contains multiple clips in a single track, while the SFX and music tracks contain single clips.
NOTE: As you’ll see below, this technique works with multiple clips across multiple tracks. I’m just keeping this simple to start so you can see how it works.

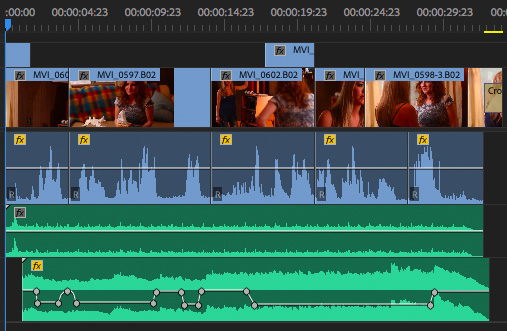
In the past, we would add audio keyframes to the music to adjust its volume during playback so that it is louder when there is no dialog and softer during the dialog.
This technique works, we’ve used it for years, but it’s time-consuming and, if you need to make changes, it means you need to go back and adjust each keyframe.
NOTE: I wish Adobe made it easier to set a keyframe to 0 dB; I spend way too much time dragging keyframes that get almost, but not quite, to 0. Sigh…. If you know a technique, please share it in the Comments below.
Now, auto-ducking provides a better way.
AUTO-DUCKING TO THE RESCUE

Auto-ducking was added with this version of Premiere to the Essential Sound panel. You can access it by either selecting:
What auto-ducking does is automatically apply keyframes to the clips in a track, based upon audio levels in one or more other tracks.

To start, select all the Dialog clips in a track, then click the Dialog text button in the Essential Sound Panel (ESP).

This panel provides a great deal of control over the sound of our audio, without having to understand audio filters or technology.
NOTE: However, behind the scenes, what the ESP is doing is applying standard audio filters and presets which can easily be changed by someone who knows how these filters work. Nothing is permanent and all settings can be changed.
The operation of the ESP is more than I have time for in this article. Here’s a video that goes into more detail: larryjordan.com/articles/adobe-audition-cc-the-new-essential-sound-panel/
Once I’ve defined the clips that make up all the dialog – and these clips can extend across multiple tracks – it’s time to adjust the music.

Select all the music clips, and assign them the Music category in the ESP; just as we did with the Dialog clips earlier.
Once ducking is enabled, you can make three adjustments:

When you’ve adjusted these settings – and, in truth, I leave them at the defaults until I’ve made a first pass through this menu – click Generate Keyframes.

Almost instantly, Premiere sets volume keyframes in your music that match these settings. What’s EXTREMELY helpful about this new feature is that:
To make adjustments, listen to the playback of your project and decide what you want to change. Then, simply reselect the music clips, change the settings in the ESP and click Generate Keyframes, again.
SUMMARY
Auto-ducking is a huge time-saver, because, if you like the finished results, you are done in seconds. And, if you don’t like the results, you can either change the settings or override them manually.
For those productions that are time-crunched, this can make your music or effects sound a lot better without wasting a second.
EXTRA CREDIT

This technique even works when dialog clips are spread across multiple tracks, or when you use multiple music clips. The key is to make sure to identify all your dialog clips across all tracks by selecting them, then assign the Dialog setting. Then, select all the music clips, assign the Music setting and enable auto-ducking. Very, very cool.
2 Responses to Adobe Premiere Pro CC: Auto-Ducking Audio
De we have a similar capability in FCPX?
Dale:
No.
Larry