 One of the exciting new features in the 2018 update to Adobe Audition is auto-ducking. What this does is automatically reduce the level of clips on a music track based upon the dialog clips above it.
This new technology is powered by Adobe Sensei, an AI-based technology that determines the best place and level to modify the gain. Though Sensei uses machine learning, you don’t need to be connected to the Internet for this effect to work. All calculations are done on your local system.
Here’s how it works.
SET-UP

Here’s a three track mix where the narrator is on Tracks 1 and 2 (top), while two music clips are on Track 3. Note that I am using multiple clips and multiple tracks.
Auto-ducking works by first labeling clips to identify them as dialogue or music using the relatively new Essential Sound panel (ESP), then adjusting the levels automatically.

Here, I’ve selected all the clips I want to tag as dialogue, then opened the Essential Sound panel and clicked the Dialogue Audio Type to assign this label to the selected clips.

Then, I did the same thing for the music clips:
Again, this label can be applied to one or more clips on one or more tracks.

NOTE: See these two small icons in the tagged clips? The top icon indicates a dialogue tag, while the bottom icon indicates a music tag.
APPLY THE EFFECT

With the clips labeled, open the Essential Sound panel, go to the Music section and enable Ducking by checking the checkbox in the upper right. (It is off by default.)

Three sliders now come into play:
The screen shot above is an example of typical settings and their result. The dotted line in the music clip displays the level changes which are automatically set.

Here’s a closer view. Notice the angle of the fade in and fade out, that is adjusted using the Fades setting. All keyframes and levels are set automatically.
Notice also that where the music levels change is not based on the location of the dialogue clips, but on the location of the sound within the clip.
ADVANCED FEATURES

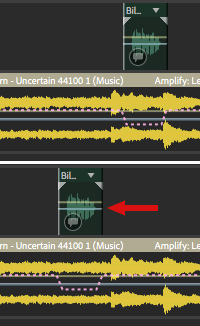
What makes this especially powerful is that all these level adjustments are dynamic. If I move a clip, as I did here moving the last dialogue clip earlier so that the final climax of the music is not covered by the narrator’s voice, the ducked levels are adjusted automatically!
This is a HUGE time-saver!

Here’s an example where the middle narration clip spans two music clips. Ducking is smoothly handled between the two music clips.
NOTE: If this clip were not tagged as Dialogue, the levels would not change.

In the Ducking section of the Essential Sound panel, Monitor clip changes has an extremely useful function:

Here, the top image is with Monitor clip changes checked – all levels and keyframes are controlled automatically. In the bottom image, Monitor clip changes is unchecked, replacing the automated levels with manual keyframes, allowing us to make changes.
NOTE: Once you uncheck Monitor clip changes, the dynamic linking between the Dialogue and Music clips is disconnected. Moving a clip will not change manual keyframes. However, turning on Monitor clip changes reestablishes the link and repositions all keyframes as necessary in the music clip.

If you need different levels in different music clips, but still want the automatic ducking to work, select the music clip you want to modify, then adjust Reduce By to change the levels only in that selected music clip(s).

NOTE: Audition displays a warning in the ESP when Music clips have different level settings. To reset all clips to the same level, select all music clips, then modify the Reduce by slider.

To remove all automatically-generated levels, select all the music clips, then click Clear Audio Type from the top right corner of the ESP.
PRESETS

As you would expect, Audition has several existing presets you can use, or you can create a setting and save it as a preset by clicking the icon with the downward-pointing arrow. The wastebasket icon allows you to delete an existing preset.
SUMMARY
Auto-ducking is magical.
Yes, we can still craft all our levels by setting keyframes by hand, but I would much rather use Auto-ducking to create all the necessary keyframes, then just tweak the exceptions. Or, if you are on deadline, this can do in an instant what used to take forever when the deadline clock was ticking.
This is a really, REALLY cool effect that will save all of us a ton of time!