
 Last week I reviewed my purchase of an Neewer X12 II Remote Teleprompter. Basically, I like it. (Link)
But the prompter hardware is only part of the solution, you also need a monitor and software to drive it. This sounds easy, but it’s a rabbit hole – because each of us needs something different from a prompter.
For example:
What I learned is that I have a very specific need for a prompter that may, or may not, apply to you. Here’s what I chose and how I got it to work.
NOTE: Key to getting this system to work is Sidebar. Here’s a tutorial that describes what Sidebar is and how to set it up on your system.
MY CHALLENGES
I need a small prompter that fits on a desk that will principally display my computer screen. That way, I can look directly at the camera and see my slides in a webinar, the On24 interface in an O’Reilly presentation, faces in a Zoom meeting, or talk directly to someone on FaceTime.
Secondarily, every so often I need to scroll a script to record it; for example, my recent thoughts on going to the 2025 NAB Show.
To keep costs down, my Neewer prompter uses an iPad for a monitor. The problem is that while there is a wide variety of prompter software, flipping an iPad screen into “mirror-image” mode is really tricky.
The prompter software that is bundled with the Neewer uses a proprietary iPad app. It is undocumented on the Neewer website, scrolls the text too fast, does not support adjusting left/right margins and is, in general, useless.
After 30 minutes of playing with it, I gave up.
I did not do an exhaustive search, but I did check into four different teleprompter software. None supported displaying a Mac screen on the iPad. None supported the remote control that came with the Neewer prompter. Only one supported adjusting left/right margins and the one that allows margin adjustment requires a subscription, plus uploading all scripts onto their cloud server. I can’t always guarantee that I’ll be attached to the web during production.
For something I thought would be easy – finding prompter software – I was getting a headache.
WHAT I CHOSE
After chasing my tail for a couple of days, I realized that my needs are very simple. All I need was to mirror my main computer display combined with some Mac-based prompter software. Regardless of what I was presenting, it would always be displayed on my Mac screen.
To scroll scripts, I’m using the free version of Teleprompter Pro, from Teleprompter Apps Ltd. (Link) It’s in the MacApp store. I chose this because it allows adjusting left/right margins, scrolls slow enough for me to read and has features I can grow into if I need them. In other words, the bare minimum of its features.
Since all my scripts are created locally and displayed on my Mac screen, the free version works perfectly for this. If I start to create more scripts, I’ll purchase it just to thank the developers for creating it.
NOTE: I don’t run this app on my iPad, I run it on my Mac, then mirror the Mac to the iPad. I then control the prompter – or anything else on my screen – with my mouse. This solves the problem of how to transfer scripts to the iPad.
However, because I’m running this on my computer, I need a way to display the script – along with any other images – onto my iPad. THAT was far harder than I first thought.
CONFIGURING THE IPAD
The iPad does not have a switch that instantly mirror-images the screen. This is necessary because all prompters reflect the monitor/screen/iPad into a mirror so you can read the text and look directly into the lens at the same time.

To flip the Mac screen, I purchased BetterDisplay, from Waydabber (link).
NOTE: They offer a 14-day free trial, which I took advantage of to see if this would work. I’ve now purchased the Pro version, not that I need all the features, but to continue to use the features that I need. Cost: $19.99 (US).
According to their website, BetterDisplay:
Notice, in this list, they never mention flipping a monitor image, but it does that, too. Both horizontally and vertically.
All these features are far more than I need – all I want is to feed a flipped image to an iPad. While the configuration is tricky, once it’s set up, I just click one button and, Poof!, instant prompter.
BETTERDISPLAY SETUP
To flip the screen, the app creates a virtual screen, flips that, then uses Sidebar to display the flipped image to the iPad. No, I have no idea how that is done, but it works great.
Download the app from the developer’s website – or MacUpdate – and install it. It’s compatible with macOS Ventura, Sonoma or Sequoia.

Start the app. Click Open if you downloaded this from the developer’s site. Installation is straight-forward.

There are about a bajillion options – maybe two bajillion – with this tool. Don’t panic, we only need to configure a few settings. (However, this does amazing things with monitors. If you are curious, here’s a link for more information.)

Once BetterDisplay is running, its icon appears in the menubar (top red arrow). Click Displays and Virtual Screens.

Then click Create New Virtual Screen (lower red arrow).

NOTE: BetterDisplay will ask permission to allow it to control your computer. Click the button to go to Settings, then enable Accessibility for BetterDisplay. It will also ask for one other permission later during setup.
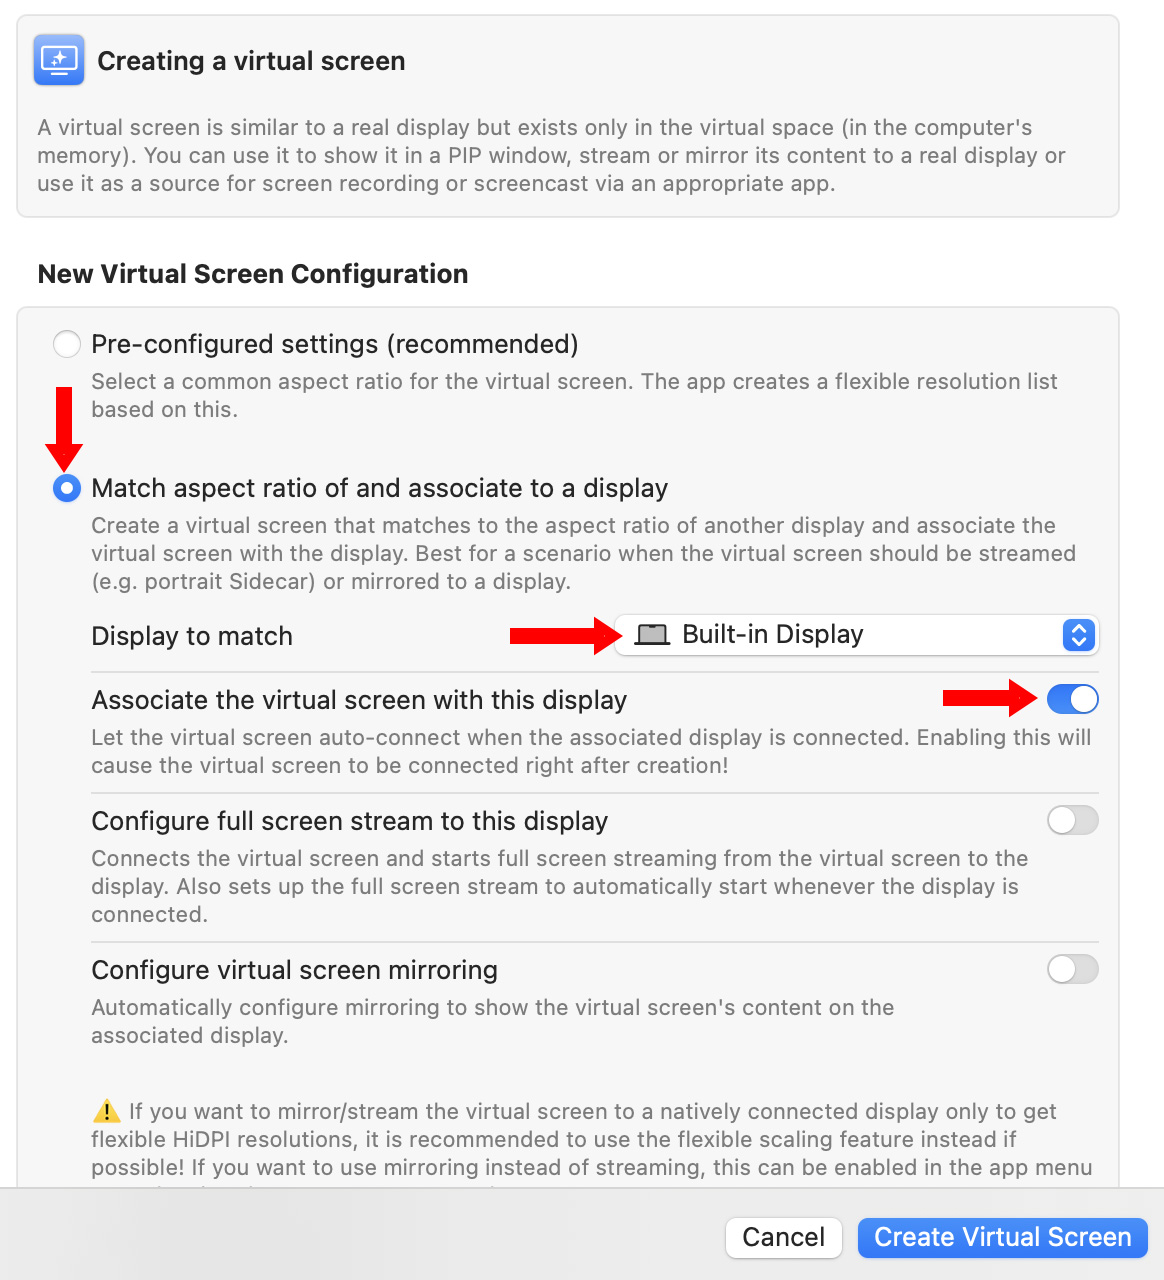
Because we want to mirror the main display of our Mac, choose the second option: “Match aspect ratio of and associate to a display.” Then, from the menu, choose the display you want to mirror (middle red arrow).
Finally, enable the setting indicated by the lower red arrow.

Finally, click the blue Create Virtual Screen button to create the screen.

After a few seconds, this window appears, showing the new Virtual screen. This lives only in memory, there’s nothing for you to see.
NOTE: Enabling this virtual screen on a MacBook Pro took an additional 300 MB of system RAM. So, while some additional memory is required, it doesn’t use a lot. In comparison, Photoshop is currently using 22 GB on my system!
While there is still one setting we need to adjust, we can already see the results on an iPad.

Go to the Focus menu in the top right corner of the menu bar (top red arrow) and click Screen Mirroring (lower red arrow).

Click the icon for the iPad or other device you want to mirror the image; “Larry’s iPad” in my case.
NOTE: A gray icon indicates streaming is not enabled for that device. A blue icon indicates that it is enabled.

The blue button indicates the iPad is actively mirroring your main monitor. In fact, you should now see the desktop mirrored on your iPad.
Next, make sure this is streaming the Virtual display not the main monitor. Click “Mirror Virtual – Built-in Display” – or however you named it earlier in this installation (red arrow).
Then, without closing this Focus window:
Finally, we need to flip the image.

Click the title: Built In Display (or the name of your source monitor NOT the virtual display!)
Click Stream Display (lower red arrow)

Click the left Flip icon (left red arrow) to reverse the image side to side, or the right icon (right red arrow) to reverse the image top to bottom. For my prompter, I needed to flip this top to bottom.
Whew… that’s a lot of settings.
DAY-TO-DAY OPERATIONS

The good news is that once you have this set up, all you need to do to toggle the prompter monitor on or off is click the Screen Mirror button in the Focus panel.
Then, click the iPad icon and choose Mirror Virtual – Built-in Display.
To turn mirroring off, go back to Screen Mirror and click the blue button next to the iPad.
SUMMARY

BetterDisplay does FAR more than I need – and most of what it does, I don’t understand. And, I will admit, that the first time I went through this configuration I got totally lost. But, now that I’ve put these instructions together, I can configure an iPad as a teleprompter in less than ten minutes.
The good news is that I can reliably use this setup any time I need a prompter – for text, screen images, or video calls. It wakes up the iPad and turns it into an instant prompter. Cool.

6 Responses to Review: BetterDisplay – More Display Controls and Better Teleprompter
I also use Teleprompter Pro. It already has the ability to flip the screen both horizontally and vertically. And I use YAM Display on both the Mac and iPad 5th Gen to display the teleprompter window on the iPad. If you have an iPad that is compatible with Sidecar you don’t need any extra software.
I’ve use Teleprompter Pro for 5 years now. I just need the basics but I did do a one time purchase just to support them. Back then it was $50 I think. No subscription model. Boy did they jack up the price.
I’m very pleased with it since I just use my track pad on my MBA to control the text. Besides just scrolling to a specific part, especially back when I flub, you can use a gesture to control the speed in real time. I don’t do that often anymore. And I use the spacebar to control stopping and starting. I think it’s a great choice for anyone. If I was doing it now I’d probably just stick with the free version.
Mark:
Thanks for your comment. I added a link to YAM Display for anyone interested.
Larry
Thanks! As far as teleprompter software, I was mistaken as to which one I use. I use PowerPrompter. That one has a one-time purchase option of about $50 and does pretty much everything the one you mentioned does as far as I know.
There is also a free version called PowerPrompter Express that allows you to use it for 5 minutes. This is 5 minutes of scrolling not 5 minutes of the app running. So if you don’t make clips longer than 5 minutes, this is an option. I can’t recall ever having a clip go that long as I would make a mistake somewhere along the line, so the 5 minute clock would reset every time (there is no actual clock display from what I remember). I had used this one for a few months and then decided to buy the full version to support them. Otherwise I could have easily still used the free version.
Mark:
Thanks for the update.
Larry
A poor man’s method that I used to use for this, was to build a simple credit roll or scroll in final cut, then use an effect in Final Cut to flip it for the mirroring and rendered as a simple QuickTime file, and play that on loop off of the tablet. The downside to that method is you can’t edit or change the presentation on the fly, and you have to pick a fixed playback speed.
Outdoors, in bright sunlight, CRT displays can still be competitive with modern flat screens for readability at a distance but they are heavy and need more electrical power from a car battery and inverter or similar.
Another form of prompting that not everybody knows about is called ear prompting; it’s great for long distance shots where you can’t get your eye line to line up with a screen anyway, and shots where you’re walking and talking at the same time. You’re prompting is basically just a digital audio recorder playing back to an earpiece that’s either wired or wireless. The fancier ones are tiny and handheld with a thumb switch that lets you control the playback backwards, forwards, and control speed as well. But you know, you could do most of that from an iPhone in your pocket and a wireless blue tooth earbud. The playback could be run by an off camera operator.
Something fun about EarPrompting is that you can imitate knowing other languages and speak in foreign languages. You just wanna record the dialogue in a phonetic pronunciation way, and you might not sound like a native speaker, repeating what you hear, but it gets better with practice.
Mark:
Cook tips. Thanks,
Larry