 Another new feature with the Spring, 2017, updates to Adobe’s Creative Cloud software is the Essential Graphics Panel which now exists in both Adobe After Effects CC and Adobe Premiere Pro CC.
While the Essential Graphics Panel in After Effects allows us to create amazing motion graphics which can then be used in Premiere, what you may not know is that you can also create graphics in Premiere that can be saved as templates in the Essential Graphics Panel without ever opening After Effects.
NOTE: Here’s a webinar I recently presented illustrating many of the new features in this update.
THE ORIGINAL TITLE

Here’s a title we created using the new Text tool in Premiere. I am SO impressed with it that I want to create a template that will allow me to easily reuse this whenever I want.
NOTE: Here’s the article that describes how this title was created using the new Text tool.
SECOND NOTE: This dance footage is courtesy of Amy Campion and Antics Performance (www.anticsperformance.com).
If this template were created in After Effects, we could include multiple layers, video and all the standard outrageous animation and effects that After Effects makes possible. However, when we create a template in Premiere, we can only work with what’s contained inside a single title clip.

Select the title clip in the Timeline, then do ONE of the following:

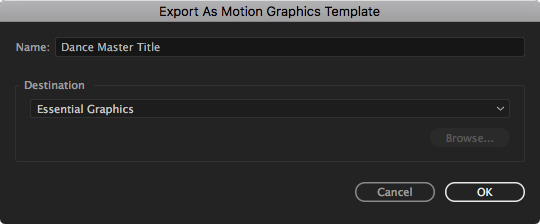
This opens the Export As Motion Graphics Template dialog. Name your template something that will help you remember what it is.

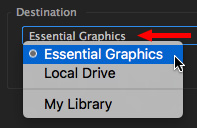
Then, specify where you want this template stored.
In this case, we’ll chose Essential Graphics. The file is saved and the dialog disappears.

Now the fun part starts. Choose Window > Essential Graphics. There’s your template, displayed as a thumbnail and ready to edit or use elsewhere.

Grab the title in the Essential Graphics panel and drag it into the Timeline where you want it. Unlike titles created using the Title panel, you don’t need to create an independent master clip. Premiere automatically creates stand-alone title clips.

Click the Edit tab at the top, select the text you want to change in the clip, and you have access to all the original text formatting controls – including the ability to change the text itself.
This allows you to either duplicate the look of a master title and just change the wording, or use that template as a starting point and create something that looks totally different.

If you have a text style that you really like, you can save the text formatting as a Master Style template, which is separate from the entire title.
RENAME OR DELETE A TEMPLATE

Adobe does not store templates anyplace that’s easy to find. But, that’s OK. If you want to delete, or rename, a template, right-click the image in the Essential Graphics Panel and choose Delete (or Rename); or, um, Move.
Poof. Gone.
SUMMARY

While there is much more flexibility in creating titles using After Effects, there is a lot of power and control using the new Essential Graphics panel in Premiere to create your own templates.
Plus, simply by changing the popup menu at the top, the Essential Graphics panel allows you to access all the existing motion graphic templates that ship with the new version of Premiere, or those that you add in the future.
This is one new feature you will want to spend time exploring.

Cool.