 Dick Osso suggested I write a few articles on creating simple effects. That sounded like a fun idea, so here we go.

This is the first example: A title rising out of the horizon – or any visual element – in the middle of the frame. As the title rises, more and more of the text is revealed. (This photo was taken by me at Zuma Beach in California the week before Christmas last year.)

In FCP X, make a sandwich, where the title is between two copies of the same background shot. The top clip will be the “mask” that hides the text.
NOTE: The fastest way to make a copy of a clip is to press the Option key, then drag the shot you want to duplicate.

Select the top clip and type V to make it invisible. This allows us to see the text. Position the text so that it straddles the line from which you want it to appear.

Select the top clip and type V again to make it visible. With the top clip selected, go to the Inspector, display the Crop settings, make sure Type is set to Trim then drag the Top setting until your text appears rising from the ocean, in my example below.

What you are doing is using the top clip to hide the bottom of the text, while the bottom clip provides the background behind the text for the entire shot.
NOTE: You can use Trim to create horizontal or vertical edges for clips to reveal themselves. However, all Trim lines must be straight.
ANIMATE THE TEXT
Once you have this boundary set, animate the movement of the text using keyframes. Place the Playhead at the beginning of the text clip and select the text clip.
NOTE: A “keyframe” is a point of change during playback. Because we want the text to change position during playback, we will set two keyframes – a starting and an ending position – for the text clip.

In the Inspector, click Show next to Transform to display the settings that control the position of the selected clip.
Create a keyframe by clicking the gray diamond to the right of the setting you want to animate. We want to animate the position of the text clip, so we set keyframes for the Position parameter.
NOTE: Keyframes are always set at the position of the playhead in the Timeline.
Drag Position > Y (which controls the vertical position of the selected clip) down until the title disappears. You have moved the position of the text clip so that it is hidden by the top clip in the Timeline.
Move the Playhead in the Timeline to the place on the clip where you want the title fully visible; for example, two seconds later.

Drag the Y setting up (or type in a number) until the text clip is in the ending position you want. Now, when you play the project, your title will rise and reveal itself in the background.
NOTE: The speed of its rising depends upon how far apart the two keyframes are. The closer they are, the faster the movement.
ADVANCED OPTIONS

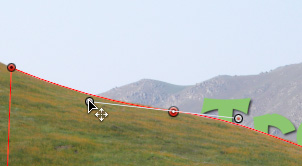
But, what if you don’t have a straight line in the background clip, as seen in this example. Now what? The process is the same, but we need to use a different tool: Draw Mask.

Create the same sandwich we created earlier. Before duplicating the background clip, position the text so it is in its starting position. You don’t need to hide the top clip.
Select the top clip and drag the Draw Mask effect on top of the clip. (Effects > Masks > Draw Masks)

Using the mouse, click to add “control points” along the edge from which you want the text to appear. These control points allow you to create polygonal or curved shapes, you are not restricted to only horizontal or vertical lines as you were using trim.
NOTE: The general goal, when setting control points is to use as few as possible to describe the shape you want. Fewer control points makes the shape easier to adjust.
When setting a control point (red dot), drag to add curves to the shape, but don’t worry if they don’t perfectly match the image. You’ll tweak these points in the next step.
Finish drawing your shape, then click the starting point to close your mask.
NOTE: The mask you create only needs to be big enough to hide the text, you don’t need to cover the entire frame.

Click one of the red control points, then drag the white lines to change the shape of the curve. Drag control points until the red mask line closely matches the shape you want.

Then, in the Inspector > Draw Mask, click Show to reveal the settings for this effect and add a bit of feathering so that the edge of the mask softens a bit.
NOTE: There’s no right amount or direction to feather, tweak until it looks “right” to you. You’ll see edges better as you play the clip and watch the text appear.
Animate the text exactly the same way we did earlier using two keyframes: one for the starting position and the other for the ending position.
Sit back, play the project and admire your work!
Very cool.