FCP X: Optimize Preference Settings
 I last wrote about the preferences in Final Cut Pro X a year ago. Since then, we’ve had a couple of upgrades which have changed things a bit. So, let’s take another look and I’ll share my thoughts on how I set my preferences.
By the way, these are called “preferences” for a reason. You can set these however you want. I’m just providing my preferences as a reference, not a requirement. The screens below show my personal settings.
NOTE: You can learn more about preferences in my Final Cut Pro X: Workflow and Editing training.
GENERAL PREFERENCES

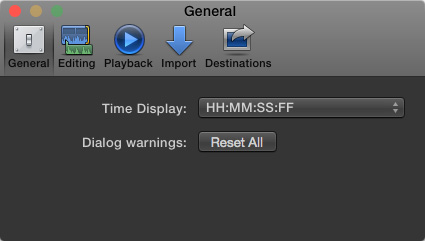
The first option has been simplified. Now, there are only two choices. I leave the top menu set to the default timecode, though you can change this, if you prefer.

Subframes allow zooming into a portion of a clip that is 1/80th of a frame, which is the smallest increment we can use for audio.
NOTE: We can only cut clips on video frame boundaries, though we can trim and keyframe audio to the nearest subframe, provided you have expanded audio from video.
And, just for the record, I’ve never needed to reset dialog alerts; though this will happen automatically when you trash FCP X preference files.
EDITING PREFERENCES

These options are the same as earlier versions.
- Detailed trimming feedback displays two monitor windows when you ripple or roll trim a clip. This allows you to easily compare the end of the first shot with the start of the second shot.
- Position playhead after edit operation means that when this option is checked and you edit a clip to the timeline, the playhead jumps to the end of the newly-edited clip. If this option is unchecked, the playhead remains in its current position. I leave this checked because I like having the playhead move.
- Setting the Inspector Units to pixels, vs. percentages, helps me better understand the changes I’m making. This means when I change a position in Transform, or change anything in the Inspector, it shows the change in pixels, not percent of the original.
- Show reference waveforms displays faint audio waveforms that are sized as if your audio levels were set to 100%. This makes it easier to see peaks and valleys for audio that was recorded very quietly. While I don’t use this very often, it can help less experienced editors find edit points in the audio. When my audio is very soft, I’ll turn this on, otherwise, I’ll leave it off.
- Still image default duration sets the default duration – the distance between the In and the Out – for imported still images. This can easily be overridden when you review a clip in the Browser. If I am importing clips for a music montage and each clip needs to be the same length to match the beat of the music, I’ll change this preference to save time trimming clips in the Timeline; otherwise, I leave this alone.
- Default Transition. I always change this. A one second dissolve is too long for me. I prefer something shorter. Since I’m always editing at different frame rates, using seconds to determine duration saves me time because I don’t have to figure out first, which frame rate I’m using. I really like the speed of a 0.67 dissolve.
PLAYBACK PREFERENCES

This panel is the same as earlier versions.
- Rendering. Turning rendering off can improve performance if you have a slower, or older, computer. If you forget to render a portion of a project, Final Cut will render it before final export. Most of the time, I leave this at its default setting. Since rendering happens in the background, if I am playing a clip or the Timeline, rendering pauses. As soon as I stop playback, Final Cut waits the amount of time specified in this option, then starts rendering all transitions, effects, or speed changes.
When I am webcasting a live webinar, or if I am editing camera native media on a slower computer, I always turn background rendering off because it is too taxing on the computer. The rest of the time, I leave background rendering on. The default setting of 0.2 seconds is fine.
- Optimized media. I strongly recommend creating either optimized media or proxy media when editing multicam clips. The performance improvement is startling. Optimized media is fine for 2-5 cameras. More than six cameras, though, and I recommend editing using proxy files. Proxy files provide much better performance with less need for storage space. Then, switch to original/native/optimized files just before final export.
- Frame drops. I strongly recommend turning both of these check boxes on. Dropping frames is most often caused by a hard disk that is too slow, or a camera format that is too complex, for your computer to play media successfully. Either way, you have a problem. It is better to discover this problem early in the editing process, rather than scrambling to resolve it under deadline at the end.
The rest of the settings on this screen are fine and I leave them alone.
- The Player Background only affects the display in Final Cut. Changing the background does not affect output.
- A/V output is used when you need to send video output to a video monitor using a 3rd-party interface. This is left off when you are only using computer monitors for your editing.
IMPORT PREFERENCES

This has changed since earlier versions. For me, this is the most important, and complex, preference screen. Everyone’s situation is a bit different, so your needs may be different from mine. But, here are the settings I use:
- Media Storage. Copy files into the library makes media management easy. Since all media is stored in the library; you only need to backup the library to backup your media. However, sharing that media between projects is harder when media is stored in the library. And relinking media stored in a library is very difficult. For media that I share between different editors or libraries, I always leave the media in place. (When I’m doing a demo and creating libraries or projects that I don’t intend to keep, I always use “Leave files in place.”)
- Transcoding. I always optimize media; which means FCP will transcode it into ProRes 422. And, if I am editing multicam clips, I will always create proxy files. Yes, file storage is bigger, but performance, effects and color grading are better as well.
- Keywords. These options allow you to automatically create keywords from Finder tags, folder names, including folders inside folders, based on the number of people in the shot and create Smart Collections after a clip is analyzed. I never use “Find People,” it just takes too long and, for longer clips, isn’t particularly useful. I don’t use Finder tags, so I only check From Folders.
- Video. Analyzing for balance color seeks to automatically correct your clip for bad color; for example a camera that wasn’t white balanced. If color mystifies you, this is a good option to fix problems. However, it isn’t as good as a manual color balance, once you know how to read video scopes and use the Color Board. It also takes a long time. Since we can always analyze colors after a clip has been imported, I leave this turned off.
- Audio. I check the first two of these. Audio analysis is fast and can always be turned off later. “Remove silent channels” is only relevant when you are importing more than 2 channels of audio, which I almost never do.
DESTINATION PREFERENCES

Here, again, everyone is different; which is why Apple gave us so many choices.
To add a destination, drag it from the right side to the left. To change the stacking order of destinations on the left (which also changes the Share menu) drag the option up or down.

To set a particular destination as your default, right-click and chose Make Default. This sets Cmd + E as the default shortcut.

Select any output option and you can modify the default settings that appear in the File > Share menu so that you can set specific parameters as defaults to save time during export.
I output virtually everything I create as a master file, review that master file, then, after I know that everything exported OK, I’ll move it to Compressor or Adobe Media Encoder for final compression.
SUMMARY
Preferences allow you to optimize Final Cut to your personal workflow. Once I have these set to my liking, the only ones I change frequently are the Import settings.
Bookmark the
permalink.
2,000 Video Training Titles
- Apple Final Cut Pro
- Adobe Premiere Pro
- DaVinci Resolve
Edit smarter with Larry Jordan. Available in our store.
Subscribe to Larry's FREE weekly "Edit Smarter" newsletter and
save 10%
on your first store purchase.
Read the latest Media Industry News, curated by Larry Jordan
Media News

 I last wrote about the preferences in Final Cut Pro X a year ago. Since then, we’ve had a couple of upgrades which have changed things a bit. So, let’s take another look and I’ll share my thoughts on how I set my preferences.


