[This article was first published in March, 2013, on my blog.]
Last November, the day they went on sale, I ordered a 27″ iMac to replace my main editing system. (Click here to read about the system I ordered.)
It arrived the end of December and, as these things tend to work out, as soon as I unpacked it, I needed to give it to our talented production assistant to do some web database work for the last two weeks. (First, its a tribute to the admiration I hold her in that she was even able to TOUCH this system and, second, I felt like she was using a Ferrari to ferry kids to and from school.)
Finally, she went back to school. Now it was my turn. While I haven’t done a ton of work with it – yet – I want to share what I’ve learned.
INITIAL IMPRESSIONS
This thing is fast! It loads fast. It runs smoothly. It renders quickly. Export is faster than real-time.
The screen is clear and easy to read – even considering the small point sizes of much of the text. And it has speed to burn.
WHAT I BOUGHT
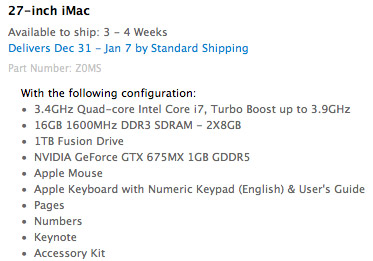
Here are the specs of the system I purchased. I was especially intrigued with how the Fusion drive would work. The Fusion drive combines the speed of a Solid State Drive (SSD) with the storage capacity of a standard hard disk (often called “spinning media”). I knew that I would be getting external storage, so I didn’t get the largest Fusion drive, as I didn’t see the benefit of the extra storage.
Also, I am not a fan of wireless keyboards or mice, especially for desktop systems. If something goes wrong with the system, you often need a wired keyboard or mouse to fix it. I found the wired keyboard and mouse worked great.
For this article, I edited a one-hour ProRes 422 project. Single-stream video, dual channel audio running at about 15 MB/sec. (This is about five times the data transfer of a single AVCHD video stream.)
FROM A STANDING START
To get started, I did a quick test. Launching FCP X on my 2010 MacPro 4,1 took 24 seconds. Launching FCP X on my new iMac took 4.3 seconds. 6 TIMES faster!
THE FUSION DRIVE
The Fusion Drive combines the high storage capacity of a traditional hard drive with the high performance of flash storage. With a Fusion Drive in your iMac, disk-intensive tasks in Final Cut Pro X, such as importing and optimizing media, are faster and more efficient.
A Fusion drive “learns” what files are used most often and moves them from the spinning hard drive to the SSD. This means that it delivers the best performance to the files you use the most often. (As a sidelight, with today’s technology, SSDs are significantly faster than spinning media, in fact, SSDs are slightly faster at reading (playing back) data than writing (recording).)
So what does this mean? Last week, I was at the Storage Visions conference in Las Vegas talking with a variety of storage and system developers trying to better understand SSDs.
NOTE: There is an inverse relationship between performance and speed. The faster a storage device is, the less data it holds for the same amount of money. 7200 RPM drives deliver data more slowly than a 15,000 RPM drive, but the 7200 RPM drive holds more data. SSDs are faster than spinning hard drives, but, for the same amount of money, spinning hard drives hold more data.
The Fusion drive does not cache files; that is, make a copy of the file from the hard drive and store it on the SSD. Instead, the file is stored either on the hard disk or on the SSD, but not both. Files you use the most are stored on the SSD to provide the fastest performance.
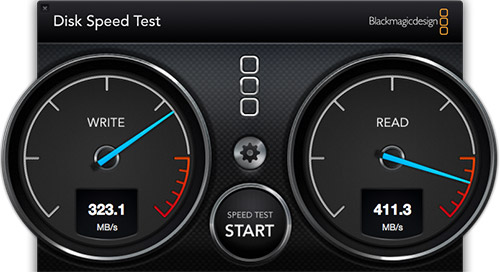
Using the Blackmagic Design Disk Speed Test, available in the Mac App Store, I measured the speed of the Fusion drive: 323.1 MB writing, and 411.3 reading. Whew! Truly fast!!
However, even though the Fusion drive is amazingly speedy, I don’t recommend it for storing your media. This is because you’ll get the best performance from this drive when you are accessing the same files over and over – such as the operating system and applications. Media files are generally played once, and they are done. Constantly playing different files, or rendering different portions of the timeline does not benefit from the speed an SSD can provide to the same extent.
SSD drives work the best when accessing the same files – like databases, or applications – or when working with lots of smaller files.
When editing video, a better option is to attach a Thunderbolt RAID as your media drive; which is what I did. I’m using the G-Technology G-RAID, which is a two-drive RAID 0.
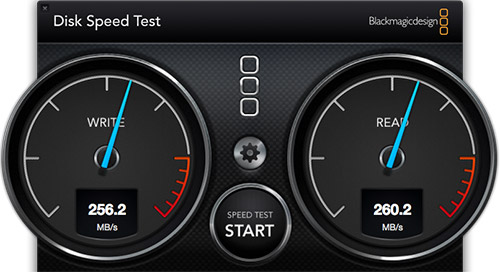
When I measured the speed of the G-RAID, it was slower than the Fusion drive, but provided far more storage: 4 TB vs. 1 TB in the Fusion drive; the G-RAID has a maximum capacity of 8 TB.
NOTE: RAID 0 drives don’t provide any data redundancy. If you lose either drive, you lose all your data. For editors needing more storage or even faster performance, I recommend using one of the Promise Pegasus RAIDs, which provide RAID 5-level data redundancy. Here’s an article on RAID levels.
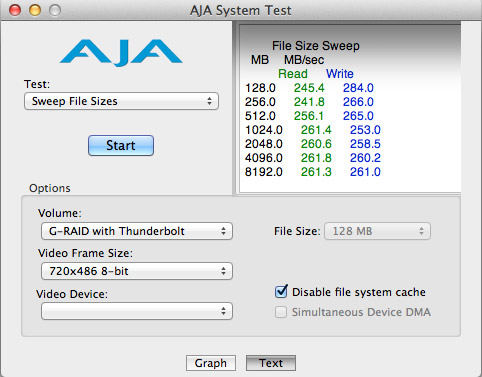
By way of comparison with other speed tests I’ve published, here is the speed of the G-RAID as measured by the AJA System Test utility, available from the AJA website, illustrating speed variations as the size of the file changes. Notice that the speeds average about 260 MB/second for both reads and writes.
NOTE: To save space, I rearranged the elements in this screen shot. The numbers, however, are untouched.
MORE THOUGHTS ON THE FUSION DRIVE
The Fusion drive automatically transfers files between the hard disk and the SSD. You don’t need to do anything, the operating system decides what to put where.
When working with very large files that exceed the free space on the SSD, you may experience stuttering playback with high-resolution video. (This is one of the main reasons I recommend using an external Thunderbolt drive for media storage.)
Thunderbolt RAIDs, depending upon how they are configured, can provide faster throughput and greater storage capacity than a Fusion drive. This is especially important for multicam work.
GPU
In addition to the Fusion drive, the other big speed boost in the iMac comes from an improved graphics card.
The CPU processes instructions one after the other – serially. The GPU processes multiple instructions at once – parallel. Parallel is always faster and ideally suited to a variety of video tasks.
All effects in Final Cut Pro X are Motion projects, so using effects in FCP X or Motion benefit from using the GPU. Exporting that requires transcoding (like converting ProRes into H.264 for web viewing) will be faster. Other operations such as color grading, Ken Burns Effects, and speed changes also benefit because they use the GPU for realtime playback and background rendering.
For my system, I only got 1 GB of video RAM (VRAM). I learned from Apple that more VRAM means faster rendering, exporting and better realtime performance.
CPU and RAM
While the CPU and RAM can’t be ignored, we already know how these work. My system has a Quad-core 3.4 GHz Intel i7 CPU and 16 GB of RAM. (The reason a 4-core CPU generates 8 bars in Activity Monitor is due to Hyper-Threading, which is worth a whole separate article.)
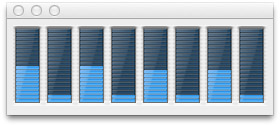
During normal editing operations, I was cruising along using 12-15% of total CPU cycles. This allows plenty of overhead when the editing gets more challenging – say with multicam work.

RAM usage, when running Final Cut Pro X editing a single stream of video, hovered around 2 GB. (The red pie slice indicates RAM used by the operating system. Yellow is RAM used by open applications. Blue is RAM assigned to an application, but not yet used. Green is unused RAM.)
NOTE: ProRes (which uses I-frame compression) uses less RAM than long-GOP video codecs like HDV, AVCHD or XDCAM EX.
This proves a point I’ve been making in my classes and webinars recently: virtually every Mac shipping today is fast enough to edit video; even 2K or 4K images. The real test is the graphics processing unit (GPU) and the speed of your storage system.
ANY OTHER THOUGHTS?
I got the 27″ iMac because I wanted the larger monitor size. It truly makes a difference when watching images. I can see a 720p image at 100% size and still have plenty of room for the Event Browser and Timeline.
I had a spare 24″ Apple monitor sitting around doing nothing, so I plugged it in. Works great. Now I can edit projects using one or two monitors.
This isn’t necessary, but it sure impresses clients!
NOTE: A two-monitor setup would be especially helpful if you are editing 1080p material, or larger, as you could display the Viewer to your largest monitor and view your image at 100% size. All my current work is shot for the web at 720p, so the extra monitor is nice, but not necessary. I principally use it to display the Event Browser.
Apple makes a point of highlighting the reduced reflections of the screen. I didn’t notice a big difference between the new monitor and my older 24″ monitor. Video looked great, text was totally readable and the reflections in the glass didn’t bother me because I made a point to position the screen to minimize reflections.
HOW ABOUT MULTICAM?
I did two quick Multicam tests. The first was a six-camera XDCAM-EX shoot and edited using the XDCAM EX video format natively. (You need to install the XDCAM drivers by downloading Sony’s XDCAM Transfer software – a 30 MB download.)
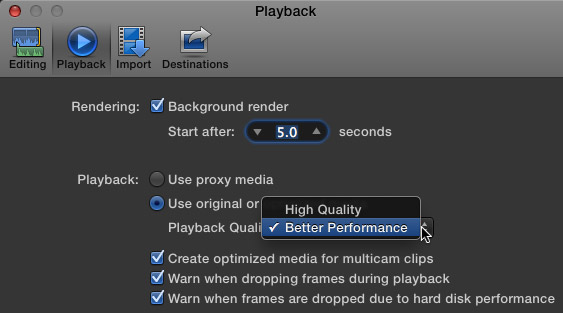
When editing multicam, be sure to set Preferences > Playback to Better Performance to avoid dropped frames. Also, I recommend checking all three dropped frame indicators to make sure you aren’t experiencing hard drive problems.
Six streams of XDCAM EX video took 12% of my CPU and 38 MB/second of data during playback. However, XDCAM EX uses MPEG-2 as its compression codec, and can become taxing on your system as the stream count rises. For example, when editing the XDCAM EX footage natively, I could easily edit six streams of video. However, I got a few dropped frame warnings when I quickly jumped around in the Timeline, or cut too quickly. The dropped frame warnings were not serious, but I wanted to see if I could eliminate them.
So, I did a second test by converting all six video streams to ProRes 422.

Now, FCP X was pulling more than 100 MB/sec from the G-RAID during the edit.
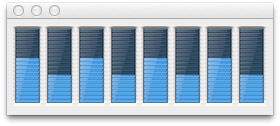
However, the CPU load was well less than 20% and FCP X used less than 3 GB of RAM.
When using ProRes 422, no matter how fast I cut, or how much I jumped around inside the Timeline, I did not get a single dropped frame error.
NOTE: This requires a Thunderbolt drive. FireWire speeds top out at 85 MB/second, which is not fast enough to edit more than four streams of ProRes 422 video. There is a serious performance benefit to optimizing media when editing multicam projects.
The performance of this iMac system makes me want to shoot a project with 10-12 cameras just to watch FCP X edit it.
FINAL THOUGHTS
Frankly, this 27″ iMac blows the doors off my MacPro. It edits single camera projects easily. Its ability to edit multicam projects is limited only by the speed of your storage – with the caveat that optimizing media into ProRes is strongly encouraged.
If you are looking for a system that can handle whatever video format you throw at it, I am VERY impressed with this new iMac.
As always, I look forward to hearing your comments.
Larry
Visit our website to see Final Cut Pro Training & more!
6 Responses to Editing with the New iMacs
Hi Larry,
Have you had any issues with the blacks on the screen being crushed? I am finding this to be an issue, I don’t have a calibration tool however.
Geoff
Geoff:
To make sure your screen is calibrated, you can use the Calibration tool built into the Display System Preference.
larry
Larry, do you mind me asking what Mac Pro you had and what specs before this iMac?
[…] Jordan (filmmaker and Adobe trainer extraordinaire) recently purchased a new iMac and was very impressed with the way it handled everything he threw at it. His initial impressions […]
I just ordered a new imac with a 3TB fusion HD and as you know you cannot add any additional HDs to the iMac. Due to this, I would love to know what kind of hard drive setup did you end up going with for editing?
Media Storage, scratch disk, cache, exports, etc.
Thanks
[…] NOTE: I’ve written about my iMac system configuration here and described editing on it, in this article. […]