
![]() Recently, I wondered whether Final Cut Pro exported faster if you rendered the timeline before exporting. The answer surprised me!
Recently, I wondered whether Final Cut Pro exported faster if you rendered the timeline before exporting. The answer surprised me!
My test system was an M2 Max Mac Studio, connected to an OWC Thunderblade SSD RAID. Background rendering was turned off.
WHAT I DID
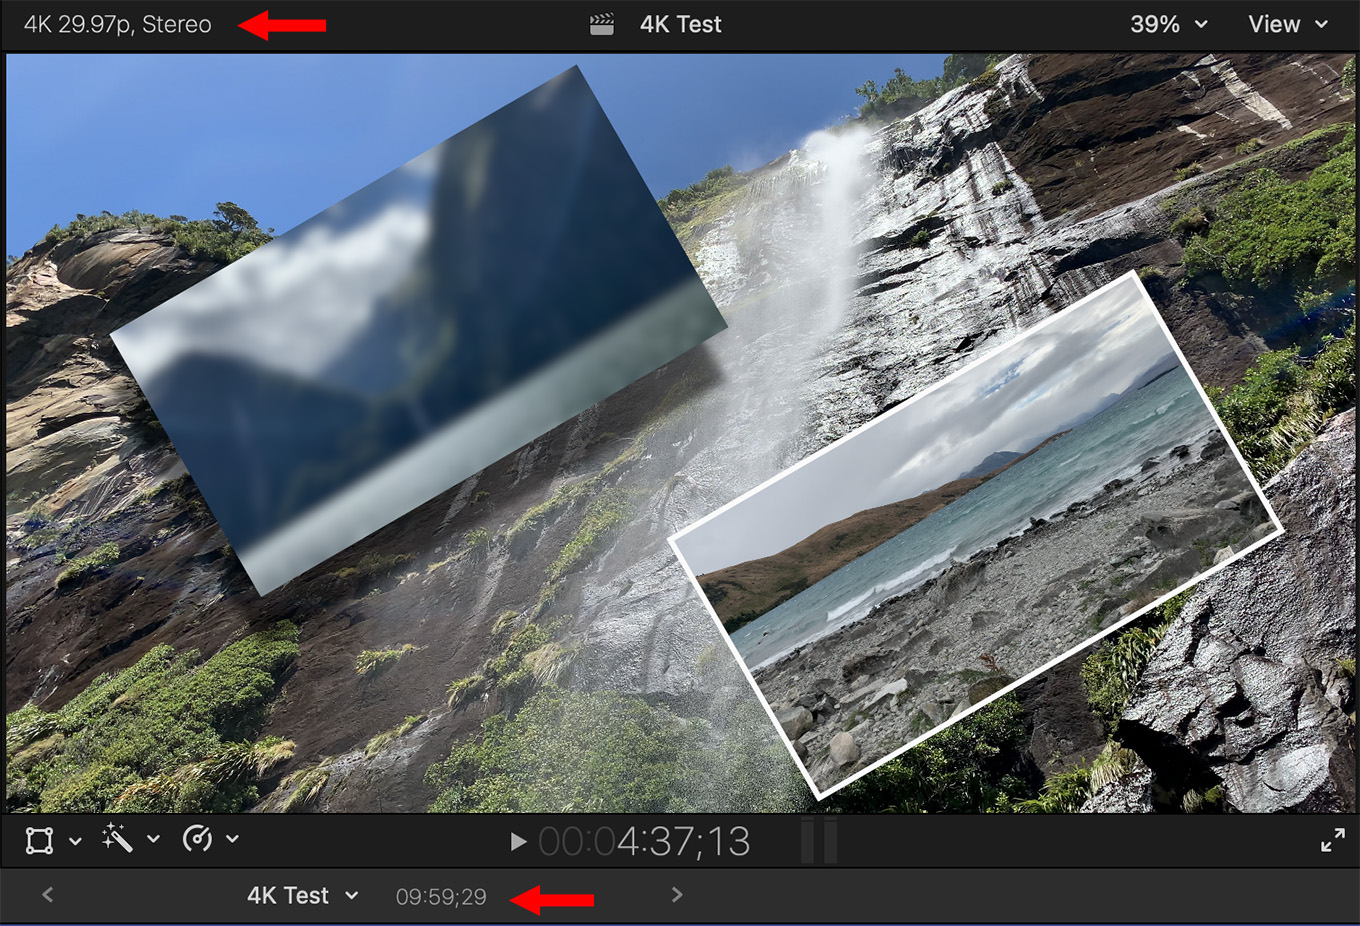
I created a ten-minute (bottom red arrow) 4K project (top red arrow) composed of 44 different ProRes 422 4K clips; with effects as shown in the screen shot above.
The primary storyline contained ten 4K clips, using straight cuts and no effects.
Compound clip 1 contained sixteen 4K clips with the following effects:
Compound clip 2 contained eighteen 4K clips with the following effects:
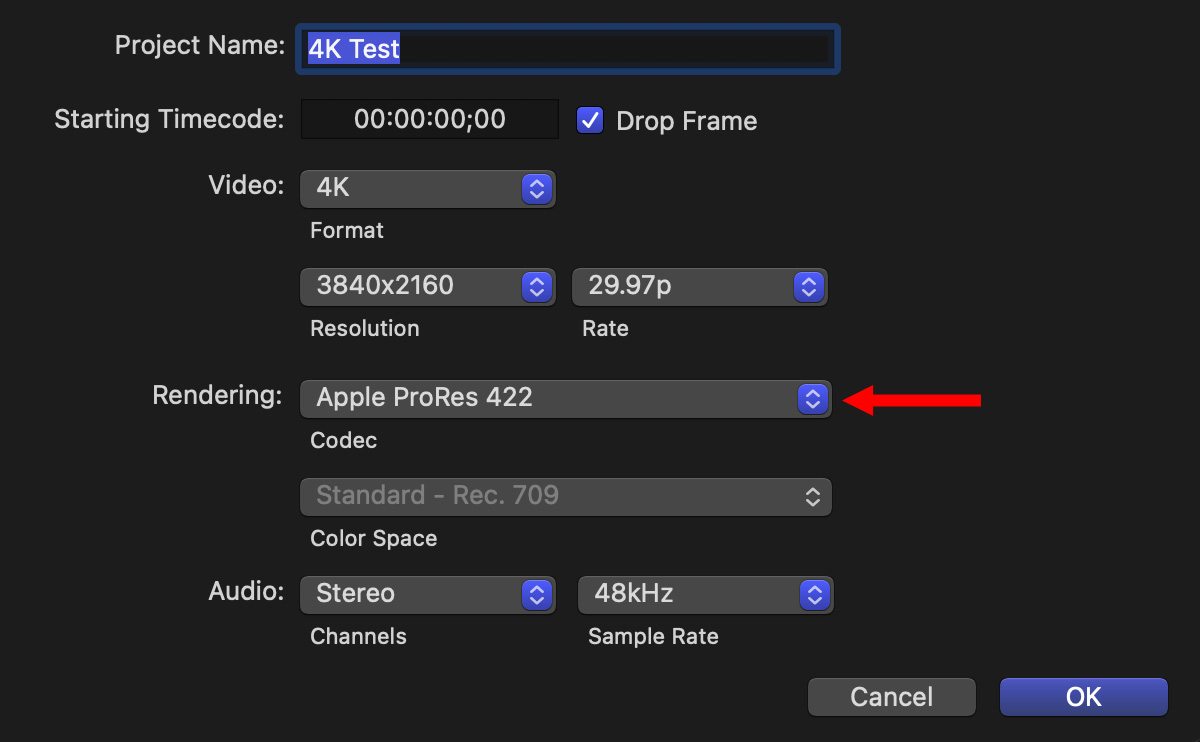
(The Project Settings window in Final Cut Pro.)
I then measured how long it took to export this project in three different ways, using five different ProRes codecs.
For extra credit, I also timed how long it took simply to render the project, without exporting.
WHAT I LEARNED
(Click to see larger image.)
Fasten your seatbelts, this is pretty stunning.
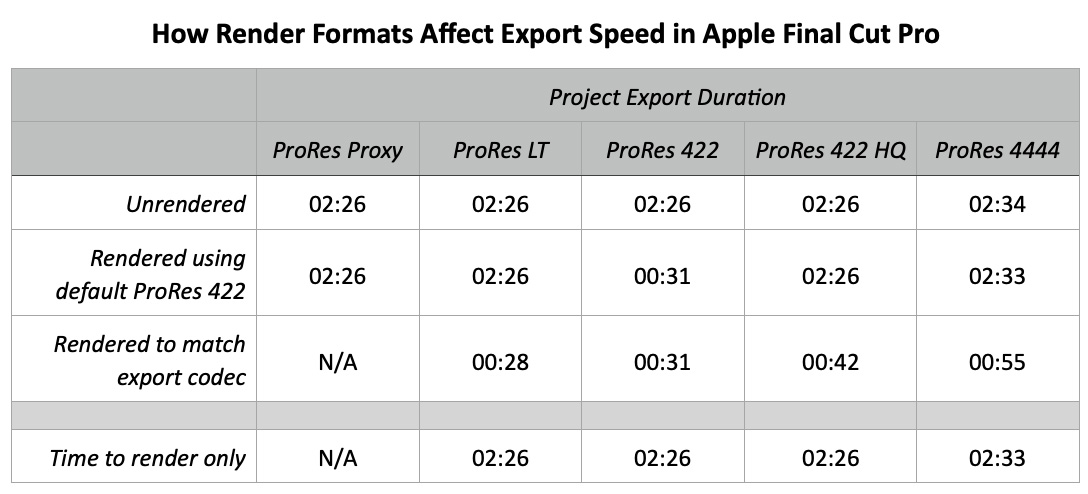
When this project was unrendered, (top line in the table above) it took the same amount of time to export it into:
When the default ProRes 422 render setting was used (second line in table), export times were exactly the same as if the project was unrendered, except when exporting as ProRes 422.
Even more surprising, it took the same amount of time to render this project without exporting as it did to render and export the project across all five codecs! (Bottom line in the table above.)
NOTE: ProRes Proxy is not available as a render setting.
However, if the project is fully rendered using the same codec as the export format, export times are significantly faster. (Third line in the table above.)
DATA RATES
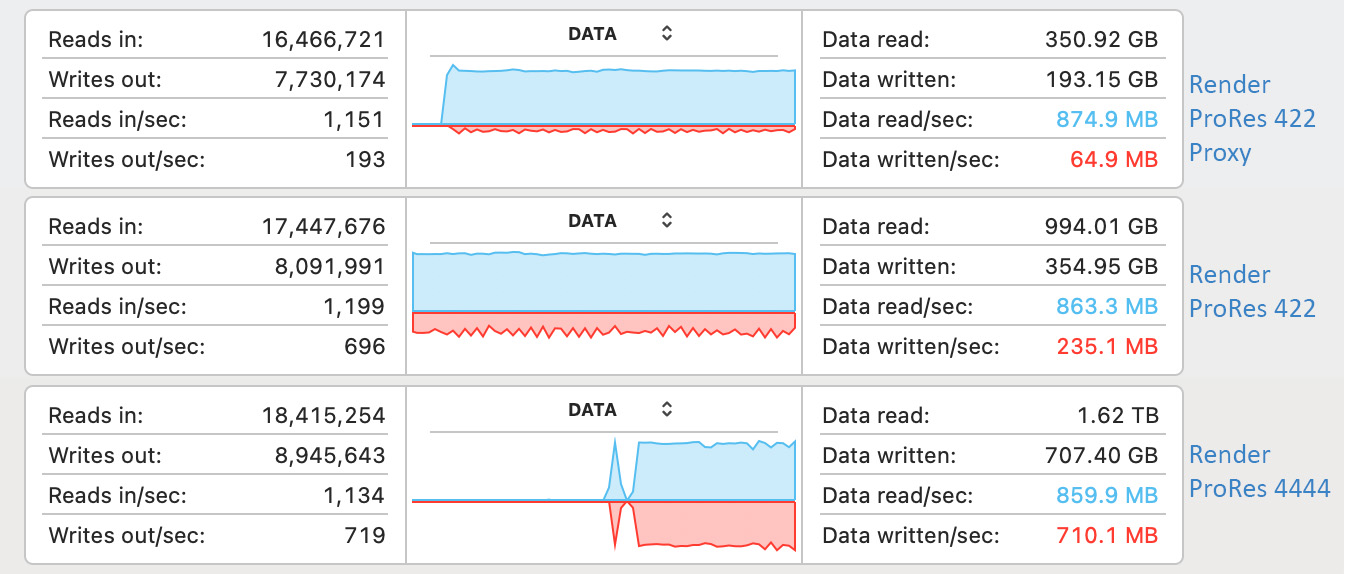
In this screenshot from Activity Monitor, the key readings are in the lower-left corner:
Notice that regardless of the export format, rendering required essentially the same import data bandwidth. Export bandwidth increased based on codec file size.
NOTE: What this suggests is that FCP always re-renders from source media whenever the export format does not match the project render format.
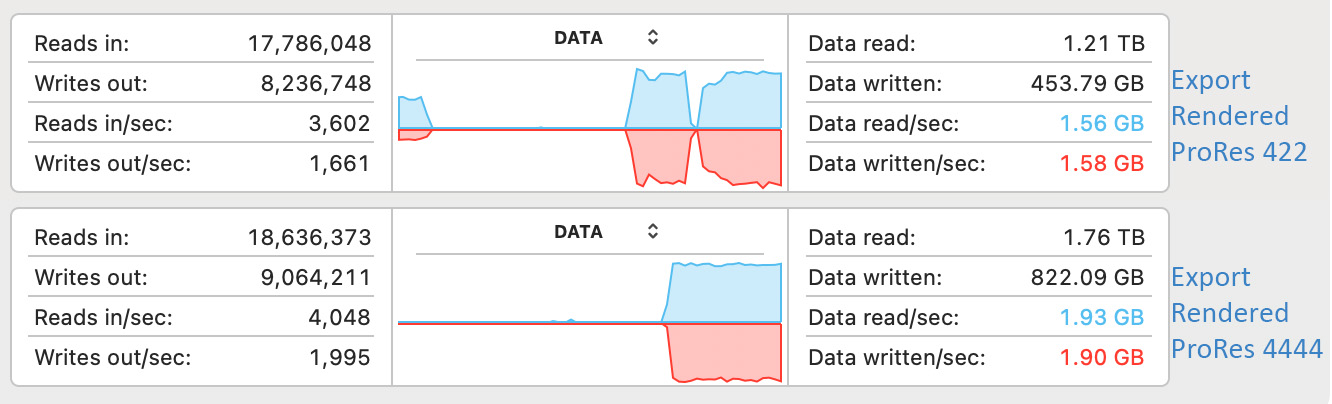
However, when a project was already rendered in the same format as the export format, output was MUCH faster – 3 – 5X. For example, in this screen shot FCP was transferring media at almost 2 GB per second for ProRes 4444! (ProRes 422 was only a bit slower at 1.5 GB/second.)
NOTE: Actual export speeds will vary by computer system and storage bandwidth.
SUMMARY
I wasn’t expecting this result. My take-away is this: To export at the fastest speed, set the project render codec to match the format you need to export.
Then, to save time, turn background rendering on to render as you edit. If you leave background rendering off, don’t worry about rendering before you export because it won’t save you any time.

11 Responses to How Rendering Affects Export Speed in Apple Final Cut Pro
Interesting results, but turning background rendering on can create huge files as you progress and make changes en route!
Geoff:
Yes – and no. Yes, rendering creates large files by definition. A render file is simply a new media file created by applying effects to the clip(s) in the timeline. The benefit to render files is that you can see exactly how your effects look and, on slower machines, render files play more smoothly.
On faster machines, many effects can play smoothly and look close to what the final results will be.
However, exporting, by definition, creates new media files from your project – so you don’t really escape large files.
Larry
Larry, do you think, the nature of these results stay put if export codecs were used that are not supported by the hardware ProRes engine?
Olaf:
Good question. While the duration of render and export will vary by computer system, project complexity and export codec, the basic rules are the same:
1. Exports are fastest when the project render codec matches the export codec.
2. If the two codecs don’t match, the entire project will be re-rendered from the source files, regardless of whether some renders exist or not.
3. It doesn’t make sense to do a separate render pass before exporting.
Larry
Perfect summary!
What a great article! The bottom line is, there is no free lunch as it pertains to working 4/6/8/12k files. Whether you’re dealing with being able to preview what your various applied effects look like (smoothly) as you edit, or how long it takes to export.
Well- the main use for me of this info is when you export something and then have to tweak and export again. If the render time saves you time on the export, then I would always want it that way, it would add up to big savings.
I had an hour long show with noise reduction on every clip. Export took five hours. I could see in Activity Monitor that all my noise and stabilizer plugins were working overtime during the export. It crashed halfway, because there were two layers with noise reduction (one was hidden but still causing problems) and so I had to remove one, then re-export. I only figured this out on the third export attempt. If I’d found that problem out during render, it would have saved hours.
And sadly… I see that HEVC is not an option to render a timeline. Makes sense, since it’s heavily interpolated and not optimal for playback, but that means I’ll never save time by rendering a timeline before multiple output attempts. I rarely deliver in any other format, as my work is almost always web video and I’d only ever output a ProRes master once: after sign-off and just before archiving the project.
SO CLOSE to solving one of the banes of my existence! But if I rendered the timeline in the BG, output to ProRes and then convert that to HEVC for each draft of a project, that probably wouldn’t help with my problem.
Flick:
I was wrong in my first answer to your question. So, let me try again.
FCP does not support rendering in either HEVC or H.264. My guess is that the compression architecture (Long-GOP) significantly degrades performance, especially on older systems. So, you can only render into variations of ProRes.
However, since ProRes, H.264 and HEVC are hardware-accelerated, it makes sense to render into a high-quality format such as ProRes 422 before exporting. That way, you remove export time from the equation and only need to deal with compression time for the different formats.
I’ve written an article that explains the difference. Find it here:
https://larryjordan.com/articles/faster-ways-to-export-h-264-and-hevc-video-from-final-cut-pro/
Larry
Another very useful article, Larry… thank you!
Over the years, I’ve learned so much from you. Your value to our storytelling community as a teacher, a problem-solver, and for creative inspiration & ideas …is something I don’t take for granted.
You’ve helped reduce my struggles, giving me more time to create.
In 2024, I promised myself I’d do a much better job of actually showing my appreciation, to the people who make a difference. Have no doubt, Larry… you certainly are such a person. Many thanks!
Kevin:
Smile.. Thank you for your very kind words. I’m glad you like my work.
Larry