
 Recently, Alex left a comment on my website saying:
I’m relatively new to video editing, but I think there might be some information that’s inaccurate, or out of date perhaps.
Specifically:
1. The mention that multi-pass reverts to software-based compression seems inaccurate. I did a fair bit of testing (on an M1 Max MBP) and CPU/GPU use pattern stayed consistent as long as Faster encoding type is used.
2. The view that multi-pass is not that important is quite misleading. The quality difference is staggering, in fact, especially if the source material is detail-heavy.
I was intrigued by Alex’s question. I haven’t tested compression speed or quality using M1 Macs. So, for this article, I tested three difference source files using the default H.264 compression setting in Apple Compressor version 4.6.1. Here’s what I found.
NOTE: While other codecs will yield different results, since H.264 is the most commonly used codec for the web, it seemed reasonable to use it for these tests.
EXECUTIVE SUMMARY

These tests were run using Apple Compressor version 4.6.1 on a 16″ MacBook Pro with an M1 Pro chip.
Based on what I’ve been told, when Multi-pass is unchecked, Compressor uses hardware acceleration. When Multi-pass is checked, it compresses using software only. Both Intel and Apple silicon chips support H.264 hardware acceleration.

Averaged across three tests for each codec, single pass compression is 2.1X faster than multi-pass in Apple Compressor, regardless of codec.

File sizes range from 2.4% smaller to 4.1% larger when using multi-pass compared to single pass, depending upon the source codec. In most cases, this difference in size is not meaningful because all social media files are recompressed by the hosting service.
There seems to be no visible difference in quality when using single vs. multi-pass compression in Apple Compressor, with the very notable exception of H.264 source media. I’ll illustrate this below.
Given these results, my recommendation to uncheck Multi-pass when using Apple Compressor still seems like good advice.
MY COMPUTER

These tests were run on an 16″ MacBook Pro with an M1 Pro and 32 GB of RAM. As you’ll see from the charts below, no application maxed out the system.
CPU & GPU PERFORMANCE
This test involved compressing a variety of source codecs into H.264, using the HD 1080 social media compression setting in Compressor. I did not change the default setting. All files were compressed using the same setting.
Basically, in all these tests, the M1 MacBook Pro did not break a sweat.

Alex makes a good point. GPUs never exceeded 50% utilization. Here, you see GPU utilization for both single and multi-pass ProRes (single is the left side of each section) and MPEG-2. GPU utilization is consistent regardless of whether single or multi-pass is chosen, but not the same between codecs.
NOTE: The gap in the middle of ProRes was caused by a delay in switching compression to multi-pass. I was quicker with the MPEG version.
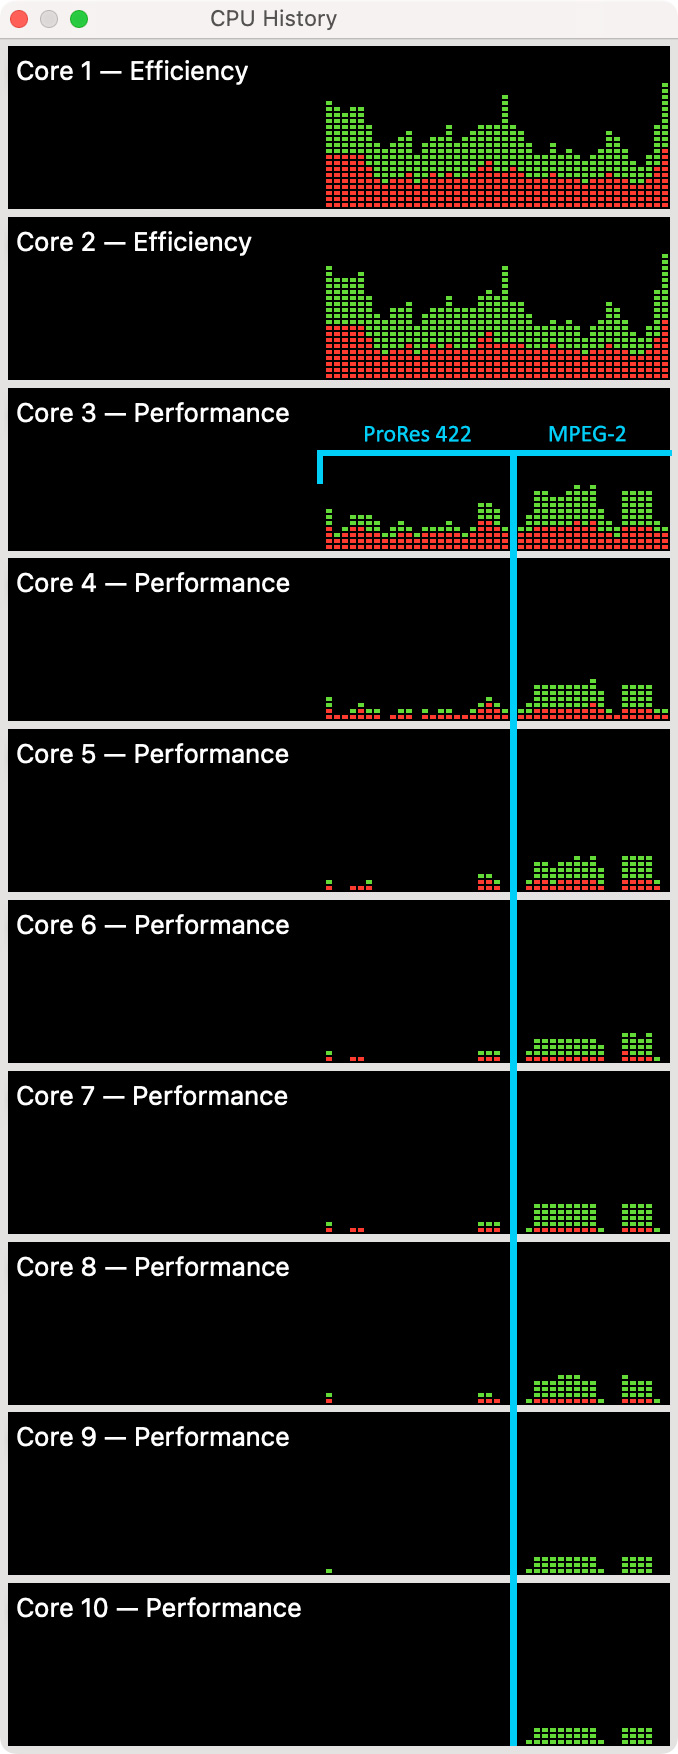
Again, looking at CPU utilization, compressing a ProRes master only used the efficiency cores and one performance core, while MPEG-2 used all the cores, but not a lot. In both examples, single pass is on the left and multi-pass is on the right. CPU usage was consistent between single and multi-pass, but not between codecs.
HOW TO TEST IMAGE QUALITY

It is easy to test for differences between two files using Apple Motion.
NOTE: There are always differences, the key is how noticeable are they.
NOTE: Remember, when using Levels you are seriously exaggerating the visible differences between these two files.
SPEED RESULTS

I compressed three different source files three times (a total of nine tests) and averaged the results. All files were compressed into 1920 x 1080, the default frame size for the HD 1080 compression setting.
QUALITY RESULTS

This compares the difference between the source clip (ProRes 422) with the single-pass H.264 compressed version, without adjusting levels. As you can see from the lack of significant gray pixels, the two files are very, very similar, with only the faintest hint of gray in the lower left part of the frame.
NOTE: All these screen shots were created in Motion. Aside from compressing the image from PNG into a high-quality JPEG, I made no adjustments in Photoshop.

Here, I added Filter > Color > Levels and dragged the white slider to 50 to emphasize the differences between the two clips. Even now, the differences are slight but can be seen as faint white “dust” on the bottom and left of the frame.
NOTE: The best way to see these differences is to zoom way into the image and look closely along the bottom and left edges for faint differences in grayscale. Everything that isn’t black is “different.” The brighter the value, the greater the difference.

This compares the differences between the two compressed versions without adjusting levels. There’s a faint gray dot along the left side, halfway down.

This compares the differences between the two compressed versions after adjusting the levels by the same amount that I used earlier (whites to 50). There’s just not a lot of difference there.
This indicates that if you start with a ProRes master, you’ll get excellent results after compression.

This compares the source MPEG file with the single pass compressed version, without boosting levels. Virtually the same. This is different content than the ProRes movie, but, again, compression quality is excellent.

This compares the source H.264 file with the compressed version, without boosting levels. Clearly, there are a LOT of differences here. This could be caused by a variety of factors, not least of which is that the source file was highly compressed before getting recompressed into H.264 again.
NOTE: This illustrates the challenges of maintaining image quality when you start with a highly-compressed camera source file.
SUMMARY
Compression quality depends upon a variety of factors, not least of which is the source codec. However, for any work destined for the web, I don’t see any advantage to using multi-pass. The files are roughly the same size and compression takes more than twice as long.
Feel free to test this yourself using your own files and compression settings. Then, let us know what you find.
