 This article was suggested by a question from James, who writes:
Is there any way audio panning can be automatically applied via channels. Currently I am going to each clip, selecting Stereo, then dragging the slider L or R, for each clip. This is very time consuming, what should I do?
Great question.
Let’s take a step back. What is a stereo clip?

A stereo clip is where a variety of sounds are combined, “mixed,” such that they span the distance from the left speaker to the right. This gives the illusion of a sonic “stage,” where different sounds are placed in different locations.
This screen shot shows a typical stereo music clip in the Source monitor of Premiere. By definition, a stereo clip consists of two, and only two, channels bundled into a single clip. As we change the audio gain for this clip, both channels change by the same amount.
In most cases, stereo is a delivery format, but it is not, generally, a recording format. Why? Because when we record we want to isolate sounds, each to their own channel, to give us the most control in the final audio mix.
NOTE: An apparent exception to this rule is live audio mixing, where we are creating a stereo master. But, even in this case, we want each sound on its own mic (and channel fader), so that the audio mixer can control the blend of sounds to provide the most pleasing mix either to the live audience or those viewing remotely.
[ 33
However, there’s a second type of two-channel clip: Dual-channel mono. This tends to be the format used most in production, before the final mix. Above is an interview, where the host is on channel 1 (top) and the guest is on channel 2 (bottom).
NOTE: A Dual-channel mono clip can have far more than two channels. The most I’ve worked with contained 64 channels.) But we still tend to call it dual-channel mono. I know, confusing.
While Premiere displays both channels, both are combined into a single clip. This means that, while we need to separately adjust volume and pan for each channel, there’s no way to separately control gain or pan for each channel.

For example, when we look in the timeline there’s no pan controls in the track header or audio gain controls for each channel in the Timeline. So, how do we change this clip so we can control both channels individually, without losing sync with the video?
Watch.


Instantly, one of your channels disappears. Don’t panic.

All your channels reappear. Whew!

Now, when you edit a clip to the Timeline, each channel appears on its own track, yet still synced to each other and the video.

Most of the time, we need both speakers to appear centered between the left and right speaker, which is the default setting for any mono clip.
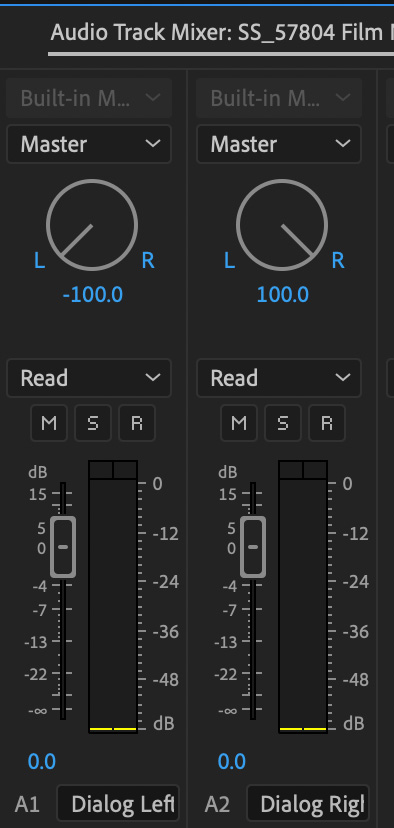
But, here’s the really cool part. If you need to deliver an edited rough cut (say for news) where one speaker is panned fully left and the other fully right, set the pan for each track you need to separate in the Audio Track Mixer. Instantly, all the clips on that track are panned exactly where you need them.
NOTE: This is NOT a good way to do a mix. It will sound very artificial. Most of the time, audio mixes pan speakers center, while sound effects and music are panned more widely.
CREATE A PRESET
If you plan to work with a lot of dual-channel mono clips, create a preset.


You’ll see the Preset you just created now part of the Audio Channels menu.
EXTRA CREDIT
Here’s an even faster way to work – as a batch!
This sets all selected clips to dual-channel mono at once.
Very cool.