 I always want to export my projects before compressing or transferring them, because I want to be sure there are no problems with the export. So, I always use Share > Master File. However, because I do this so much, I also don’t want to waste any time, so I tend to use the keyboard shortcut for this process: Command+E.
However, last week, in my newsletter, I wrote that the Command+E export shortcut had disappeared! Gasp!
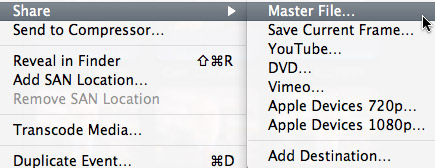
As you can see, here in this screen shot, there is no shortcut for Share > Master File. So, I went to create one using the Commands menu. Except….
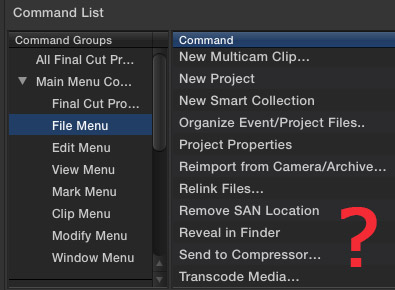
There is no way to create export keyboard shortcuts in the Command menu, because none of the Share menus are available.
This was a scandal!! No sooner had I published this astonishing fact, when several (OK, dozens) of readers wrote in to say that Apple moved this shortcut out of the Command menu and into Preferences. There was no scandal, just a new location.
In other words, I was not paying proper attention.
CREATING DESTINATIONS
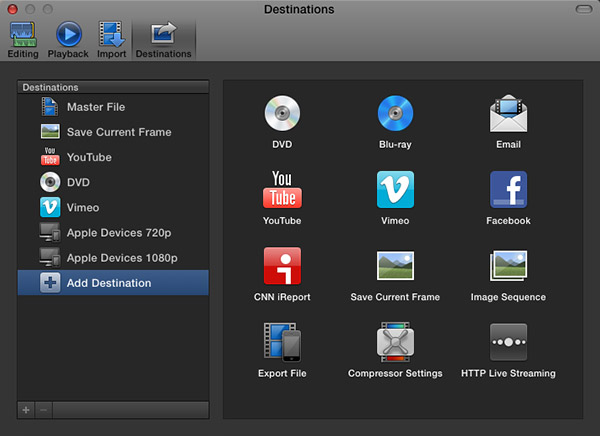
The Final Cut Pro > Preferences > Destinations pane now allows you to determine which export options appear in the Share menu, and to easily assign a keyboard shortcut to the default output option.
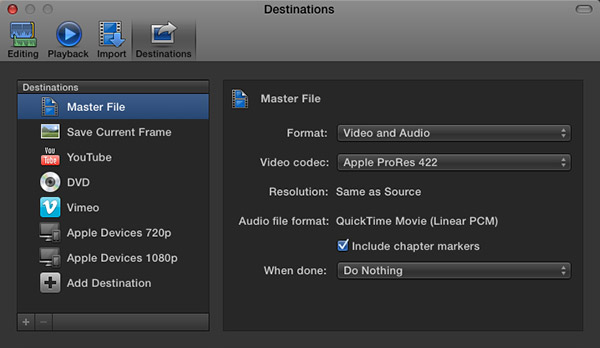
My recommendation, when exporting projects from Final Cut Pro X, is to always export a Master File. This is the highest quality and fastest export from FCP.
When you select Master File (or any other option from the list on the left), you are able to configure your default export settings on the right. My recommendation is to export using ProRes 422 (a good balance between high quality and smaller file size).
This screen shot above shows my default export settings.
NOTE: I am getting a LOT of reports of “bad frame” errors preventing exports when trying to burn DVDs or export to Vimeo. My recommendation is to export a Master File first, then compress/process/burn the file as a separate step, using different software.
SET THE DEFAULT KEYBOARD SHORTCUT
It is in this Preferences pane that you set the export keyboard shortcut. It can be to any of the options listed on the left, as these are the destinations that appear in the File > Share menu.
NOTE: The list on the right are potential destinations. To add a destination to the list on the left, simply drag the icon from the right to the left. You can change the stacking order by dragging up or down. You can configure the default export settings for any destination by selecting it on the left, and adjusting the settings on the right.
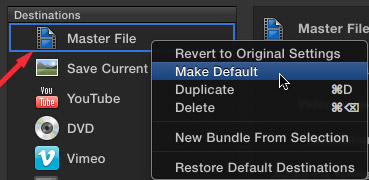
To create the Command+E keyboard shortcut, simply right-click the destination you want to use for the shortcut – in my case, that would be Master File – and select “Make Default.”
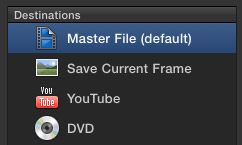
When the shortcut has been applied to a destination, Final Cut displays the words “(default)” after the destination.

To prove this for yourself, select File > Share > Master File and notice that the Command+E shortcut now appears where it belongs.
Thanks to everyone that wrote in pointing out this change. The next time my Command+E goes missing, I will know where to look!
2,000 Video Training Titles
Edit smarter with Larry Jordan. Available in our store.
Access over 2,000 on-demand video editing courses. Become a member of our Video Training Library today!
Subscribe to Larry's FREE weekly newsletter and
save 10%
on your first purchase.
141 Responses to FCP X: Export Master File
← Older Comments-
 junglena says:
October 15, 2019 at 11:32 pm
-
 Larry says:
October 16, 2019 at 10:10 am
-
 junglena says:
October 16, 2019 at 5:15 pm
-
 Norris W Tidwell says:
January 4, 2021 at 11:03 am
-
 Larry says:
January 4, 2021 at 11:05 am
-
 Richard Wright says:
January 4, 2021 at 1:52 pm
-
 Larry says:
January 4, 2021 at 2:25 pm
-
 Steve says:
April 18, 2021 at 8:16 pm
← Older CommentsHi Larry!
In your Final Cut Pro 10.4 Workflow and Editing videos (section 13), you mentioned that your recommended way is creating a Master File before distributing it to the web (I totally agree with it).
However, you also mentioned that unlike sharing to web directly, once you’ve created this master file you still need to compress it for final distribution as a separate step. My question is what third party software do you use to compress your videos and share it to the web?
Thank you!
Junglena:
It depends upon what format of compressed files I’m creating. For example, for H.264, I’ll use ffWorks, for MP4, Adobe Media Encoder and for HTTP Live Streaming, I’ll use Compressor. There’s no one tool that I use for everything.
Larry
Thank you for your reply! I need it mostly for the web (YouTube).
I have toast. I would like to burn to a blu-ray disc. Is it better to export a master file and burn to a blu-ray disc for better quality?
Norris:
There is an intermediate step. After you export the master file, you need to compress it into a format that can be burned to Blu-ray.
If Toast supports that compression, use it. Otherwise, you’ll need to create the compressed elements using Adobe Media Encoder, Apple Compressor or Handbrake.
Larry
Really useful Larry – thanks
have you posted anything on workflow from FCPX to files for stock agencies such as Pond5? Could be really useful for many of us.
Richard
Richard:
Good idea – I’ll write something for next week’s newsletter.
Larry
The advice in this tutorial is brilliant and still 100% relevant – it also produces the best results. If you export directly from FCP to Compressor it takes sooooo much longer.